2
A
C
H
G
Joint
B
1pc
3pcs
1
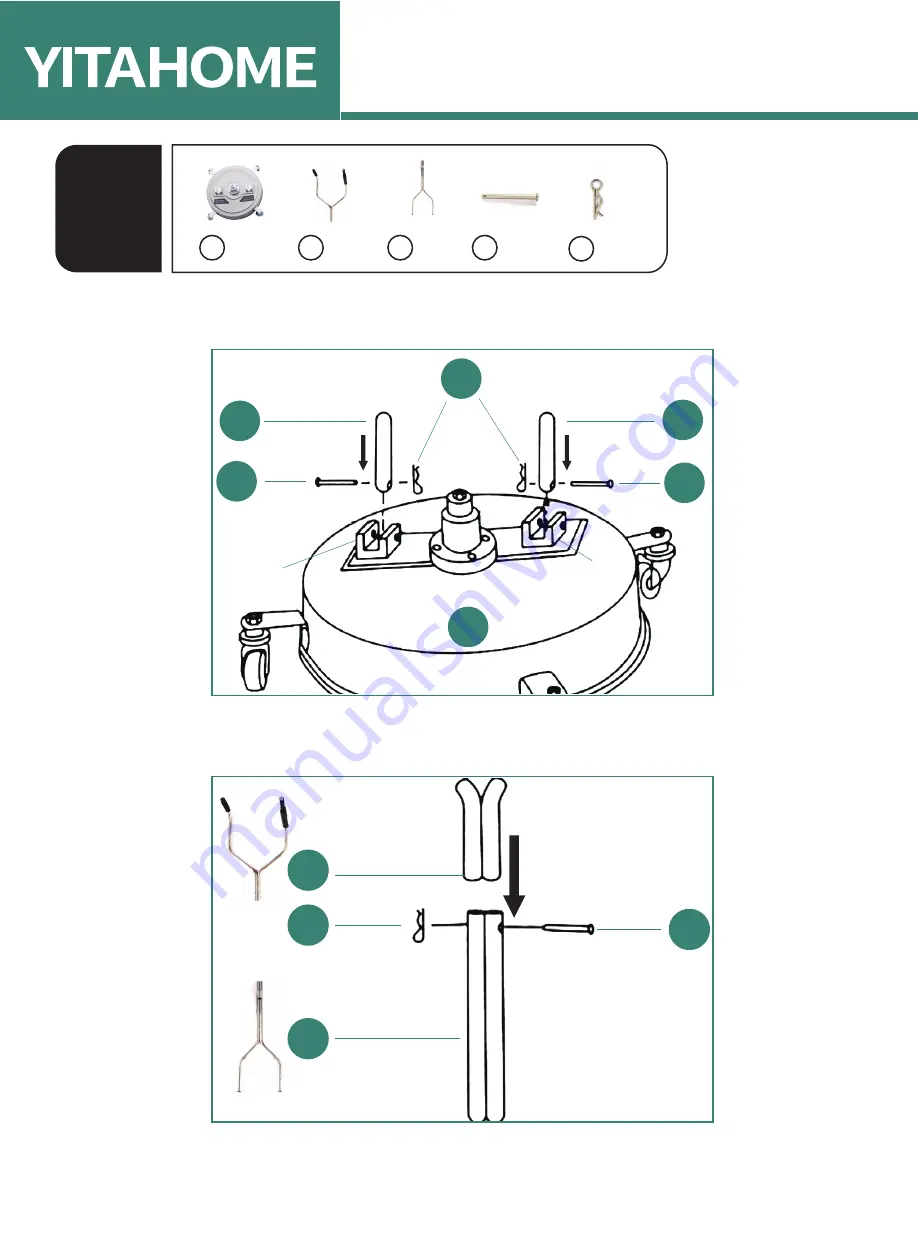
1.Insert part C into part A, secure with 2 x part H and 2 x part G.
2.Attach part B to part C and secure with part H and part G.
ASSEMBLY INSTRUCTIONS
Page 1: ...PRESSURE WASHER SURFACE CLEANER ASSEMBLY INSTRUCTIONS HZXY V1...
Page 2: ...pler 4 Silicone Oil 1 Keep your work area well lit to avoid accidents 2 Keep children bystanders and pets away while using this cleaner and store it out of reach of children 3 DO NOT operate this clea...
Page 3: ...H G G Joint Joint B C H G 1pc A 1pc B 1pc C 3pcs G 3pcs H 1 1 Insert part C into part A secure with 2 x part H and 2 x part G 2 Attach part B to part C and secure with part H and part G ASSEMBLY INSTR...
Page 4: ...nect one end of part D to the control handle s outlet on part B 4 Connect the other end of part D to part E then attach the connected parts D E to part F Finally link to part A making sure all parts a...
Page 5: ...y some Te on tape I to the thread of the replacement nozzle 1 Lubricate moving parts with high quality silicone oil not included periodically 2 The exterior of the cleaner can be cleaned with a soft d...
Page 6: ...5 bars and 2 gpm 7 5 L min respectively Clear o any obstructions in the slots of the nozzles with the cleaning pin Replace worn nozzles with the provided spares Retighten the bolts and nuts underneat...
Page 7: ...YITAHOME products just contact us at from Mon Fri AM PM PST Sat AM PM PST or e mail us at after sale cs hotmail com Alternative method to contact us amazon com orders only Log into your Amazon account...