ASSEMBLY INSTRUCTIONS
ASSEMBLY INSTRUCTIONS
5
6
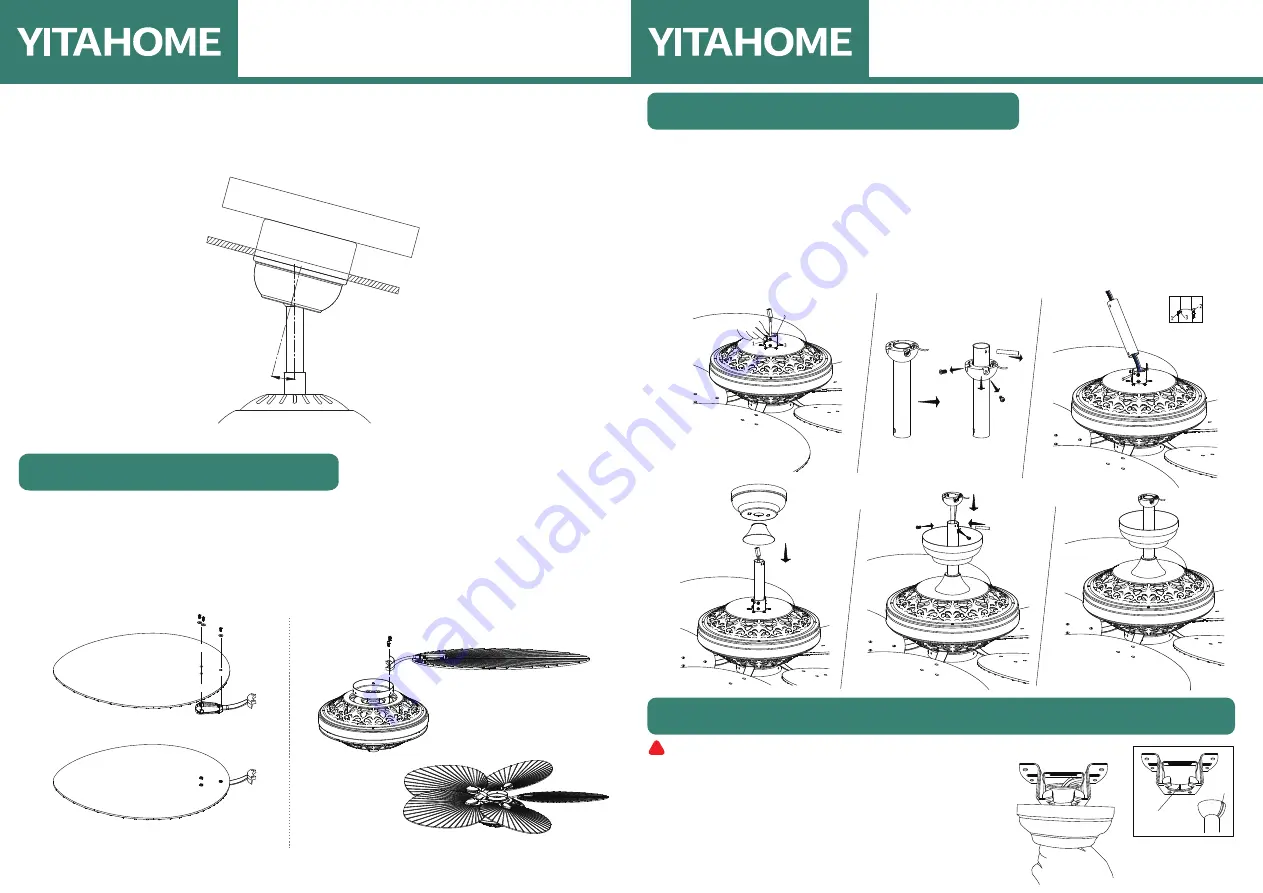
4. Refer to the Fig. on the right to mount when the ceiling is angled (Max. 15°).
NOTE
: The hanger must be able to withstand 100lbs (45kg) or more after the installation.
INSTALLING THE BLADE
1 )Attach blade brackets to blades with the blade bracket screws and metal or fabric
washers.
2)Before installing fan blades, remove the motor’s fastener that is only used to protect
the motor from damages in transit. Then, attach the blade assembly to the screws
provided and tighten them.
15
1)
2)
REMEMBER to turn off the power before hanging the fan. Follow the steps below to hang your fan properly:
1) Remove the hair clip pin “1” and clevis pin “2” on the fan motor’s downrod joint, then withdraw half of the screw
“3” that locks the downrod.
2) Loosen the screws “5” and “6” on the downrod and remove the lifting ball and safety pin “4”.
3) Pass the detached downrod through the wire and insert it into the downrod joint. Make sure that it is aligned with
the hole on the joint. Pass through clevis pin “2” and insert the hair clip “1” into the hole of clevis pin “2”, then
lock the downrod with the screw “3”.
4) Pass the canopy through the downrod.
5) Pass the detached lifting ball through the downrod, then insert safety pin “4” to jam the lifting ball, and then use
screws “5” and “6” to lock it.
INSTALLING THE DOWNROD
INSTALLING THE FAN TO MOUNTING BRACKET ON CEILING
WARNING
: To avoid possible electrical shock, be sure the electricity is
turned off in the main fuse box before wiring.
Carefully lift the fan assembly onto mounting bracket and rotate the fan
until the notch on downrod ball “1" engages the ridge on the mounting
bracket “2".
This will allow for hands free wiring.
1)
2)
3)
4)
5)
6)
1
2
!
5
4
6


