background image

YMGI, Engineered Comfort Products for A Sustainable and Efficient Green World! 


52 


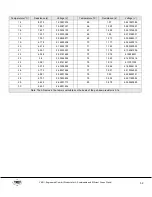
Temperature (°C) 

Resistance (k) 

Voltage (V) 


Temperature (°C) 

Resistance (k) 

Voltage (V) 

14 

8.279 

1.90597205 


65 

1.37 

3.941267388 

15 

7.951 

1.95387327 


66 

1.328 

3.967019291 

16 

7.637 

2.00204130 


67 

1.289 

3.991234935 

17 

7.337 

2.05033368 


68 

1.25 

4.015748031 

18 

7.051 

2.09859271 


69 

1.213 

4.039284017 

19 

6.778 

2.14682606 


70 

1.177 

4.062450215 

20 

6.516 

2.19524793 


71 

1.142 

4.085229093 

21 

6.267 

2.24333597 


72 

1.109 

4.106941536 

22 

6.028 

2.29151689 


73 

1.076 

4.12888601 

23 

5.8 

2.33944954 


74 

1.045 

4.149715216 

24 

5.581 

2.38741691 


75 

1.015 

4.17007359 

25 

5.372 

2.43506594 


76 

0.986 

4.189944134 

26 

5.172 

2.48247664 


77 

0.957 

4.210004953 

27 

4.981 

2.52951096 


78 

0.93 

4.228855721 

28 

4.797 

2.57653834 


79 

0.904 

4.247168554 

29 

4.622 

2.62291710 


80 

0.878 

4.265640683 

30 

4.453 

2.66931854 


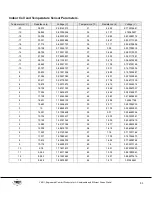
Note: The AD value in the table is calculated on the basis of the pull-down resistor is 5.1k. 


Summary of Contents for WMMS-09C-V2B(78)1

Page 1: ...s provided by YMGI Failure to follow and adhere to all codes and documentation can cause damage to equipment property even personal injury Installer Currently licensed certified HVAC technicians only...

Page 2: ...ion to Mini Split Wall Mount Systems 14 Unit Diagram 15 Specification Sheet 16 Installation Diagram and Unit Clearance 18 Installation Location Selections 19 Recommended Tools for Installation 20 Inst...

Page 3: ...ndling reclaiming recovering and recycling of certain refrigerants the equipment and tools necessary to perform these service procedures In addition some states or municipalities may have additional r...

Page 4: ...or HVAC professional as soon as possible and provide the following information Data on the unit model number serial number and owner s name A detailed description of the unit s problem before and aft...

Page 5: ...manufacturer may not require certified and licensed personnel to install Reading and following YMGI Group recommendations and requirements contained in the following pages and other documents is the f...

Page 6: ...before pulling the piping through any structures at time of installation 2 Not installing an oil P trap in the copper suction line where the indoor unit is located 18 feet or more below the outdoor un...

Page 7: ...r identifying marks on each pair of copper lines and wiring cable sets to keep from cross piping or cross wiring in multiple zone installations or where pipes for different single zone systems are clo...

Page 8: ...0 days as of original shipping date from YMGI Group whichever comes first This is a standard limited liability warranty and DOES NOT cover the following Any damage or repairs to properties or persons...

Page 9: ...rged accordingly 3 YMGI will ground ship out the parts ASAP Expedited shipping is available at the customer s expense 4 Replacement parts that have an approved warranty registration are to be warrante...

Page 10: ...YMGI Engineered Comfort Products for A Sustainable and Efficient Green World 10...

Page 11: ...liar with Local contractors have a faster response time and it will be easier for you to determine if they are reputable 4 Use only a reputable licensed certified HVAC installation professional to pre...

Page 12: ...unit or can result in electric shock 16 Do not expose the unit to moist or corrosive environments 17 While operating in cooling mode do not set the indoor units room temperature too low keeping the te...

Page 13: ...isconnect the power supply and switch off all circuits prior to inspecting or servicing the unit Inspecting and servicing the unit while the power supply is connected and the circuits are switched on...

Page 14: ...bracket kit is used some outdoor units can be stacked 2 or 3 units high upon unit size and applications Air is discharged horizontally quietly and smoothly These units are a perfect fit in locations...

Page 15: ...YMGI Engineered Comfort Products for A Sustainable and Efficient Green World 15 SAMPLE ILLUSTRATION OF INSTALLED SYSTEM...

Page 16: ...48 45 40 36 48 45 40 36 50 45 40 38 50 45 40 38 Outdoor Sound pressure dB A 53 53 55 58 60 60 Airflow Indoor Unit S H M L CFM 412 380 351 276 412 380 351 276 635 577 482 383 635 577 482 383 1107 845...

Page 17: ...2 x 3 4 Tube pitch a x row pitch b in 53 64 x 23 32 53 64 x 23 32 53 64 x 23 32 53 64 x 23 32 53 64 x 23 32 53 64 x 23 32 Fin spacing in 1 16 1 16 1 16 1 16 1 16 1 16 Liquid Pipe Diameter in 1 4 1 4 1...

Page 18: ...YMGI Engineered Comfort Products for A Sustainable and Efficient Green World 18 INSTALLATION DIAGRAM...

Page 19: ...e gas could leak Keep required distance away from walls Keep outdoor unit away from exhaust vents or chimneys Avoid installing unit near street or roadside where there is a risk of mud or water damage...

Page 20: ...Two at One Time Flare Nut Tool Set Not Shown Hex Head Allen Wrench Sets Metric and Imperial Brazing Rods and Brazing Torch Outfit for AC Application Not Shown Brazing Flux Nitrogen Cylinder for Posit...

Page 21: ...ce Note The center of the mounting bracket may not be the center of the Indoor unit Attach the mounting plate to the wall with a minimum of five screws evenly spaced to properly support the weight of...

Page 22: ...ies Models Bracket Width 629mm 24 8 in For 24000 Btu h Series Models Bracket Width 820mm 32 3 in Unit Model Size A Size B Size C mm in mm in mm in 9k 12k of 21 SEER Series 70 2 35 1 3 8 70 2 18k 24k o...

Page 23: ...ing through the hole from the outside Decide whether to remove the unloading piece in accordance with the piping direction as shown below After connecting the piping install the drain hose then the po...

Page 24: ...indoor unit When the piping is directed to the right the piping power cord and drain pipe should be insulated and fixed to the back of the unit with a piping fastener Piping Connection a Connect indoo...

Page 25: ...he manufacturer for installation of wall brackets and rubber pads Verify the wall brackets or rubber pad can safely support eh Outdoor Unit s weight Verify that the wall hangers or rubber pad is level...

Page 26: ...s to avoid kinks Apply a small amount of refrigerant oil to the flare connection of the refrigerant pipe Properly align piping and tighten the flare nut using a standard wrench and a torque wrench as...

Page 27: ...id and gas copper lines with at least 3 8 inch thick insulation tubes Band tape and secure the refrigerant lines Support copper lines at a proper distance apart to keep the tubes from sagging CUTTING...

Page 28: ...this case wrap a wet rag around the pipe to protect the valves or other components from being overheated When using flux rub the tube surface using steel wool to remove any oxidation then clean and d...

Page 29: ...oor to Indoor Unit Min Wire Size Outdoor Indoor Units Fuse is Factory Installed 09K 1 4 Liq 3 8 Gas 15 50 30 15 N 1 2 3 G 18AWG At Indoor Control Board 12K 1 4 Liq 1 2 Gas 15 50 30 15 N 1 2 3 G 18AWG...

Page 30: ...e fitted Always use a dedicated power circuit specifically for the air conditioner For wiring requirements refer to the circuit diagram found inside the unit access door Confirm cable gauge as specifi...

Page 31: ...YMGI Engineered Comfort Products for A Sustainable and Efficient Green World 31 Wiring Diagrams 115V Systems 208 230V Systems Diagrams are for reference only Actual terminal may appear different...

Page 32: ...re not to discharge the refrigerant into the air directly How to Vacuum Air Tubes 1 Unscrew and remove caps from 2 way and 3 way valves 2 Unscrew and remove cap from service valve 3 Connect vacuum pum...

Page 33: ...en any exposed piping to outside walls where ever possible 5 Seal and weatherproof the hole in the wall where the interconnecting wires and refrigerant pipes pass through Indoor Unit 1 Do all Remote c...

Page 34: ...mote control instead of the machine to keep your current location at the temperature you are comfortable at 10 CLOCK Used to set the current time 11 TIMER ON Used to set the timed start function 12 TI...

Page 35: ...ner will not operate if curtains doors or other items block the signal from the remote controller to the Indoor Unit If the signal cannot be transmitted properly either move the item s blocking the si...

Page 36: ...ng sequence Heating mode is NOT available for cooling only air conditioners Fan Mode Each time the FAN button is pressed the fan speed is changed it the following sequence In FAN ONLY mode AUTO is not...

Page 37: ...are at the preferred angle The automatic swing will stop and hold the set position Horizontal Airflow Control Using the remote controller to set various angles or adjusting the louvers to direct air...

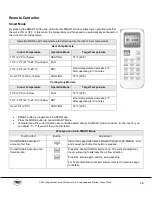
Page 38: ...on Mode Target Temperature 73 F 23 C or below FAN 72 F 22 C 73 F 79 F 23 C 26 C or below DRY Room temperature decrease 2 F after operating for 3 minutes Over 79 F 26 C COOLING 79 F 26 C SMART button i...

Page 39: ...he and button 2 seconds to increase or decrease the time setting by 10 minutes Press the and button and hold to increase or decrease the time setting by 1 hour When your desired time is displayed on t...

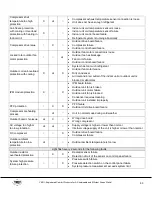
Page 40: ...the Super icon will display on the remote controller LCD screen SUPER Mode can be set when the air conditioner is turned on and running In SUPER Mode you can set the temperature airflow direction and...

Page 41: ...et forth for an uncontrolled environment This equipment should be installed and operated with minimum distance of 50 cm 8 in between the radiator and your body Radiation Exposure Statement This equipm...

Page 42: ...Communication cable has failed Connection between the filter board and the outdoor control board is incorrect or loose Connection between the filter board and the terminal is incorrect or loose Indoo...

Page 43: ...of the indoor unit or outdoor unit is blocked or abnormal IPM module protection X X IPM board failure Outdoor unit fan is broken Outdoor unit motor failure Outdoor unit fan is blocked Condenser requir...

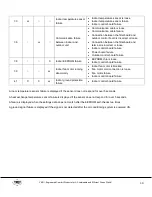
Page 44: ...r prohibition of frequency rising protection against overload of outdoor coiled pipe 10 x x Frequency decreasing or prohibition of frequency increasing for power saving when it is being used simultane...

Page 45: ...talled properly 6 X AC voltage out of range protection Supplied voltage is higher or lower than normal Indoor unit supply voltage is higher or lower than normal 7 X Communication failure between Indoo...

Page 46: ...oose Indoor coil temperature sensor failure Indoor control board failure Refrigerant system is abnormal 17 PFC protection PFC failure Outdoor drive board failure 18 DC compressor start failure Outdoor...

Page 47: ...sor is loose Indoor coil temperature sensor failure Indoor control board failure 36 X Communication failure between Indoor unit and Outdoor unit Communication cable is loose Communication cable has fa...

Page 48: ...ion Supplied voltage is higher or lower than normal Internal supplied voltage of the unit is higher or lower than normal 7 X Communication failure between Indoor unit and Outdoor unit Communication ca...

Page 49: ...oard failure 18 X DC compressor start failure Outdoor drive board failure Compressor failure 19 X Compressor drive issue Outdoor drive board failure Compressor failure Outdoor control board failure 20...

Page 50: ...or control board failure 38 X Indoor EEPROM failure EEPROM chip is loose Indoor control board failure 39 Indoor fan motor running abnormally Indoor fan motor is blocked Fan motor cord connection is lo...

Page 51: ...8487 8 21 594 0 95527085 43 2 801 3 227439565 7 20 611 0 99179340 44 2 706 3 266717909 6 19 678 1 02913875 45 2 615 3 305249514 5 18 794 1 06721353 46 2 528 3 342947037 4 17 954 1 10609872 47 2 444 3...

Page 52: ...19 6 778 2 14682606 70 1 177 4 062450215 20 6 516 2 19524793 71 1 142 4 085229093 21 6 267 2 24333597 72 1 109 4 106941536 22 6 028 2 29151689 73 1 076 4 12888601 23 5 8 2 33944954 74 1 045 4 14971521...

Page 53: ...SC1 Made of steel Coated with weatherproof polyester powder Model Size Inch Capacity A B LBs Btu h BRKT 0918 SC1 17 7 15 4 320 09K 18K BRKT 1860 SC 21 7 18 3 360 18K 60K BRKT XXXX ST1 Made of stainle...

Page 54: ...asive cleanser CLEAN THE FRONT PANEL MAKE SURE TO TAKE IT OFF BEFORE CLEANING Take off the front panel Along the direction of arrows lift the front panel up meanwhile hold both slots of the front pane...

Page 55: ...rd at a slight angle and pull downward carefully Cleaning To clean the dust adhering to the filters you can either use a vacuum cleaner or wash them with warm water and a neutral detergent the water s...

Page 56: ...ower V Ph Hz 2 If the unit is still securely fastened 3 If the batteries of remote control are good 4 If the filter is loaded and clean 5 If the intake and discharge vents are clear from any obstructi...

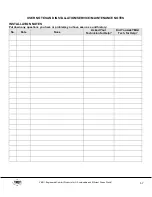
Page 57: ...nd Efficient Green World 57 USER NOTES AND INSTALLATION SERVICE MAINTENANCE NOTES INSTALLATION NOTES Put down any questions you have or problems you have seen as a unit history No Date Noes Asked Your...

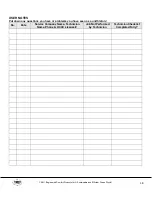
Page 58: ...and Efficient Green World 58 USER NOTES Put down any questions you have or problems you have seen as a unit history No Date Service Company Name Technician Name Phone HCAC License Job Not Performed b...

Page 59: ...I Engineered Comfort Products for A Sustainable and Efficient Green World 59 SERVICE MAINTENANCE NOTES No Date Contents of Service Maintenance Technician s Company Name Technician Name Phone HCAC Lice...

Page 60: ...u h 58 2 Single Zone 16 22 SEER 09 36K Btu h 58 4 78 1 Single Zone 18 23 SEER 09 36K Btu h Symphony CHOIR DC Inverter 59 2 DC Inverter Multiple Zone 16 SEER 2x09K to 5x12K Btu h 59 2S DC Inverter Mult...

Reviews: