background image

ENG

ENG IMPORTANT Keep this instructions for future reference.

!WARNINGS

Failure to follow these warnings and the assembly instructions could result in serious

injury or death.

BEFORE USE, REMOVE AND DISPOSE OF ALL PLASTIC BAGS AND PACKAGING


MATERIALS AND 

KEEP THEM OUT OF REACH OF CHILDREN.

The product is ready for use only when all locking mechanisms are engaged.

Check carefully that these are engaged before use.

All opening, adjusting, anchoring and positioning operations of the product


must be carried out 

ex

c

lusively by an adult.

The young children should not be allowed to play unsupervised in the


vicinity of a crib.

The crib should be locked in the fixed position when a child is unsupervised


in it.

Do not use the product if any part is broken, torn or missing.

W

hen a child is able to sit, kneel or to pull itself up, the crib shall not be


used anymore for this child.

The thickness of the mattress must be such that the vertical height (upper


surface of the mattress 

until the upper edge of the product's sides) is at least


200mm. 

Do not use more than one mattress in the crib.

The product must always be placed on a horizontal surface. Never leave


the product on an inclined 

surface with the child inside of it.

Be aware of the risk of fire and other sources of strong heat, such as electric


bar fires, gas fires, 

etc. In the near vicinity of the crib

.

Keep the fastening belts away from the reach of children.

Do not leave any object inside the product that could reduce its depth.

Do not position the crib near walls and obstacles to prevent trapping hazards.

Do not leave small objects inside the product to prevent choking hazards.

Do not adjust or move the product with the child inside.

Do not use the product with more than one child at a time.

The product must be kept away from electric cables and cords. Do not place


the product near 

windows where cords, curtains or similar objects could pose


choking or strangling hazards for the 

child.

All assembly fittings should always be tightened properly and taken cared


that no screws are 

loose,because a child could be trapped by parts of the body


or clothing (e.g. strings, necklaces, 

ribbons for babies dummies, etc), which


would pose a risk of strangulation.

This product is intended for one child weighing up to a maximum of 9kg.

Not to use the body of the crib without its frame.

Use the mattress correctly with the zipper side downwards the base of the crib


and make sure the 

zipper head put into the sleeve at the side end completely.

Care and Maintenance: 

Plastic and metal parts may be sponged lightly using warm water and a 

mild detergent. Dry 

thoroughly

 before storing.

WARNING

! During the removal and/ or application of the mattress cover, handle the fabric 

carefully in order to avoid accidental damage or tears.


CLEANING: 

Never clean any part of the product with abrasive, ammonia based, bleach based or 

spirit type cleaners. Do not twist; do not spin-dry; do not iron.

This product complies with EN 

1130-1

:

1996


Summary of Contents for TOVA

Page 1: ...TOVA SIDE BY SIDE BED SE NO ENG...

Page 2: ...acera inte spj ls ngen n ra v ggar och f rem l som kan skada barnet eller uts tta barnet f r risk L mna inte sm f rem l inuti produkten f r att f rhindra kv vningsrisker Justera inte eller flytta prod...

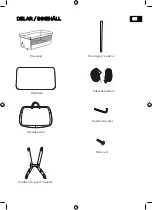
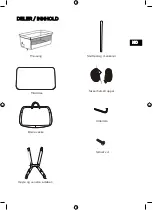
Page 3: ...SE Minis ng DELAR INNEH LL Madrass Skyddsv ska St dregel L nkr r Sidoben H ger V nster S kerhetsband Sexkantsnyckel Skruv x 4...

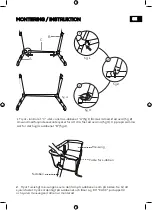
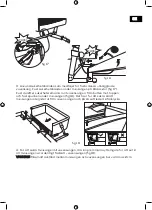
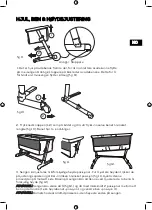
Page 4: ...r att dra fast skruvarna fig 3 U pprepa samma sak f r det h gra sidobenet B fig 4 2 Tryck f rsiktigt minis ngens vre del ram p sidobenen som p bilden Se till att sj lva f stet trycks ordentligt p sido...

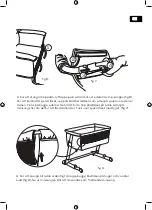
Page 5: ...lva vre del av ramen Finns p b gge sidorna Se till att f ra i hop plastl set p sidan samt p minis ngens ram del f r att l sa denna del T ck ver sj lva l set med tyget fig 7 4 F r att st nga till sida...

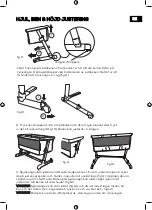
Page 6: ...Benen kan justeras i tv l gen g 11 g 12 3 Spj ls ngen kan justeras till 6 olika h jdpositioner F r att justera h jden trycker du p justeringsspaken och st ller in spj llen till nskat l ge fig 11 Uppr...

Page 7: ...knappen p undersidan fig 15 VARNING Anv nd minis ngen med l ngsidan s nkt endast i sovande l ge intill en vuxens ng 2 Placera minis ngen n ra vuxens ngen och titta h jden p minis ngen j mf rt med vuxe...

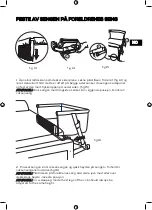
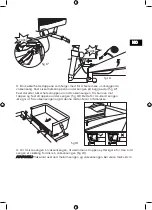
Page 8: ...n och f st sp nnen under minis ngen fig 18 Detta r f r att s kra s att minis ngen inte glider ut fr n vuxen s ngen och p s s tt leder till fallolycka g 17 g 18 CLICK CLICK max 2 cm g 19 4 F r att s kr...

Page 9: ...ens dybde Ikke plasser sengen ved siden av vegg eller andre hindringer for unng klemskader Ikke etterlat eller ha sm gjenstader i sengen for unng kvelningsrisiko Ikke flytt eller juster sengen mens ba...

Page 10: ...NO Miniseng DELER INNHOLD Madrass B reveske St ttestag Lenker r H yre og venstre sideben Sikkerhetsstropper Umbrako Skruer x 4...

Page 11: ...skru inn skruene fig 3 Gjenta samme prosedyre for det h yre sidebenet B fig 4 2 Trykk forsiktig minisengens vre del ramme p sidebenet som vist p bildet Se til at selve festet trykkes godt p sidebenet...

Page 12: ...ve vre del av rammen Finnes p begge sidene S rg for f re sammen plastl sen p siden samt p minisengens rammedel for l se denne delen Dekk over selve l sen med stoffet fig 7 4 For lukke siden skikkelig...

Page 13: ...Benet har to innstillinger g 11 g 12 3 Sengen kan justeres til 6 forskjellige h ydeposisjoner For justere h yden trykker du p justeringsspaken og stiller inn l sen til nsket posisjon fig 11 Gjenta de...

Page 14: ...fig 15 ADVARSEL Bruk sengen med langsiden senket kun i liggende posisjon inntil en voksenseng 2 Plasser sengen inntil voksensengen og sjekk h yden p sengen i forhold til voksensengens madrass fig 16...

Page 15: ...fra bunnen mot toppen og fest stroppene under sengen fi g 18 Dette for sikre at sengen ikke glir ut fra voksensengen og p denne m ten f rer til fallulykke g 19 4 For sikre sengen til voksensengen dra...

Page 16: ...from the reach of children Do not leave any object inside the product that could reduce its depth Do not position the crib near walls and obstacles to prevent trapping hazards Do not leave small objec...

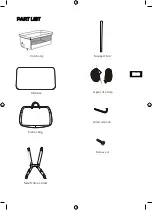
Page 17: ...ENG Crib body PART LIST Matress Fabric bag Support bar Side frame stand A pair of strap Allen wrench Screw x 4...

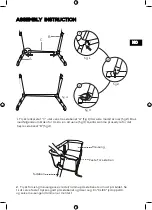
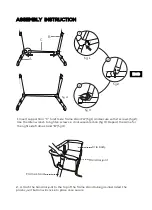
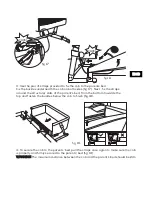
Page 18: ...allen wrench to tighten screws in clockwise direction g 3 Repeat the same for the right side frame stand B g 4 2 Attach the handrail joint to the top of the frame stand tubing as illustrated the plas...

Page 19: ...located both sides of the padded crib rail Attach the plastic joints on the tubing to secure Close the velcro panel to hide the joint g 7 4 Fasten the side of the crib with the mesh window using the...

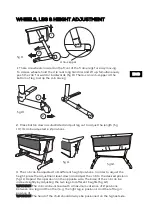
Page 20: ...0 It can be adjusted in 2 positions g 11 g 12 3 The crib can be adjusted to 6 different height positions In order to adjust the height press the adjustment lever down and adjust the crib to the desire...

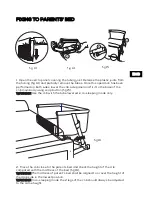
Page 21: ...main body using snap button fig 15 WARNING Use the crib with the tube lowered in co sleeping mode only 2 Move the crib close to the parents bed and check the height of the crib compared with the mattr...

Page 22: ...lats of the parent s bed from the bottom towards the top and fasten the buckles below the crib to nish g 18 g 17 g 18 CLICK CLICK max 2 cm g 19 4 To secure the crib to the parents bed pull the straps...

Page 23: ...Made in China BH NORDIC AS Grenseveien 107 0663 Oslo NORWAY customerservice yngri no www yngri no www yngri se...

Reviews: