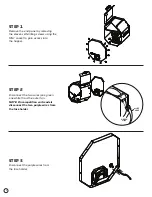
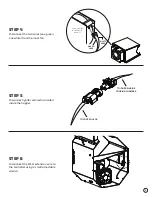
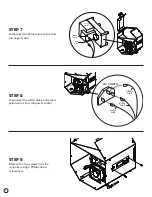
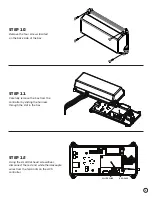
background image

8

step 22

Reconnect red and black wiring spade 

terminals to auger drive motor.

step 23

Connect the two short green and white 

wires to the inner fan.

step 24

Connect the two purple wires

to the fuse holder.

AUGER

MOTOR

BLACK

WIRE

RED

WIRE

GREEN WIRE

WHITE WIRE

Summary of Contents for S Series

Page 1: ...OU LL NEED 5 16 Socket Small Adjustable Wrench Small Phillips Head Screwdriver Small Flat Head Screwdriver UNPLUG POWER CORD EMPTY THE HOPPER CAUTION BEFORE BEGINNING THIS PROCEDURE ENSURE THAT THE PO...

Page 2: ...the 5 16 socket to gain access into the hopper step 2 Disconnect the two wires one green one white from the outer fan NOTE On competition cart models disconnect the two purple wires from the fuse hold...

Page 3: ...ner fan step 5 Disconnect igniter connector located inside the hopper step 6 Disconnect the Wi Fi extension wire to the controller using a small adjustable wrench WHITE WIRE GREEN WIRE ROTATED VIEW OF...

Page 4: ...e auger motor step 8 Disconnect the white black and green yellow wires from the power socket step 9 Remove the two screws from the controller using a Phillips head screwdriver AUGER MOTOR BLACK WIRE R...

Page 5: ...ed and white thermocouple wires from the terminals on the ACS controller step 11 Carefully remove the box from the controller by sliding the harness through the slot in the box step 10 Remove the four...

Page 6: ...ler by sliding the harness through the slot in the box step 15 Using the small flat head screwdriver install the red and white thermocouple wires into the correct terminals on the ACS controller When...

Page 7: ...g the four screws removed earlier NOTE Take care to not crimp or pinch the ribbon cable or any wires in the process of closing the box step 17 Remove the two phillips head screws from the faceplate st...

Page 8: ...controller using a small adjustable wrench step 20 Connect the igniter to the control board step 21 Reconnect the spade connectors to the A C power socket TO CONTROL BOX TO IGNITER INSIDE COOKING CHA...

Page 9: ...black wiring spade terminals to auger drive motor step 23 Connect the two short green and white wires to the inner fan step 24 Connect the two purple wires to the fuse holder AUGER MOTOR BLACK WIRE RE...

Page 10: ...n one white to the outer fan step 26 Ensure all wires are free of both fans and the auger drive motor Lastly attach the end panel to the hopper using the eleven self drilling screws WHITE WIRE GREEN W...

Page 11: ...vice team Selecting the incorrect model will cause the unit to operate erratically step 2 Push and release the rotary selector knob until your model appears Confirm you have the correct model selected...

Page 12: ...u ll be presented with a login screen FIG 1 If you don t already have a FireBoard account you ll need to create one Tap on Create Account fill in the fields FIG 2 and tap Register Once registered and...

Page 13: ...ill fail While within 30 feet of your cooker tap the Add FireBoard button on your app screen Your mobile device will scan for nearby FireBoard devices FIG 4 and will find the one embedded into your co...

Page 14: ...ess point on the provided lines Please note that network names and passwords are case sensitive If you re unsure of the exact spelling of your network name or unsure of which networks are within the r...

Page 15: ...RE RETURNING YOUR CONTROLLER PLEASE REMOVE your cooker from the app by selecting Remove FireBoard from my account You will be prompted to confirm and your cooker will be removed from the previous cont...

Page 16: ...QUESTIONS 877 409 6337 CUSTOMERSERVICE YODERSMOKERS COM...

Reviews: