


15
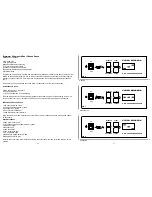
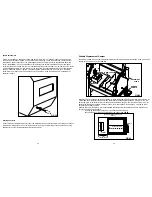
Door Open Function
When the cooker has been in maintenance for more than 10 minutes and the cooker loses more than 15
degrees, the program interpretes that the cooking chamber door has been opened. When this happens,
there is a speci
fi
c piece of programming that is executed to speed recovery back to the set point.
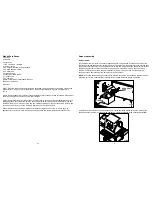
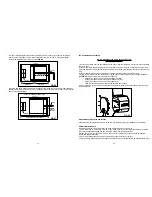
Prime Button
The prime button overrides the program altogether and turns the auger continuously, feeding pellets as
long as the button is depressed. This is valuable anytime you have had the door open for a long time and
have lost signi
fi
cant temperature or if you want to raise the cooker temperature from say 250 to 350° F.
To use this function, press and hold the prime button on for 60 seconds, then let o
ff
for 60 seconds. You
may repeat this twice allowing at least 2 minutes before repeating.
44
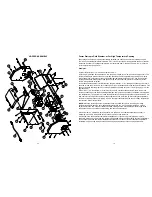
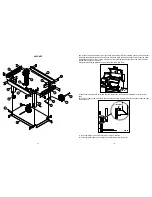
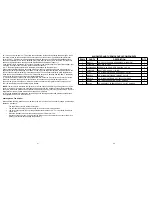
640 COMP CART
ITEM #
PART #
DESCRIPTION
QTY.
1
A90491
YS, PELLET, CHAMBER ASSEMBLY, 640
1
2
W90551
YS, WELDMENT, 640 COMP CART, BASE
1
3
90725
YS, CASTER, FLATFREE TIRE, 8" DIA., RIGID, MARATHON
2
4
90724
YS, CASTER, FLATFREE TIRE, 8" DIA., SWIVEL/LOCK, MARATHON
2
5
W90531
YS, WELDMENT, TIE-DOWN, UNDERCARRAIGE, 640
1
6
3816X1WHB
BOLT, WHIZ, 3/8-16 X 1" LONG
20
7
23867
WASHER, PHENOLIC, 3/8"
4
8
3816LNN
NUT, NYLOCK, 3/8-16
20
9
90527
YS, SIGN, COMP CART BASE, YODER SMOKERS LOGO
2
10
1420X12BHCSSS
1/4-20 X 1/2" BUTTON HEAD CAP SCREW, STAINLESS STEEL
8
11
1420X1WHB
BOLT, WHIZ, 1/4-20 X 1" LONG
8
12
23866
WASHER, PHENOLIC, 5/16"
8
13
1420LNN
NUT, NYLOCK, 1/4-20
16
14
91434
YS, HARNESS, WIRING EXTENSION W/RCPT, COMP CART
1
15
632X38MS
SCREW, MACHINE, ROUND HEAD, 6-32 X 3/8" LONG
2
16
632HN
NUT, HEX, 6-32
2
17
A90535
YS, ASSEMBLY, FRONT SHELF, 640, STAINLESS
1
18
A90511
YS, ASSEMBLY, SIDE SHELF, 640, STAINLESS
1
19
W90348
YS, WELDMENT, 2ND SHELF, 640 PELLET
1
20
90460
BUCKET, GALVANIZED, 1-1/4 QT
1
21
24117
EDGE TRIM, ADHESIVE, 1/4" OUTSIDE WIDTH, NC02-05
6 LF
22
91435
FUSE, 250V, 1.6A, 5X20MM, LITTLEFUSE #021701.6HXP
1
Summary of Contents for YS 640
Page 1: ......


