


33
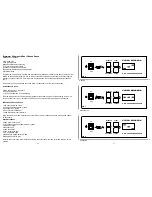
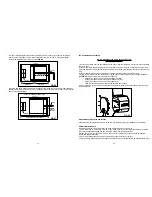
Fuse Replacement
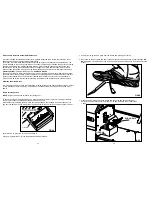
If there is no display on the power switch with the switch in the “on” position, check the power source
to verify the GFCI hasn’t tripped. If the power source is working, check the Yoder fuse. The fuse holder
is located on the left front side of the pellet hopper below the control panel (on the standard backyard
carts). (see
FIG 33
). * On the competition cart models the fuse holder is located on hopper end panel.
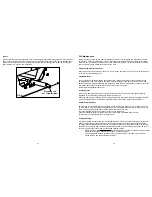
Verify that the power switch is in the “o
ff
” position and disconnect the Yoder from its power source. Insert
a small
fl
at blade screwdriver into the slot on the top of the fuse container and twist it counterclockwise
to open. If the fuse is blown, replace it with the supplied replacement fuse. (The fuse is a 1.6-ampere
quick-blow fuse.) Reconnect the power and turn the Yoder on. If the fuse blows again, contact us for
technical support.
Storing Your Grill
Cover your Yoder Smoker to protect it from the weather and to keep the pellets dry. If storing your cooker
inside, be sure the smoker is cool to the touch before moving it inside. Inspect the hopper and cooking
chamber for any remaining embers before storing the unit.
FIG 33
26
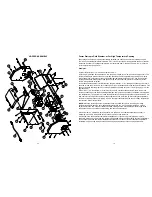
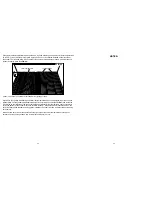
Variable Displacement Damper
The YS640 is
fi
tted with a variable displacement damper for managing heat distribution in the pit from the
fi
rebox to the chimney end. (See
FIG 24
)
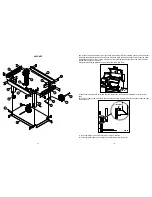
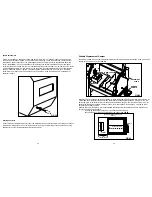
When the YS640 is set up with the heat di
ff
user in place the Variable Displacement Damper allows the pit
master additional temperature control at the grate level. With the damper pushed all the way in, the left
half of the grill will run hotter (FIG 25). When positioned all the way open, the right side of the grill will run
hotter. With the damper pushed in about 5 inches, the grate surface will cook evenly, creating an ideal
environment for slow cooking.
With the direct grill kit in place, it is recommended that the damper is completely open to develop heat
across the entire cooking surface.
•
By pushing the damper all the way in (toward the
fi
rebox) heat is
concentrated for grilling on the left side of the Yoder. (See
FIG 25
)
DAMPER
HANDLE
CHIMNEY
STACK
DAMPER AT MID-LOCATION
DAMPER AT MID-LOCATION
FIREBOX
FIG 24
EXAMPLE: DAMPER ALL THE WAY IN
(Top View)
FIREBOX
DAMPER POSITION
HANDLE
HEAT
CONCENTRATION
FIG 25
Summary of Contents for YS 640
Page 1: ......


