background image


ENGLISH 


22 


35. 

Do not use the meat grinder to grind bones, nuts or other hard objects. 

36. 

Before grinding in the meat grinder, meat must be cleaned of bones, tendons and fat, and cut into pieces 
of around 2 x 2 x 10 cm in size. Do not use frozen meat. 

37. 

The bowl must always be installed during operation of the device. 

38. 

Do not limit airflow underneath the device. 

39. 

No parts of the kitchen machine are dishwasher-safe. 

40. 

Only use the device for its intended purposes. 

41. 

Do not leave the device unattended when turned on. 

42. 

The device is not intended for outdoor use. 

43. 

This  appliance  is  intended  for  household  use  only,  on  dry  surfaces.  Any  other  use  is  considered 
inappropriate and dangerous. 

44. 

The manufacturer does not accept liability for damage resulting from failure to follow the instruction sheet. 


Summary of Contents for GALAXO KM01S

Page 1: ...Robot kuchenny Kitchen machine KM01S GALAXO PL EN ...

Page 2: ...zawsze po zakończonej pracy 13 Odłącz urządzenie od zasilania przed przystąpieniem do przenoszenia oraz czyszczenia 14 Nie chwytaj wtyczki zasilającej mokrymi rękoma gdyż może to doprowadzić do porażenia prądem elektrycznym 15 Nie używaj urządzenia mokrymi rękami lub stojąc boso 16 Jeżeli podczas pracy urządzenia pojawi się nietypowy dźwięk lub zapach natychmiast wyłącz urządzenie i odłącz zasilan...

Page 3: ... 1500 ml 33 Używaj urządzenie w odcinkach czasu nie dłuższych niż 15 minut Pozwól robotowi stygnąć przez 30 minut pomiędzy każdym 15 minutowym użyciem 34 Nie używaj blendera w sposób ciągły dłużej niż 2 minuty 35 Nie używaj maszynki do mięsa do mielenia kości orzechów lub innych twardych przedmiotów 36 Przed mieleniem w przystawce do mielenia mięsa należy je oczyścić z kości ścięgien oraz tłuszczu...

Page 4: ...1 Tarka do krojenia na plasterki 12 Popychacz szatkownicy 32 Tarka do ucierania ziemniaków 13 Komora szatkownicy 33 Tarka do siekania na wiórki 14 Osłona misy 34 Nasadka do makaronu pappardelle 15 Oś elementów mieszających 35 Nasadka do makaronu udon 16 Osłona gniazda komory mielenia szatkownicy 36 Nasadka do makaronu tagliatelle 17 Głowica robota 37 Nasadka do makaronu rigatoni 18 Hak do zagniata...

Page 5: ...uty Nie miksuj w blenderze produktów spożywczych bez dodatku płynów i nie pozwól ostrzom pracować bez żadnej żywności ponieważ może to spowodować zatarcie silnika Nie używaj więcej niż jednej funkcji urządzenia naraz Podczas przygotowywania makaronu nie wkładaj do urządzenia więcej niż 500 g ciasta naraz Po każdej takiej porcji pozwól urządzeniu stygnąć przez 30 minut Podczas pracy urządzenia misa...

Page 6: ...esorium Prędkość Czas Trzepaczka 8 6 minut Mieszadło 2 7 6 minut Hak do zagniatania ciasta 1 6 minut Blender nie dotyczy 2 minuty Szatkownica 8 3 minuty Przystawka do mielenia mięsa przygotowywania makaronu ciastek 7 8 mięso 3 minuty 4 5 makaron 4 5 ciastka ...

Page 7: ... 3 Nałóż mieszadło hak do zagniatania ciasta lub trzepaczkę na oś elementów mieszających tak by wypustka na osi wsunęła się w wyżłobienie w gnieździe elementu mieszającego Dociśnij aż poczujesz opór a następnie przekręć element w prawo Charakterystyczne kliknięcie informuje o prawidłowym zamontowaniu elementu mieszającego 4 Umieść misę w gnieździe mocującym Przekręć ją w prawo aż poczujesz opór Wr...

Page 8: ...LENDER Montaż akcesoriów UWAGA Przed przystąpieniem do którejkolwiek z poniższych czynności odłącz urządzenie od zasilania 1 Ustaw urządzenie na płaskim stabilnym podłożu Upewnij się że głowica robota jest opuszczona i misa jest zamontowana zgodnie z instrukcjami montażu akcesoriów miksera 2 Wrzuć składniki do kielicha i zamknij pokrywę dociskając ją do końca Osłona dziubka kielicha na pokrywie po...

Page 9: ...jkolwiek z poniższych czynności odłącz urządzenie od zasilania 1 Ustaw urządzenie na płaskim stabilnym podłożu Upewnij się że głowica robota jest opuszczona i misa jest zamontowana zgodnie z instrukcjami montażu akcesoriów miksera 2 Zdejmij osłonę gniazda komory mielenia pociągając ją ku górze 3 Wsuń ślimak do komory mielenia aż poczujesz delikatne kliknięcie 4 Nałóż nożyk na końcówkę ślimaka wypu...

Page 10: ...a się stosowanie do wskazówek umieszczonych w tabeli zalecane ustawienia prędkości i czas pracy 3 Wyjmij popychacz wrzucaj kawałki mięsa do podajnika i dociskaj je popychaczem 4 Po zakończonej pracy ustaw pokrętło w pozycji OFF i odłącz urządzenie od zasilania WSKAZÓWKA Po skończonej pracy włóż kawałek chleba do komory mielenia i włącz na chwilę urządzenie by pozbyć się zalegającego mięsa Aby zdem...

Page 11: ...ślimak do komory mielenia aż poczujesz delikatne kliknięcie 4 Nałóż wybraną nasadkę do makaronu na ślimaku tak by okrągła wypustka na komorze mielenia została dopasowana do wyżłobienia w nasadce Nałóż i dokręć pierścień mocujący 5 Wsuń komorę mielenia do gniazda komory pod kątem ok 45 ku prawej stronie Upewnij się że jest wsunięta do końca 6 Przekręć komorę mielenia w lewo do pozycji pionowej aż u...

Page 12: ...dajnika i dociskaj je popychaczem 4 Produkowany makaron odcinaj nożem na odcinki o pożądanej długości 5 Po zakończonej pracy ustaw pokrętło w pozycji OFF i odłącz urządzenie od zasilania WSKAZÓWKA Po skończonej pracy włóż kawałek chleba do komory mielenia i włącz na chwilę urządzenie by pozbyć się zalegającego ciasta Aby zdemontować komorę mielenia naciśnij i przytrzymaj przycisk znajdujący się po...

Page 13: ...go otworu komory szatkownicy Szatkowanie UWAGA Zachowaj szczególną ostrożność podczas używania szatkownicy gdyż jej tarka tnąca jest odsłonięta podczas pracy Nie wolno wkładać palców ani żadnych innych części ciała oraz przedmiotów do otworu wylotowego bądź wlotowego komory 1 Podłącz urządzenie do zasilania 2 Włącz urządzenie poprzez ustawienie pokrętła sterowania od 1 do 8 w zależności od przygot...

Page 14: ... 2 Zdejmij osłonę gniazda młynka do mięsa pociągając ją ku górze 3 Wsuń ślimak do komory mielenia aż poczujesz delikatne kliknięcie 4 Nałóż sitko nasadek do kiełbas i ciastek na ślimaku tak by okrągła wypustka na komorze mielenia została dopasowana do wyżłobienia w nasadce Szersza strona sitka powinna być skierowana do wewnątrz komory 5 Nałóż na sitko nasadkę do kiełbas po czym nałóż i dokręć pier...

Page 15: ...li zalecane ustawienia prędkości i czas pracy 5 Wyjmij popychacz wrzucaj uprzednio zmielone i przyprawione mięso do podajnika i dociskaj je popychaczem jednocześnie formując kiełbasy 6 Po zakończonej pracy ustaw pokrętło w pozycji OFF i odłącz urządzenie od zasilania WSKAZÓWKA Po skończonej pracy włóż kawałek chleba do komory mielenia i włącz na chwilę urządzenie by pozbyć się zalegającego mięsa A...

Page 16: ... Wsuń komorę mielenia do gniazda komory pod kątem ok 45 ku prawej stronie Upewnij się że jest wsunięta do końca 8 Przekręć komorę mielenia w lewo do pozycji pionowej aż usłyszysz charakterystyczne kliknięcie 9 Nałóż tackę na komorę mielenia i dociśnij Wsuń popychacz do górnego otworu komory mielenia 10 Wybierz kształt ciastek przesuwając blaszkę w pożądaną pozycję Przygotowywanie ciastek 1 Podłącz...

Page 17: ... zamontowana zgodnie z instrukcjami montażu akcesoriów miksera 2 Zdejmij osłonę gniazda młynka do mięsa pociągając ją ku górze 3 Wsuń ślimak do komory mielenia aż poczujesz delikatne kliknięcie 4 Nałóż na ślimak nasadkę do kebbe kibbeh po czym nałóż i dociśnij element wylotowy nasadki węższą stroną na zewnątrz Następnie nałóż i dokręć pierścień mocujący 5 Wsuń komorę mielenia do gniazda komory pod...

Page 18: ...iskaj ją popychaczem 4 Przycinaj wytłaczaną rurkę na odcinki pożądanej długości 5 Włóż nadzienie do każdego odcinka otrzymanej rurki i dociśnij jej końce 6 Smaż zgodnie ze wskazówkami posiadanego przepisu WSKAZÓWKA Po skończonej pracy włóż kawałek chleba do komory mielenia i włącz na chwilę urządzenie by pozbyć się zalegającego ciasta Aby zdemontować komorę mielenia naciśnij i przytrzymaj przycisk...

Page 19: ...zasilającego Blender komora mielenia lub szatkownicy wypada z mocowania Akcesoria zostały niepoprawnie zamontowane Wyjmij akcesoria i zamontuj je poprawnie Miarka blendera przecieka Miarka została nieprawidłowo zamontowana Zatrzymaj pracę urządzenia wyjmij miarkę i zamocuj ją prawidłowo Robot słabo miesza mieli lub szatkuje żywność Ustawiona moc jest zbyt niska Ustaw pokrętło sterowania w wyższej ...

Page 20: ...wane naprawiane lub w jakikolwiek sposób naruszane przez nieupoważnioną do tego osobę ani też uszkodzone w wyniku nieprawidłowego użycia lub transportu Gwarancja nie obejmuje naturalnego zużycia się elementów ani elementów łatwo tłukących się jak szkło czy ceramika Niniejsza gwarancja nie ogranicza ustawowych praw konsumenta ani innych praw jakie konsument posiada zgodnie z obowiązującymi przepisa...

Page 21: ...d turn it back on 18 If the automatic overheating protection turns off the device often contact customer service 19 When using an extension lead please ensure you do not exceed the maximum rated running wattage load of the extension lead 20 When unplugging the device hold by the plug not the cord 21 Do not attempt to repair disassemble or modify the appliance There are no user serviceable parts in...

Page 22: ...of the device 38 Do not limit airflow underneath the device 39 No parts of the kitchen machine are dishwasher safe 40 Only use the device for its intended purposes 41 Do not leave the device unattended when turned on 42 The device is not intended for outdoor use 43 This appliance is intended for household use only on dry surfaces Any other use is considered inappropriate and dangerous 44 The manuf...

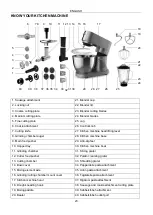
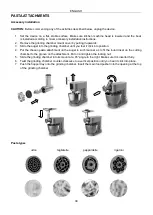
Page 23: ...n machine bowl 11 Grinding chamber 31 Slicing grater 12 Cutter food pusher 32 Potato creaming grater 13 Cutting chamber 33 Shredding grater 14 Bowl cover 34 Pappardelle pasta attachment 15 Mixing element axle 35 Udon pasta attachment 16 Grinding cutting chamber mount cover 36 Tagliatelle pasta attachment 17 Kitchen machine head 37 Rigatoni pasta attachment 18 Dough kneading hook 38 Sausage and coo...

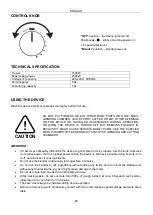
Page 24: ...utes Do not use the blender to mix ingredients without adding any fluids and do not let the blades work without any food inside the jug as it might cause damage to the motor Do not use more than one device functionality at a time While making pasta do not put more than 500 g of dough inside it at once After each such portion allow the unit to cool down for 30 minutes The bowl must always be instal...

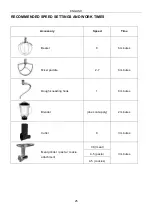
Page 25: ...D WORK TIMES Accessory Speed Time Beater 8 6 minutes Mixer paddle 2 7 6 minutes Dough kneading hook 1 6 minutes Blender does not apply 2 minutes Cutter 8 3 minutes Meat grinder pasta cookie attachment 7 8 meat 3 minutes 4 5 pasta 4 5 cookies ...

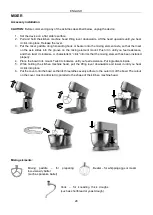
Page 26: ...eading hook or beater onto the mixing element axle so that the inset on the axle slides into the groove on the mixing element mount Push it in until you feel resistance and then twist it clockwise A characteristic click informs that the mixing element has been installed properly 4 Place the bowl in its mount Twist it clockwise until you feel resistance Put ingredients inside 5 While holding the ki...

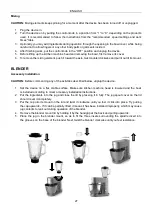
Page 27: ...out of its mount BLENDER Accessory installation CAUTION Before commencing any of the activities described below unplug the device 1 Set the device on a flat stable surface Make sure kitchen machine head is lowered and the bowl is installed according to mixer accessory installation instructions 2 Put the ingredients into the jug and close the lid by pressing it in fully The jug spout cover on the l...

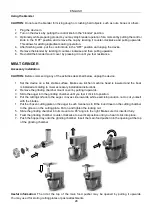
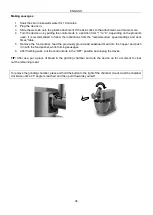
Page 28: ...ble surface Make sure kitchen machine head is lowered and the bowl is installed according to mixer accessory installation instructions 2 Remove the grinding chamber mount cover by pulling it upwards 3 Slide the auger into the grinding chamber until you feel it click into position 4 Put the cutting knife onto the auger convex side inwards while exercising caution not to cut yourself with the blades...

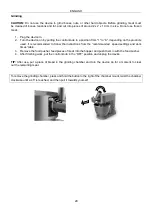
Page 29: ...ed to follow the instructions from the recommended speed settings and work times table 3 Remove the food pusher feed pieces of meat into the hopper and push them in with the food pusher 4 After finishing work put the control knob in the OFF position and unplug the device TIP After use put a piece of bread in the grinding chamber and turn the device on for a moment to clear out the remaining meat T...

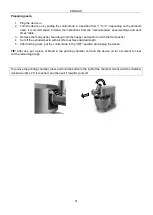
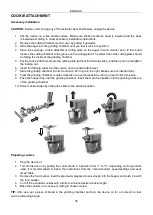
Page 30: ...ber until you feel it click into position 4 Put the chosen pasta attachment on the auger in such manner as to fit the round inset on the cutting chamber to the groove on the attachment Put on and tighten the locking nut 5 Slide the grinding chamber into its mount at a 45 angle to the right Make sure it is inserted fully 6 Twist the grinding chamber counter clockwise to a vertical position until yo...

Page 31: ...e hopper and push it in with the food pusher 4 Cut off the extruded pasta with a knife to achieve desired length 5 After finishing work put the control knob in the OFF position and unplug the device TIP After use put a piece of bread in the grinding chamber and turn the device on for a moment to clear out the remaining dough To remove the grinding chamber press and hold the button to the right of ...

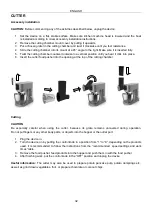
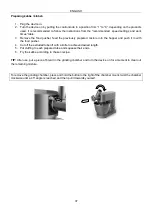
Page 32: ... the cutter food pusher into the opening at the top of the cutting chamber Cutting CAUTION Be especially careful when using the cutter because its grate remains uncovered during operation Do not put fingers or any other body parts or objects into the hopper or the outlet port 1 Plug the device in 2 Turn the device on by putting the control knob in a position from 1 to 8 depending on the products u...

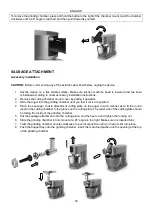
Page 33: ...e auger into the grinding chamber until you feel it click into position 4 Place the sausage cookie attachment cutting plate on the auger in such manner as to fit the round inset on the cutting chamber to the groove on the cutting plate The wider side of the cutting plate should be facing the inside of the grinding chamber 5 Put the sausage attachment onto the cutting plate and then put on and tigh...

Page 34: ...speed settings and work times table 5 Remove the food pusher feed the previously ground and seasoned meat into the hopper and push it in with the food pusher while forming sausages 6 After finishing work put the control knob in the OFF position and unplug the device TIP After use put a piece of bread in the grinding chamber and turn the device on for a moment to clear out the remaining meat To rem...

Page 35: ...ice on the cookie attachment 7 Slide the grinding chamber into its mount at a 45 angle to the right Make sure it is inserted fully 8 Twist the grinding chamber counter clockwise to a vertical position until you hear it click into place 9 Push the hopper tray onto the grinding chamber Insert the main food pusher into the opening at the top of the grinding chamber 10 Select cookie shape by sliding t...

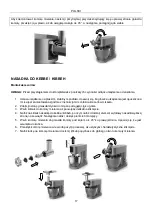
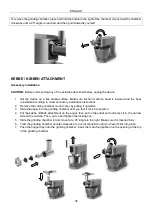
Page 36: ...tallation instructions 2 Remove the cutting chamber mount cover by pulling it upwards 3 Slide the auger into the grinding chamber until you feel it click into position 4 Put the kebbe kibbeh attachment on the auger then put on the outlet port and press it in the narrow side on the outside Then put on and tighten the locking nut 5 Slide the grinding chamber into its mount at a 45 angle to the right...

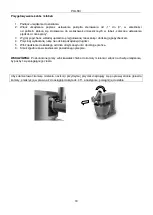
Page 37: ...the hopper and push it in with the food pusher 4 Cut off the extruded tube off with a knife to achieve desired length 5 Put stuffing in each prepared tube and squeeze their ends 6 Fry the kebbe according to chosen recipe TIP After use put a piece of bread in the grinding chamber and turn the device on for a moment to clear out the remaining mixture To remove the grinding chamber press and hold the...

Page 38: ...r cutting chamber falls out of their mount The accessories are improperly installed Remove the accessories and install them properly The blender cap leaks The cap has been improperly installed Stop device operation take the cap off and install it properly The unit is mixing grinding cutting poorly The power setting is too low Set the control knob in a higher position The meat was not cleaned off a...

Page 39: ...ctions and provided that it has not been modified repaired or interfered with by any unauthorized person or damaged by misuse or transportation The warranty does not apply to defects resulting from natural wear of components or nor breakables such as glass and ceramic items This warranty does not limit the customer s basic or any other rights granted by laws regarding appliance purchase In the eve...

Page 40: ...KM01S GALAXO Producent Yoer Bernardyńska 2 64 000 Kościan Polska www yoer pl ...

Reviews: