background image

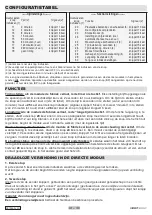
MODULE CONFIGURATION TABLE

(1) Short presses sequence on pushbutton.

(2) Confirmation with flashes or relay clicks at the end of short presses sequence.

(3) Toggles the ON/OFF function (between activation and deactivation)

(4) The time may be set in minutes (default) or in seconds.

In order to guarantee the correct operation of the Bus Radio and of wireless communication between the various modules in

the system, all wireless devices must be wired in the same way either with the button (BP) connected to neutral or with the

button (BP) connected to live.

Time configuration: Timing is off by default.

All configurations are saved in the case of blackout. The on

time can be configured from 2 seconds to 4 hours by means of short presses sequences (See table). 

25

short presses will set the time in seconds (from 2 seconds to 4 minutes): (reply: 5 flashes). 

26

short presses

will return to a timing in minutes (from 2 minutes to 4 hours) (reply: 6 flashes).

extended time: “extended time” is off by default. 29

short presses will activate the “extended time”

function. The light will be switched on for 12 hours when a connected pushbutton is pressed for longer than 3

seconds. Short press once to switch it off before the time has passed.  The module will resume normal

operation after switch-off (with the set time).

Warning: Warning is off by default. 24

short presses will activate the warning function. The light will flash

briefly one minute before the switch-on time expires (10 seconds if the time was programmed in seconds).

The pushbutton can be pressed again before the light goes out to extend the switch-on. 

Current state memory in case of blackout:

The current state of the relay may be saved in case of blackout

to restore the state when power is restored. 

28

short presses will do this. The contact will remain open if the

relay was at rest (open) before the blackout. Otherwise it will close.
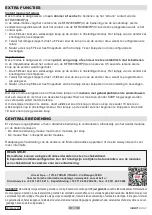
FUNCTIONS

DS1054-023D

P9

1. Step 1:

5 short presses of the push button to be connected to the transmitter.

The transmitter LED will start flashing for 30 seconds, indicating that the system is waiting for a connection.

2. Step 2

While the transmitter LED is blinking, use a pointed and properly insulated tool to press the receiver

"connect" hole shortly 

(placed on the front of the modular case).

The receiver relay will flash once and the transmitter LED will stop flashing if the connection was successful.

Warning: the receiver must be powered up.

To delete a connection:

repeat the procedure above.

DIRECT MODE RADIO CONNECTION

------ time configuration -------

Number of

Presses (1) Time (4)

Reply (2)

11

2 minutes

1 flash

12

4 minutes

2 flashes

13

8 minutes 

3 flashes

14

15 minutes 

4 flashes

15

30 minutes 

5 flashes

16

60 minutes (1 hour)

6 flashes

17

120 minutes (2 hours)

7 flashes

18

240 minutes (4 hours)

8 flashes

19

no timing

9 flashes

------ function configuration -------

Number of

Presses (1) Function

Reply (2)

20

Local control from switch (3)

10 flashes

21

Lock configurations 

1 flash

22

Flashing mode (3)

2 flashes

23

Unlock configurations (with automatic

lock after one hour)

3 flashes

24

Enable switch-off warning (3)

4 flashes

25

Set time in seconds (4)

5 flashes

26

Set time in minutes (4)

6 flashes

27

Timer/Relay Mode

7 flashes

28

Enable memory status in case of

blackout (3)

8 flashes

29

Enable extended time (3)

9 flashes

30

Full reset to default settings

2 flashes

Summary of Contents for MTR2000MRP

Page 1: ...confirmation par des flashs ou bruits du relais la fin des appuis 3 bascule la fonction OFF ou ON activation ou d sactivation 4 les dur es peuvent tre r gl es en minute ou seconde Afin d assurer le b...

Page 2: ...pt e aux portails garages ouvertures de porte par g che ou ventouse lectrique Avec le mode impulsionnel le contact du MTR2000MRP X fait une impulsion de 0 5 seconde lorsque la touche de l metteur est...

Page 3: ...lairage MTR2000eR P X MTR2000MRP X MTV500eR cette application est d j programm e d usine 1 Faire 10 impulsions rapides sur une touche de l metteur MENU R glages La led de l metteur se met alors cligno...

Page 4: ...bref du relai et la led de l metteur s arr te de clignoter 3 Cr er un point d entr e sur le r cepteur le plus proche en effectuant 7 impulsions sur la touche programm e de l metteur E la led de l mett...

Page 5: ...truzione dei trasmettitori Le caratteristiche speciali dell MTR2000MRP X Con il ricevitore MTR2000MRP X possibile utilizzare degli interruttori al posto di pulsanti facendo uso del trasmettitore E2BP...

Page 6: ...oria dello stato corrente in caso assenza rete E possibile in caso assenza tensione di rete memorizzare lo stato corrente del rel perch esso venga ripristinato al ritorno della tensione Per far ci far...

Page 7: ...E necessario aggiungere un trasmettitore E2BP collegato al pulsante della suoneria Per impostare la modalit lampeggiante esercitare 22 pressioni brevi Inoltre sul trasmettitore fare 10 pressioni rapi...

Page 8: ...lem of an insufficient range Refer to the transmitter instruction booklet for more information Special features of the MTR2000MRP X Switches may be used instead of pushbuttons with the MTR2000MRP X re...

Page 9: ...t goes out to extend the switch on Current state memory in case of blackout The current state of the relay may be saved in case of blackout to restore the state when power is restored 28 short presses...

Page 10: ...y signal An E2BP transmitter connected to the ringer pushbutton must be added Making 22 short presses will activate or deactivate flashing mode Additionally make 10 short presses on any pushbutton on...

Page 11: ...de los emisores Caracter sticas especiales del MTR2000MRP X Con el receptor MTR2000MRP X es posible utilizar interruptores en lugar de los pulsadores empleando el emisor E2BP Para la conexi n realizar...

Page 12: ...ria del estado actual en caso de ausencia de red En caso de ausencia de tensi n de red es posible memorizar el estado actual del rel para que se restablezca cuando vuelva la corriente Para ello realiz...

Page 13: ...E2BP conectado al pulsador del timbre Para configurar el modo intermitente realizar 22 pulsaciones breves Adem s en el emisor realizar 10 pulsaciones r pidas en un pulsador cualquiera Men Configuraci...

Page 14: ...der die besonderen eigenschaften des MTR2000MRP X Mit dem Empf nger MTR2000MRP X k nnen anstelle der Taster Schalter verwendet werden indem der Sender E2BP eingesetzt wird F r die Verbindung dann 5 sc...

Page 15: ...ausfall kann der aktuelle Status des Relais gespeichert werden um diesen bei der R ckkehr der Spannung wieder herzustellen Hierzu 28 Mal kurz dr cken Befindet sich das Relais vor dem Ausfall der Netzs...

Page 16: ...ssener E2BP Sender hinzugef gt werden Um den Blinkmodus einzugeben 22 Mal kurz dr cken Au erdem auf dem Sender 10 Mal schnell auf einen beliebigen Taster dr cken Konfigurationsmen Die Led des Senders...

Page 17: ...kenmerken van de MTR2000MRP X Met de ontvanger MTR2000MRP X kunnen schakelaars in de plaats van drukknoppen worden gebruikt met gebruik van de zender E2BP Voor de verbinding schakelt u 5 keer snel om...

Page 18: ...ls de stroom wordt onderbroken De status waarin het relais zich bevindt op het ogenblik waarop de stroom uitvalt kan opgeslagen worden en hersteld als de stroom terugkeert Druk hiervoor 28 keer snel d...

Page 19: ...oegd worden die verbonden wordt met de belknop Om de knippermodus in te stellen drukt u 22 keer snel de knop in Druk ook op de zender 10 keer een willekeurige knop in Instellingenmenu Het lampje op de...

Page 20: ...ion of conformity is available at the following internet address www yokis com eSPA OL deCLARACI N Ue de CONFORMIdAd SIMPLIFICAdA Por la presente Yokis S a s declara que los tipos de equipos radioel c...

Reviews: