background image

14-2

IM 05P04D41-01EN

14.2 

Registering and Initializing User Default Values

14.2.1 

Registering as User Setting (Default) Values

Description

The user default values can be registered as parameter default values.
Use the LL50A Parameter Setting Software to register user setting (default) values.

 CAUTION

Before registering the user default value, make sure that the user setting value is set to 
the parameter.

14.2.2 

Initializing to User Setting (Default) Values

Description

Parameter settings can be initialized to the user setting (default) values.
Use the LL50A Parameter Setting Software to execute it.

Setting Details

Parameter 

symbol

Name

Display 

level

Setting range

Menu symbol

U.DEF

Initialization to user 

default value

PRO

12345: Initialization, 

automatically returned to "0" 

after initialization.

INIT 

Summary of Contents for UT35A-L

Page 1: ...User s Manual UT35A L Digital Indicating Controller Limit Control Type User s Manual IM 05P04D41 01EN IM 05P04D41 01EN 2nd Edition...

Page 2: ...hasing YOKOGAWA products YOKOGAWA provides registered users with a variety of information and services Please allow us to serve you best by completing the product registration form accessible from our...

Page 3: ......

Page 4: ...w to install and uninstall the LL50A LL50A Parameter Setting Software User s Manual IM 05P05A01 02EN This manual describes how to use the LL50A ladder sequence function peer to peer communication and...

Page 5: ...class A product In a domestic environment this product may cause radio interference in which case the user needs to take adequate measures The instrument is a product rated Measurement Category O othe...

Page 6: ...sure to use the spare parts approved by YOKOGAWA when replacing parts or consumables This product is not designed or manufactured to be used in critical applications that directly affect or threaten...

Page 7: ...tten consent from YOKOGAWA Handling Precautions for the Main Unit The instrument comprises many plastic components To clean it wipe it with a soft dry cloth Do not use organic solvents such as benzene...

Page 8: ...mmunication with serial gateway function Display language 1 English Case color 0 White Light gray 1 Black Light charcoal gray Fixed code 00 Always 00 DC Power supply 24 V AC DC Accessories The product...

Page 9: ...separately LL50A Parameter Setting Software Model Suffix code Description LL50A 00 Parameter Setting Software Terminal cover Model UTAP001 Brackets Part number L4502TP 2 pieces for fixing the upper a...

Page 10: ...autions that should be taken to prevent such occurrences CAUTION Calls attention to actions or conditions that could cause injury to the user or damage to the instrument or property and indicates prec...

Page 11: ...block diagrams 9 Auxiliary Control Functions Describes auxiliary control functions 10 Retransmission Output Functions Describes output functions 11 Alarm Functions Describes alarm output and status ou...

Page 12: ...es and Functions of Keys 3 2 3 3 List of Display Symbols 3 4 3 4 Brief Description of Setting Details Parameters 3 6 Chapter 4 Basic Operation 4 1 Overview of Display Switch and Operation Keys 4 1 4 2...

Page 13: ...1 4 Selecting the Initial Operation Display that Appears at Power ON 13 5 13 1 5 Setting Message Function 13 6 13 1 6 Changing Guide Scroll Speed 13 7 13 1 7 Turning Guide Display ON OFF 13 7 13 1 8 S...

Page 14: ...hapter 17 Installation and Wiring 17 1 Installation Location 17 1 17 2 Mounting Method 17 3 17 3 External Dimensions and Panel Cutout Dimensions 17 4 17 4 Wiring 17 5 17 4 1 Important Information on W...

Page 15: ...Blank Page...

Page 16: ...ld I do to perform operate immediately First I want to set the input and output A Use the Quick setting function to perform the setup easily Quick setting function Chapter 5 Check the contents Install...

Page 17: ...t Retransmission output outputs a PV input value PV target setpoint SP and the like as an analog signal to for example the recorder Chapter 10 Retransmission Output Functions Current External device s...

Page 18: ...ut Relay Operation RST key or external contact input B C A D B Confirmation not accepted lit lit lit lit on on off off off off off off off In Case of Low Limit Control When PV exceeds a setpoint SP EX...

Page 19: ...CLOSE and OUT lamp turns off if the PV doesn t exceed SP point B lit lit lit on on off off off off off off SP PV Confirmation accepted Hysteresis EXCEEDED Lamp OUT Lamp Output Relay Operation RST key...

Page 20: ...Setting Active Color PV Display Function Normal Abnormal Guide Display The guide is displayed on PV display when setting parameters This guide can be turned on off with the Fn key The scrolling guide...

Page 21: ...r devices Up to 31 connected slaves with a maximum length of 1200m Model ML2 of YOKOGAWA is recommended RS 485 RS 232C converter PC Ethernet Communication Modbus TCP The UT35A L can be connected to IE...

Page 22: ...rt is used to connect with the dedicated cable when using LL50A Parameter Setting Software sold separately The parameters can be set without supplying power to the UT35A L Dedicated cable LL50A Parame...

Page 23: ...span This means that engineering units are required to be set Set a temperature for temperature input The following describes a conversion example When the PV input range is 100 to 600 C 0 of the PV...

Page 24: ...essary Set the other parameters as necessary Input setup Installation and Wiring Power ON Limit control type setup Limit control type setup Input output setup Use Quick setting function Chapter 2 UT35...

Page 25: ...Blank Page...

Page 26: ...parameter symbol 4 Data display orange Displays a parameter setpoint and menu symbol 5 EXCEED indicator red Light to indicate the exceeded status of PV Lights while PV exceeds SP 6 OUT indicator orang...

Page 27: ...in the Menu Display to move to the Parameter Setting Display of the Menu Press the key in the Parameter Setting Display to transfer to the parameter setting mode setpoint is blinking and the paramete...

Page 28: ...supplying power to the UT35A L Maintenance port UT35A L Upper surface CAUTION When using the maintenance port do not supply power to the controller Otherwise the controller does not work normally If p...

Page 29: ...ic of guide and symbols which are displayed on the UT35A L Figure common to all display area 0 1 2 3 4 5 6 7 8 9 PV display 14 segments Alphabet A B C D E F G H I J K L M N O P Q R S T U V W X Y Z Sym...

Page 30: ...3 5 IM 05P04D41 01EN Part Names 3 Group display 7 segments Alphabet A B C D E F G H I J K L M N O P Q R S T U V W X Y Z None PV display 14 segments Symbol Space 3 3 List of Display Symbols...

Page 31: ...r setting range 5 Menu symbol Indicates the menu to which the parameter belongs Operation parameter Setup parameter Parameter Display Level Display level Description EASY Easy setting mode The minimum...

Page 32: ...arameter Setting Display The Menu Display and Parameter Setting Display are changed in a circular pattern The Menu Display and Parameter Setting Display are changed in a circular pattern Same as 1 Ope...

Page 33: ...Setup Parameter SET M is displayed Menu symbol is displayed The scrolling guide for the menu is displayed Parameter Setting Display The following is the Display for displaying and setting a parameter...

Page 34: ...scrolling guide of END is displayed Basic Key Operation Sequence To move to the Setup Parameter Setting Display Hold down the PARAMETER or PARA key and the Left arrow key simultaneously for 3 seconds...

Page 35: ...arm setpoint A1 Operation 1 Hold down the PARAMETER key for 3 seconds in the Operation Display to call up the SP Menu Display 2 Press the SET ENTER key to display the SP Parameter Setting Display 3 Pr...

Page 36: ...Right arrow keys to move between digits 6 Press the SET ENTER key to register the setpoint the setpoint stops blinking 7 Press the PARAMETER key once to return to the Menu Display Press the DISPLAY ke...

Page 37: ...own arrow key when 0 is displayed to move one digit to the right Press the SET ENTER key to register the setpoint Display the Parameter Setting Display Press the SET ENTER key to move to the setting m...

Page 38: ...t arrow key to move one digit to the right Press the SET ENTER key to register the setpoint Display the Parameter Setting Display Press the SET ENTER key to move to the setting mode the setpoint blink...

Page 39: ...Blank Page...

Page 40: ...ction to easily set the basic function of the controller The Quick setting function starts when the power is turned on after wiring The following lists the items to set using the Quick setting functio...

Page 41: ...er ON The parameter HI LO limit control type is displayed first Finally EXIT is displayed Select YES and press the SET ENTER key to complete the setup of basic functions The Operation Display is displ...

Page 42: ...owing parameters Set QSM YES to enter the quick setting mode 1 Set HI LO HIGH 2 Set IN K1 3 Set UNIT F 4 Set RH 500 0 5 Set RL 0 0 Set EXIT YES to quit the quick setting mode The Operation Display is...

Page 43: ...0 F JPT2 150 0 to 150 0 C 200 0 to 300 0 F PT1 200 0 to 850 0 C 300 0 to 1560 0 F PT2 200 0 to 500 0 C 300 0 to 1000 0 F PT3 150 00 to 150 00 C 200 0 to 300 0 F 0 4 2V 0 400 to 2 000 V 1 5V 1 000 to 5...

Page 44: ...el Setting range Menu symbol SDP PV input scale decimal point position EASY 0 No decimal place 1 One decimal place 2 Two decimal places 3 Three decimal places 4 Four decimal places PV SH Maximum value...

Page 45: ...the Quick setting function Set the parameter QSM Quick setting mode to ON and turn on the power again Set the parameter IN PV input type to OFF and turn on the power again CAUTION The parameters rela...

Page 46: ...isplay Transitions PV Display SP can be changed When setup parameter HOME is set to PV When setup parameter HOME is set to SP PV Display SP can be changed SP Display SP can be changed SP Display SP ca...

Page 47: ...y to move between digits the setpoint blinks 3 Use the UP or Down arrow key to change the value the setpoint blinks 4 Press the SET ENTER key to register the setpoint the setpoint stops blinking Only...

Page 48: ...n the memory and display in the HIGH or LOW display in the confirmation display When the control type is specified as high limit control the maximum value is displayed in the HIGH display and control...

Page 49: ...played to move one digit to the right Press the SET ENTER key to register the setpoint Control with the new setpoint Bring the SP Display into view Press the SET ENTER key to move to the setting mode...

Page 50: ...The group number is displayed on Group display Setting Details Parameter symbol Name Display level Setting range Menu symbol A1 to A3 Alarm 1 to 3 setpoint EASY Set a display value of setpoint of PV a...

Page 51: ...rmed Releasing the alarm latch function releases all of the latched alarm outputs By factory default the function is not assigned to the user function key and contact input Assign and use the function...

Page 52: ...type 270 0 C 1370 0 C RL 0 0 C RH 800 0 C Maximum value of PV input range Set a range to be controlled PV input range Example of Voltage and Current Inputs The figure below is an example of setting 2...

Page 53: ...0 C 200 0 to 300 0 F PT1 200 0 to 850 0 C 300 0 to 1560 0 F PT2 200 0 to 500 0 C 300 0 to 1000 0 F PT3 150 00 to 150 00 C 200 0 to 300 0 F 0 4 2V 0 400 to 2 000 V 1 5V 1 000 to 5 000 V 4 20 4 00 to 2...

Page 54: ...elsius No unit No unit No unit F Degree Fahrenheit MPV P DP Control PV input decimal point position 0 No decimal place 1 One decimal place 2 Two decimal places 3 Three decimal places 4 Four decimal pl...

Page 55: ...an be turned off External Reference Junction Compensation ERJC For TC input a temperature compensation value for external device can be set The external RJC can be used only when RJC OFF Furnace Furna...

Page 56: ...display digits to fluctuate so that the displayed value is difficult to read a digital filter can be inserted to smooth operation This filter provides a first order lag calculation which can remove m...

Page 57: ...s EASY 100 0 to 100 0 of PV input range span EUS PVS FL PV input filter EASY OFF 1 to 120 s Parameter symbol Name Display level Setting range Menu symbol A BS PV analog input bias STD 100 0 to 100 0 o...

Page 58: ...lter Equipped as standard Equipped as standard Relay Current RET retransmission output Alarm Limit Control computation Contact inputs PV PV input Equipped as standard Equipped as standard Alarm 1 PV h...

Page 59: ...Blank Page...

Page 60: ...They works to the SP of all SP groups 0 0 100 0 Setting range SPH Actual SP SPL Setting range of actual SP Original setting range 0 0 100 0 High limit of SP Low limit of SP Setting Details Parameter s...

Page 61: ...on can be set by a setup parameter restart mode R MD For details see Chapter 15 Power Failure Recovery Processing Setting Details Parameter symbol Name Display level Setting range Menu symbol R MD Res...

Page 62: ...C Retransmission scale PV scale Output range Minimum value of PV input range Maximum value of PV input range To Recorder Setting Details Parameter symbol Name Display level Setting range Menu symbol R...

Page 63: ...selected from among 4 to 20 0 to 20 20 to 4 or 20 to 0 mA Setting Details Parameter symbol Name Display level Setting range Menu symbol RET A RET current output range STD 4 20 4 to 20 mA 0 20 0 to 20...

Page 64: ...ttings Alarm on off delay timer 3 number of settings Alarm setpoint 3 number of settings Alarm hysteresis 11 2 Setting Hysteresis to Alarm Operation Alarm delay timer 11 3 Delaying Alarm Output Alarm...

Page 65: ...ON OFF ON Contact type in the figure above Energized when an event occurs factory default Alarm hysteresis Alarm hysteresis OFF Time PV high limit alarm setpoint PV low limit alarm setpoint PV high l...

Page 66: ...he deviation low limit alarm setpoint the deviation setpoint will be higher than the SP Deviation high limit alarm setpoint positive setpoint Deviation High and Low Limits Alarm PV Alarm hysteresis Al...

Page 67: ...on does not work the alarm hysteresis the stand by action and the alarm delay timer functions Fault diagnosis Alarm The function outputs an alarm signal in the following cases The corresponding event...

Page 68: ...is effective in the following cases where The power is turned on SP is changed The alarm type is changed Forced stand by via communication The following shows the behavior of an alarm with the stand b...

Page 69: ...ition is removed Alarm output OFF Latch 4 Cancels the alarm output when an order to release the alarm latch is received Alarm output OFF However cancels the alarm output for the duration of the sampli...

Page 70: ...nlit Unlit ON ON OFF OFF ON ON ON OFF OFF Time PV high limit alarm setpoint PV low limit alarm setpoint PV high limit alarm state PV low limit alarm state PV high limit alarm output of latch 1 action...

Page 71: ...ergized de energized Latch Name Latch action Note 1 Energized 0 de energized 1 Stand by action Without 0 with 1 Alarm type Disable Note 2 Note 2 Note 2 00 PV high limit 0 1 2 3 4 0 1 0 1 01 PV low lim...

Page 72: ...When Setting Hysteresis of 5 C and 15 C for PV High Limit Alarm Closed ON Open Time Alarm 1 setpoint 100 C example Closed ON Open Time Alarm 1 setpoint 100 C example HYS 15 C example HYS 5 C example...

Page 73: ...vent occurs factory default Alarm hysteresis Unlit OFF Time PV high limit alarm setpoint PV high limit alarm state without delay timer PV high limit alarm output Elapsed time On delay timer time ON Th...

Page 74: ...LCD LCD backlight ON OFF can be switched using contact input Switch by the rising edge and the falling edge Contact status Operation Remark OFF ON Turns off the LCD backlight ON OFF Turns on the LCD...

Page 75: ...nput signal changes the status to the specified operation The minimum detection time is 250 ms Falling edge Detection time 250 ms Falling edge ON OFF OFF Receiving an ON to OFF contact input signal ch...

Page 76: ...e alarm 1 setpoint The red to white switching action can be set C Time PV color red PV color white PV color white Alarm 1 setpoint A1 80 C PV 75 C Alarm 1 hysteresis Change by Deviation The PV display...

Page 77: ...70 C Parameter PCL PV color change low limit 20 C C PV color red PV color red PV color white PV color white Use in Fixed Color PV display color can be fixed in red It can also be fixed in white PV col...

Page 78: ...V limit Within range white Out of range red 7 PV limit Within range red Out of range white 8 SP deviation Within deviation white Out of deviation red 9 SP deviation Within deviation red Out of deviati...

Page 79: ...This parameter does not function for the PV without decimal point Least significant digit is displayed Least significant digit is not displayed The following shows the example of with and without leas...

Page 80: ...ut The LCD backlight ON OFF switch can be assigned to the contact input Contact input 12 1 Setting Contact Input Function In the following cases the LCD backlight does not go off When an alarm occurs...

Page 81: ...lphanumeric characters A maximum of four messages can be registered If a number of messages occur simultaneously the priority is as follows high MG1 MG2 MG3 MG4 low Message registration LL50A Paramete...

Page 82: ...off by the Fn key in the Menu Display and Parameter Setting Display Setting Details Parameter symbol Name Display level Setting range Menu symbol GUID Guide display ON OFF STD OFF Nondisplay ON Displ...

Page 83: ...tness adjustment of PV display PRO Adjusts the white brightness of PV display Dark 4 to 4 Bright B PVR Red brightness adjustment of PV display PRO Adjusts the red brightness of PV display Dark 4 to 4...

Page 84: ...djust LCD brightness The current brightness gradually increases every time the function key is pressed Pressing the function key after reaching the maximum brightness changes to the minimum brightness...

Page 85: ...fied CTL PV MPV OUT R485 ETHR KEY DISP KLOC MLOC DI SL I O SYS INIT VER and LVL Always remember your password when using the password function Setting Details Parameter symbol Name Display level Setti...

Page 86: ...enu lock PRO OFF Display ON Nondisplay MLOC PV PV menu lock PRO MPV MPV menu lock PRO OUT OUT menu lock PRO R485 R485 menu lock PRO ETHR ETHR menu lock PRO KEY KEY menu lock PRO DISP DISP menu lock PR...

Page 87: ...lock ON Lock KLOCK 13 3 5 Prohibiting Writing via Communication Description Writing data to each register via all communication methods can be permitted or prohibited However writing data via light lo...

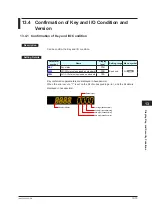
Page 88: ...Display level Setting range Menu symbol KEY Key status PRO Read only I O X000 DI1 DI2 status equipped as standard PRO Y000 AL1 AL3 status equipped as standard PRO Key confirmation parameters are displ...

Page 89: ...N 3rd digit 8 F1 key 0 OFF 1 ON 9 RST key 0 OFF 1 ON 10 Fn key 0 OFF 1 ON 11 4th digit 12 13 14 15 Parameter X000 Displayed digit bit Description 1st digit 0 DI1 status 0 OFF 1 ON 1 DI2 status 0 OFF 1...

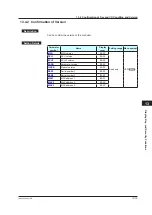
Page 90: ...r symbol Name Display level Setting range Menu symbol MCU MCU version EASY Read only VER DCU DCU version EASY ECU3 ECU 3 version EASY PARA Parameter version EASY H VER Product version EASY SER1 Serial...

Page 91: ...Blank Page...

Page 92: ...ameter Setting Software to execute it Note The user setting values defaults are not initialized even if the parameter setting values are initialized to the factory default values Setting Details Param...

Page 93: ...Before registering the user default value make sure that the user setting value is set to the parameter 14 2 2 Initializing to User Setting Default Values Description Parameter settings can be initia...

Page 94: ...lure of 1 ms A power failure is not detected Normal operation continues The following shows effects caused in settings and operation status Alarm action Does not continue Alarm with stand by function...

Page 95: ...atic detection or manually However when the DC option is specified only manual setting is available Set the range to the commercial frequency of the installation location Setting Details Parameter sym...

Page 96: ...O signal failure Yes No Check the I O specifications of the controller Check the supply voltage Check the specifications and polarity of connected devices Check the communication related parameters C...

Page 97: ...gain PAR 0010 for setup parameter error only Setup parameter error Setup parameter data is corrupted Initialized to factory default value PAR 0020 for operation parameter error only Operation paramete...

Page 98: ...rmal operation Setup parameter PV1 E PV input burnout error Burnout of analog input connected to PV Check wiring and sensor of connected analog input terminal Error indication is erased in normal oper...

Page 99: ...it Description 1st digit 0 System data error 1 Calibration value error 2 User parameter default value error 3 2nd digit 4 Setup parameter error 5 Operation parameter error 6 7 3rd digit 8 Faulty FRAM...

Page 100: ...t hexadecimal Symbol display Parameter PA ER Displayed digit bit Description 1st digit 0 System data error 1 Calibration value error 2 User parameter default value error 3 2nd digit 4 Setup parameter...

Page 101: ...digit 4 5 RJC error of PV input 6 7 3rd digit 8 PV input burnout error 9 10 11 4th digit 12 13 14 15 Parameter PV1 E Displayed digit bit Description 1st digit 0 PV input burnout error 1 2 3 2nd digit...

Page 102: ...normal in several minutes Do not use alcohol benzene or any other solvents 16 2 2 Packaging when Shipping the Product for Repair Should the instrument break down and need to be shipped to our sales re...

Page 103: ...16 8 IM 05P04D41 01EN 16 3 Periodic Maintenance Check the operating condition periodically to use this instrument with good condition...

Page 104: ...1EN Troubleshooting Maintenance and Inspections 16 16 4 Disposal When disposing of this instrument arrange for appropriate disposal as industrial waste according to the rules of a country the area or...

Page 105: ...Blank Page...

Page 106: ...llow If mounting other instruments adjacent to the instrument comply with these panel cutout dimensions to provide sufficient clearance between the instruments Locations with little mechanical vibrati...

Page 107: ...ace magnets or tools that generate magnetism near the instrument If the instrument is used in locations close to a strong electromagnetic field generating source the magnetic field may cause measureme...

Page 108: ...n the top and bottom of the controller as shown in the figure below then tighten the screws of the brackets Take care not to overtighten them Bracket top mounting hardware Terminal board Bracket botto...

Page 109: ...2 0 8 0 92 0 8 0 92 0 03 0 3 62 0 03 0 3 62 0 03 0 3 62 0 03 0 N 1 3 78 3 62 65 2 56 20 0 79 11 0 43 UT35A L 94 6 3 72 91 6 3 61 105 2 4 14 96 3 78 96 3 78 Bracket Bracket Terminal cover 1 to 10 mm 0...

Page 110: ...ence 3 For the wiring cable the temperature rating is 75 C or more E3 terminal area UT35A L Terminal Block Diagram 101 102 103 104 105 106 107 108 109 110 111 112 407 401 408 409 410 411 412 201 202 2...

Page 111: ...9 to 2 0 mm2 Thermocouple Shielded compensating lead wire JISC1610 RTD Shielded wire three four conductors UL2482 Hitachi Cable Other signals other than contact input output Shielded wires Other signa...

Page 112: ...ee wires 4 If there is a risk of external lightning surges use a lightning arrester etc UT35A L TC Input RTD Input 3 wire system 203 202 TC Compensating lead wire Class D grounding grounding resistanc...

Page 113: ...rawing below This product Functional insulation A safety voltage circuit A safety voltage circuit This product Reinforced insulation Reinforced insulation Functional insulation A hazardous voltage cir...

Page 114: ...mA 3 When using a transistor contact the voltage at both terminals must be 2 V or less when the contact is ON and the leakage current must be 100 A or less when it is OFF 4 If there is a risk of exter...

Page 115: ...ctional insulation A safety voltage circuit A safety voltage circuit This product Reinforced insulation Reinforced insulation Functional insulation A hazardous voltage circuit A hazardous voltage circ...

Page 116: ...nd Wiring 17 17 4 6 Retransmission Output Wiring The current output range can be changed 208 207 Class D grounding grounding resistance of 100 or less RET terminals Shield Receiver Recorder etc Receiv...

Page 117: ...istance of 100 or less PC External Terminating resistor 220 1 4 W External Terminating resistor 220 1 4 W External Terminating resistor 220 1 4 W 2 wire Wiring of 4 wire Terminal SG ML2 UT B A SDB SDA...

Page 118: ...via Ethernet Devices that can be connected via Ethernet UT35A L Upper side LED baud rate Lower side LED link activity Color Amber Color Green Lit 100M bps Lit Linked Unlit 10M bps Blink Active Unlit...

Page 119: ...s Communication cable Class D grounding grounding resistance of 100 or less Slave terminals Terminal symbol above UT35A L For Standard model Suffix code Type 3 1 For Detailed model Optional suffix cod...

Page 120: ...istance of more than 1 cm from other signal wires 5 The power cable is required to meet the IEC standards concerned or the requirements of the area in which the instrument is being installed 6 Wiring...

Page 121: ...Method 2 The following figure is a mounting image 1 Attach the terminal cover to the rear panel of the main unit horizontally When Ethernet communication is specified cut and use a terminal cover as f...

Page 122: ...ng mode Displays the minimum parameters Corresponding parameters are displayed in all modes S STD Standard setting mode Displays a wider range of parameters than displayed in the Easy setting mode Cor...

Page 123: ...enu symbol Functions CTL Limit control type the way of confirming operation PV PV input type range scale etc MPV Input range SP limiters OUT Retransmission output R485 E3 RS 485 communication E3 termi...

Page 124: ...MU END AL1 AL2 AL3 VT1 VT2 VT3 HY1 HY2 HY3 DYN1 DYN2 DYN3 DYF1 DYF2 DYF3 END SP BS FL HYS END PVS SPS ALRM END END P P P S S S Operation display Setting parameters for the functions necessary for oper...

Page 125: ...END PA ER OP ER AD1 E PV1 E MCU DCU ECU3 E3 PARA H VER SER1 SER2 MAC1 E3 MAC2 E3 MAC3 E3 END U DEF F DEF END E3 E3 PV CTL PASS ETHR R485 OUT VER INIT LEVL LVL END P P P P P P S S S S S S S S P UNI P D...

Page 126: ...OC DI SL I O SYS INIT VER LVL SP SPS ALRM PVS END COM W DATA END PCMD PCH PCL SPD GUID HOME ECO BRI B PVW B PVR B SP B BAR B STS D CYC OP JP MLSD END R MD C GRN FREQ QSM PASS SMEC END KEY X000 Y000 EN...

Page 127: ...e EU Setting range SPL to SPH SPH A1 to A3 Alarm 1 to 3 setpoint EASY Set a display value of setpoint of PV alarm deviation alarm or velocity alarm 19999 to 30000 Set a value within the input range De...

Page 128: ...it 02 Without Stand by action 0 Energized 0 Latch action 0 VT1 to VT3 PV velocity alarm time setpoint 1 to 3 EASY 0 01 to 99 59 minute second 1 00 HY1 to HY3 Alarm 1 to 3 hysteresis EASY Set a display...

Page 129: ...etting Menu Menu CTL Parameter symbol Name Display level Setting range Initial value HI LO Limit control type EASY LOW Low limit control HIGH High limit control HIGH CNF The way of confirming operatio...

Page 130: ...JPT2 150 00 to 150 00 C 200 0 to 300 0 F PT1 200 0 to 850 0 C 300 0 to 1560 0 F PT2 200 0 to 500 0 C 300 0 to 1000 0 F PT3 150 00 to 150 00 C 200 0 to 300 0 F 0 4 2V 0 400 to 2 000 V 1 5V 1 000 to 5 0...

Page 131: ...0 C or 14 0 to 140 0 F 0 0 A BS PV analog input bias STD 100 0 to 100 0 of PV input range span EUS 0 0 of PV input range span A FL PV analog input filter STD OFF 1 to 120 s OFF Input Range SP Limiter...

Page 132: ...T STD When RTS PV1 SP1 RTL 1 digit to 30000 19999 to RTH 1 digit Decimal point position When RTS PV1 or SP1 decimal point position is same as that of PV input When RTS PV decimal point position is sam...

Page 133: ...BRTU Modbus RTU MBRTU BPS Baud rate EASY 600 600 bps 1200 1200 bps 2400 2400 bps 4800 4800 bps 9600 9600 bps 19200 19 2k bps 38400 38 4k bps 19200 PRI Parity EASY NONE None EVEN Even ODD Odd EVEN STP...

Page 134: ...left DG1 to DG4 Default gateway 1 to 4 EASY 0 to 255 Initial value 0 0 0 0 See left PRT Port number EASY 502 1024 to 65535 502 IPAR IP access restriction EASY OFF Disable ON Enable OFF 1 IP1 to 1 IP4...

Page 135: ...arm 1 Alarm OFF red Alarm ON white 4 Link to alarm 1 or 2 Alarm OFF white Alarm ON red 5 Link to alarm 1 or 2 Alarm OFF red Alarm ON white 6 PV limit Within range white Out of range red 7 PV limit Wit...

Page 136: ...adjustment of Setpoint display PRO Adjusts the brightness of SP display Dark 4 to 4 Bright 0 B BAR Brightness adjustment of Bar graph display PRO Adjusts the brightness of EXCEED lamp and OUT lamp Dar...

Page 137: ...RO KEY KEY menu lock PRO DISP DISP menu lock PRO KLOC KLOC menu lock PRO DI SL DI SL menu lock PRO I O I O menu lock PRO SYS SYS menu lock PRO INIT INIT menu lock PRO VER VER menu lock PRO LVL LVL men...

Page 138: ...tus equipped as standard PRO Y000 AL1 AL3 status equipped as standard PRO System Setting Menu Menu SYS Parameter symbol Name Display level Setting range Initial value R MD Restart mode STD 0 Limit out...

Page 139: ...D converter error status 1 EASY PV1 E PV input error status EASY MCU MCU version EASY See 13 4 2 Confirmation of Version DCU DCU version EASY ECU3 ECU 3 version EASY PARA Parameter version EASY H VER...

Page 140: ...ters can be displayed in an easy to read manner The guide display shows parameter names Easy to operate Navigation keys SET ENTER and Up Down Left Right arrow keys are employed to facilitate making se...

Page 141: ...nts 3 Contact I O Function This function allows for allocating the input error condition operation condition alarm condition or other conditions to the contact input and contact output Contact input L...

Page 142: ...0 1 of instrument range 1 digit 1 000 to 5 000 V 4 00 to 20 00 mA DC voltage 0 000 to 2 000 V 0 00 to 10 00 V 10 00 to 20 00 mV DC current 0 00 to 20 00 mA The accuracy is that in the standard operati...

Page 143: ...output 0 02 of F S C or less Effect of power supply fluctuation For analog input 0 05 of F S instrument range or less For analog output 0 05 of F S or less Each within rated voltage range Retransmissi...

Page 144: ...A resistance load Alarm 3 output PV high limit Alarm 2 output PV low limit Alarm 1 output PV high limit Common Common Common UT 104 105 106 107 108 109 100 240 V AC power supply N L Allowable range 1...

Page 145: ...0 height Mounting position Up to 30 degrees above the horizontal No downward titling allowed Wiring M3 screw terminal with square washer signal wiring and power n Model and Suffix Code Model Suffix c...

Page 146: ...onal suffix code INPUT OUT DI DO PV RET DI1 DI2 AL1 AL2 AL3 OUT UT35A x x x xx 00 x Type 1 Basic control L Type 2 Functions 0 Type 3 Open networks x Display language Case color xx Fixed code 00 Option...

Page 147: ...Blank Page...

Page 148: ...D41 01EN July 2011 1st Edition Newly published Aug 2015 2nd Edition Safety standard IEC EN 61010 2 201 conformity Safety and EMC standard 3rd edition confomity and error correction n Written by Yokoga...

Page 149: ...Blank Page...

Page 150: ...r 129090 Moscow RUSSIA Phone 7 495 737 7868 Fax 7 495 737 7869 YOKOGAWA CHINA CO LTD 3F Tower D Cartelo Crocodile Building No 568 West Tianshan Road Shanghai 200335 CHINA Phone 86 21 62396262 Fax 86 2...

Reviews: