background image


<1.  OVERVIEW>

1-4

IM 12E04A02-02E

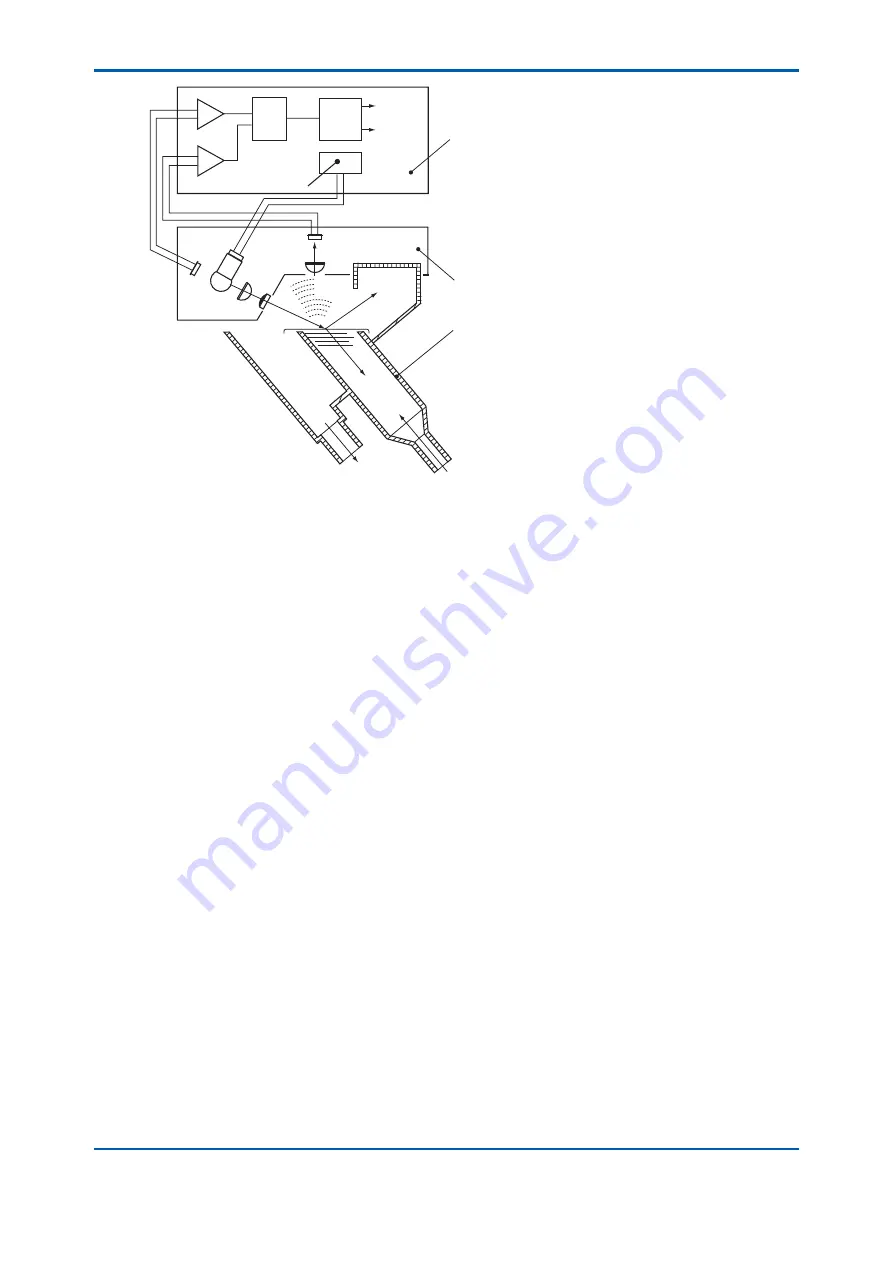
F0102.ai

Reflected
light

Detector

Measuring cell

Transmitted

light

Drain

Measuring water

Reference

element

Turbidity

element

Scattered
light

Lenses

Lamp

Lens

Display

Amplifier

Amplifier

AD

CPU

Analog

output

Lamp

power

supply

Converter

Figure 1.2  Operating Principle

3rd Edition : May. 31, 2010-00

Summary of Contents for Vigilant Plant EXA TB Series

Page 1: ...User s Manual Model TB400G Scattered light Turbidimeter Style S3 IM 12E04A02 02E IM 12E04A02 02E 3rd Edition ...

Page 2: ...May 2010 3rd Edition Style of TB400G has been changed to S3 P2 5 Style code of TB400G MS code changed to S3 P4 2 Some change of step 1 on Sec 4 1 4 P4 3 Some change of step 3 on Sec 4 1 8 P6 4 Some error correction of item 7 B C and F on Table 6 4 P6 15 Some error correction of step 1 on item 7 P6 16 Some error correction of step 2 on item 9 P6 25 to 6 26 Some footnote addition on end of item 11 t...

Page 3: ...d physical injury and electric shock or death of the operator WARNING Identifies instructions that must be observed in order to prevent the software or hardware from being damaged or the system from becoming faulty NOTE Identifies information required to understand operations or functions Notes on Handling User s Manuals Please hand over the user s manuals to your end users so that they can keep t...

Page 4: ...1 4 TB400G A3 with automatic cleaning and zero calibration 1 3 1 2 Operating Principle 1 3 2 SPECIFICATIONS 2 1 2 1 Standard Specifications 2 1 2 2 Characteristics 2 4 2 3 Model and Suffix Codes 2 5 2 4 Accessories 2 5 2 5 External Dimensions 2 6 2 5 1 TB400G NN 2 6 2 5 2 TB400G A1 2 7 2 5 3 TB400G A2 2 8 2 5 4 TB400G A3 2 9 2 5 5 TB400G A1 PHU 2 10 2 5 6 TB400G A2 PHU 2 11 2 5 7 TB400G A3 PHU 2 1...

Page 5: ...act Output Range Output Wiring 3 7 3 3 5 Contact Output Wiring 3 8 3 3 6 With Arrester ARS 3 9 4 OPERATION 4 1 4 1 Preparation for Operation 4 1 4 1 1 Checking Piping and Wiring Conditions 4 1 4 1 2 Supplying Power 4 1 4 1 3 Supplying Zero Water 4 1 4 1 4 Adjustment for Leveling Detector 4 2 4 1 5 Supplying Cleaning Water 4 2 4 1 6 Setting Output Range 4 3 4 1 7 Running in 4 3 4 1 8 Zero and Span ...

Page 6: ...peration in Meas Mode 6 8 6 5 Operation in MAINT Mode 6 9 6 6 Operation in PROGRAM1 Mode 6 18 6 7 Operation in PROGRAM2 Mode 6 32 6 8 Valve Operation 6 34 7 MAINTENANCE 7 1 7 1 Inspection and Maintenance Intervals 7 1 7 2 Washing with Cleaning Water 7 1 7 3 Cleaning of Measuring Cell 7 2 7 4 Cleaning of Head Tank 7 3 7 5 Lamp Replacement 7 3 7 6 Zero Calibration 7 5 7 6 1 Zero Calibration with Zer...

Page 7: ...5 2 Span Standards 7 14 7 16 Replacement of Silicone Tube 7 15 8 TROUBLESHOOTING 8 1 8 1 Events in Which FAIL Lamp Is Lit 8 1 8 2 Events in Which FAIL Lamp Is Not Lit 8 5 9 SPARE PARTS 9 1 Customer Maintenance Parts List Style S3 CMPL 12E04A02 03E Revision Information i 3rd Edition May 31 2010 00 ...

Page 8: ...ed light This instrument has the following features High performance high reliability Self diagnostic functions such as detection of a disconnected lamp automatic converter checking functions and upper and lower limit alarms Choice of functionality such as automatic cleaning range free function automatic zero calibration etc Easy maintenance through small light weight and accessible design No wind...

Page 9: ...mple zero calibration water and cleaning water see subsection 2 6 1 The measuring water flows into a header tank constant level chamber serving also as a bubble separation tank after passing the ball valve located after the tap water inlet port Debubbled sample in this tank flow into the measuring cell in the detector at a constant flowrate and drains through the drain outlet after overflowing at ...

Page 10: ... emits light onto the surface of the sample through a system of lenses This light is separated into scattered reflected and transmitted light on the water s surface The transmitted light and reflected light are absorbed in a dark area equivalent to a black body This scattered light intensity L is proportional to the turbidity as shown here L K Q S Where K a constant relative to turbidity S turbidi...

Page 11: ...ctor Measuring cell Transmitted light Drain Measuring water Reference element Turbidity element Scattered light Lenses Lamp Lens Display Amplifier Amplifier AD CPU Analog output Lamp power supply Converter Figure 1 2 Operating Principle 3rd Edition May 31 2010 00 ...

Page 12: ...og Output Signal 4 to 20 mA DC maximum load resistance 550 Ω or 1 to 5 V DC output resistance 100 Ω or less Digital Output Signal Conforms to RS 232C Communication Specifications Data format ASCII Data length 8 bits Baud rate 1200 bps Parity None Start bit 1 bit Stop bit 2 bits Transmission method Mono directional transmission only asynchronous system Communication Data Measured turbidity values C...

Page 13: ...en Closed Fail Open Closed Open High low alarm Closed Closed Open Auto zero calibration cleaning Closed Open Closed Contact status open closed when power is turned on is user configurable Contact Rating Maximum switching voltage 250 V AC or 220 V DC resistive load Maximum carrying current 2 AAC or 2 A DC resistive load Maximum switching capacity 125 VA or 60 W resistive load Contact Input Remote r...

Page 14: ...ing the ground terminal inside the converter or the ground terminal on the outside of the case Water Sample With sampling system Flow rate 2 to 10 l min Pressure 20 to 500 kPa Temperature 0 to 50 C Ambient temperature should not exceed 30 C Without sampling system Flow rate 1 5 to 2 l min Temperature 0 to 50 C Ambient temperature should not exceed 30 C Zero Turbidity Water and Cleaning Water Tap W...

Page 15: ...umidity 5 to 95 RH non condensing Storage Temperature 30 to 70 C Weight Detector Approx 3 kg Converter Approx 9 kg With sampling system Approx 50 kg in full specifications Dimensions Detector 245 W x 250 H x 200 D mm Converter 260 W x 340 H x 150 D mm With stanchion 530 W x 1450 H x 550 D mm 2 2 Characteristics Linearity when using kaolin standard Upper range limit of 1000 mg l degrees or less 2 o...

Page 16: ...w rate of the water sample reaches the specified flow 1 5 to 2 l min 2 Optional specifications for selecting without sampling system code NN 3 Optional specifications for selecting with sampling system code A1 A2 or A3 4 For applications where the measuring range is low 200 mg l or less and air bubbles are likely to occur add the L option spike detection function This option is not available for h...

Page 17: ...ing material 2B pipe Ø60 5 Ø6 to Ø12 o d waterproof plug Cable inlet 4 Ø6 holes Option code R Rack mounting material Option code P Pipe mounting material 2B pipe Ø60 5 Detector Converter 190 170 170 145 310 30 150 245 208 250 3 Ø6 holes Ø25 i d hose joint 48 Water sample input Water sample output Ø25 i d hose joint 25 105 120 Unit mm F0201 ai 3rd Edition May 31 2010 00 ...

Page 18: ...anually operated valve Terminal box Note 3 V5 Manually operated valve VP16 pipe Sample water inlet VP40 pipe Drainage port VP16 pipe Tap water inlet Note 2 Note 2 Converter Haed tank V1 Manually operated valve Detector V4 Manually operated valve reference filter Zero tubidity Unit mm Cubicle Note 1 Option code B specified for rear mounting Base mounting is without B specified Note 2 Option code L ...

Page 19: ...inch valve VP16 Sample water inret pipe Note 2 Terminal box Note 3 Zero turbidity reference filter V4 Manually operated valve V1 Manually operated valve Head tank Converter V3 Manually operated valve V2 Manually operated valve Detector for anchor bolts 4 ø15Hoes SV2 Solenoid valve Unit mm Cubicle Note 1 Option code B specified for rear mounting Base mounting is without B specified Note 2 Option co...

Page 20: ...etector Drainage port VP40 pipe Tap water inlet VP16 pipe Sample water inlet VP16 pipe Zero turbidity reference filter for anchor bolts 4 ø15Holes Terminal box Note 3 Manually operated valve V1 SV3 Solenoid valve SV1 Pinch valve SV2 Solenoid valve SV4 Solenoid valve Unit mm Cubicle Manually operated valve V4 Note 2 Note 1 Option code B specified for rear mounting Base mounting is without B specifi...

Page 21: ... through type holder V4 Manually operated valve Zero turbidity reference filter V1 Manually operated valve KCl tank Ultrasonic oscillator Note 2 Note 2 V5 Manually operated valve VP40 pipe Drainage port VP16 pipe Tap water inlet VP16 pipe Sample water inlet Unit mm Note 1 Option code B specified for rear mounting Base mounting is without B specified Note 2 Option code L specified for bubble redand...

Page 22: ...idity reference filter V4 Manually operated valve Flow through type holder pH sensor Turbidity detector Terminal box Turbidity converter V2 Manually operated valve V3 Manually operated valve for anchor bolts 4 ø15 Holes V6 Manually operated valve SV2 Solenoid valve Unit mm 530 Approx 200 Approx 200 600 Approx 500 Front Maintenance space Maintenance space Maintenance space Approx 400 Cubicle Note 1...

Page 23: ...operated valve Turbidity detector for anchor bolts 4 ø15Holes Turbidity converter PH converter KCl tank Terminal box Ultrasonic oscillator PH sensor Flow through type holder SV4 Solenoid valve SV2 Solenoid valve SV1 Pinch valve V5 Manually operated valve VP16 pipe Sample water inlet Unit mm 530 Approx 200 Approx 200 600 Approx 500 Front Maintenance space Maintenance space Maintenance space Approx ...

Page 24: ... filter Zero turbidity V1 Manually operated valve Head tank pH converter VP16 pipe Tap water inlet VP40 pipe Drainage port VP16 pipe Sample water inlet Note 2 Note 2 KCl tank for anchor bolts 4 ø15 holes V2 Manually operated valve V5 Manually operated valve V6 Manually operated valve Unit mm Note 1 Option code B specified for rear mounting Base mounting is without B specified Note 2 Option code L ...

Page 25: ...ed valve V3 Manually operated valve Zero turbidity reference filter pH converter tank Head Turbidity converter Terminal box Turbidity detector pH sensor Flow through type holder V4 Manually operated valve V1 Manually operated valve Note 2 Note 2 VP40 pipe Drainage port VP16 pipe Tap water inlet SV2 Solenoid valve SV1 Pinch valve V6 Manually operated valve VP16 pipe Sample water inlet Unit mm Cubic...

Page 26: ...idity detector pH sensor Flow through type holder V4 Manually operated valve Zero turbidity reference filter Turbidity converter pH converter tank Head V1 Manually operated valve KCl tank Note 2 Note 2 VP40 pipe Drainage port VP16 pipe Tap water inlet SV4 Solenoid valve SV2 Solenoid valve SV1 Pinch valve SV3 Solenoid valve V5 Manually operated valve VP16 pipe Sample water inlet Unit mm Cubicle Not...

Page 27: ...lve detector FC400G V4 Manually operated valve Zero turbidity reference filter Terminal box Turbidity detector Turbidity converter FC400G converter tank Head V1 Manually operated valve Note 2 Note 2 VP40 pipe Drainage port VP16 pipe Tap water inlet V7 Manually operated valve V5 Manually operated valve VP16 pipe Sample water inlet V6 Manually operated valve Unit mm Cubicle Note 1 Option code B spec...

Page 28: ...d valve tank Head converter FC400G Turbidity converter Terminal box Note 2 Note 2 VP16 pipe Tap water inlet VP40 pipe Drainage port V3 Manually operated valve for anchor bolts 4 ø15 holes V2 Manually operated valve V6 Manually operated valve Zero turbidity type filter SV2 Solenoid valve SV1 Pinch valve V5 Manually operated valve VP16 pipe Sample water inlet Unit mm Cubicle Note 1 Option code B spe...

Page 29: ...ve Terminal box Turbidity converter FC400G converter Turbidity detector V4 Manually operated valve detector FC400G tank Head V1 Manually operated valve Note 2 Note 2 VP40 pipe Drianage port VP16 pipe Tap water inlet SV4 Solenoid valve SV2 Solenoid valve SV1 Pinch valve SV3 Manually operated valve V5 Manually operated valve VP16 pipe Zero turbidity reference filter Unit mm Cubicle Sample water inle...

Page 30: ...rated valve V5 Zero turbidity reference filter PVC tray F0214 ai Water sample VP16 2 6 2 TB400G A2 Head tank Note Detector Manually operated valve V1 Pinch valve SV1 Manually operated valve V2 Manually operated valve V3 Zero turbidity reference filter PVC tray Water sample VP16 Tap Water VP16 Drain VP40 Note Option Code L For bubble retardant Manually operated valve V4 Solenoid valve SV2 F0215 ai ...

Page 31: ...Note Option Code L For bubble retardant M F0216 ai Note1 Please consider to install a check valve so that cleaning water does not flow backward in the tap water side Note1 2 6 4 TB400G A1 PHU PHN Water sample VP16 Tap Water VP16 Drain VP40 PVC tray Note Option Code L For bubble retardant pH sensor Manually operated valve V2 Manually operated valve V1 Manually operated valve V6 Manually operated va...

Page 32: ... Manually operated valve V5 Manually operated valve V3 Zero turbidity reference filter F0218 ai 2 6 6 TB400G A2 PHU PHN Water sample VP16 Tap Water VP16 Drain VP40 PVC tray Note Option Code L For bubble retardant pH sensor Pinch valve SV1 Manually operated valve V2 Manually operated valve V1 Manually operated valve V5 Manually operated valve V3 Zero turbidity reference filter Head tank Note Detect...

Page 33: ...lve SV2 F0220 ai Note1 Please consider to install a check valve so that cleaning water does not flow backward in the tap water side Note1 2 6 8 TB400G A3 PHU PHN M pH sensor Water sample VP16 Tap Water VP16 Drain VP40 PVC tray Note Option Code L For bubble retardant Manually operated valve V4 Pinch valve SV1 Solenoid valve SV2 Solenoid valve SV4 Motor operated valve SV3 Manually operated valve V2 ...

Page 34: ...ly operated valve V5 Manually operated valve V3 Zero turbidity reference filter Free available chlorine analyzer detector Head tank Note Turbidity detector F0222 ai Note1 Please consider to install a check valve so that cleaning water does not flow backward in the tap water side Note1 2 7 Internal Wiring Diagram Figure 2 8 shows the internal wiring diagram of the turbidimeter with a sampling syste...

Page 35: ...ix code Specifications with without sampling system automatic cleaning and zero calibration Valves to be connected NN W o sampling system automatic cleaning or automatic zero calibration No valve connection A1 W sampling system but w o automatic cleaning or automatic zero calibration No valve connection A2 W sampling system and automatic cleaning but w o automatic zero calibration SV1 SV2 A3 W sam...

Page 36: ...ut range 1 Output range 2 Output range 3 Range contact output 3 1 1 1 Ground terminal on the outside of the converter case with a grounding resistance of 100 Ω or less Ground the power cord instead only if the above grounding is not feasible Note Do not use two point grounding 2 Remote range swiching method 3 Output range swiching method 4 In the case of with automatic cleaning A2 A3 5 In the case...

Page 37: ...pH holder PH8HF pH sensor PH8EFP Please wire by the customer Sensor cable Please wire by the customer 1 2 3 4 5 6 7 8 Ultrasonic oscillator PUS400G U1 U2 S L1 L2 4 5 4 5 1 Power supply Input output signal 7 6 1 Ground the power cord 8 with a grounding resistance of 100 Ω or less 2 Remote range swiching method 3 Output range swiching method 4 In the case of with automatic cleaning A2 A3 5 In the ca...

Page 38: ...nput 2 Digital output signal RS 232C Analog output signal 4 to 20 mA DC or 1 to 5 V DC COM Output range 1 Output range 2 Output range 3 Range contact output 3 1 2 3 4 5 6 7 8 Power supply Output signal 4 6 5 4 5 1 1 Ground the power cord 8 with a grounding resistance of 100 Ω or less 2 Remote range swiching method 3 Output range swiching method 4 In the case of with automatic cleaning A2 A3 5 In t...

Page 39: ... supply 1 1 4 5 4 5 AR2 AR2 S G L1 G L2 L2 L1 G CB1 AR1 1 2 G L1 L2 AR1 AR2 Arrestor CB1 Circuit breaker 1 Ground terminal on the outside of the converter case with a grounding resistance of 100 Ω or less Ground the power cord instead only if the above grounding is not feasible Note Do not use two point grounding 2 Remote range swiching method 3 Output range swiching method 4 In the case of with a...

Page 40: ...bicle 2 there is little vibration 3 corrosive gases are not present 4 there is low humidity 5 temperature changes are kept to a minimum and the temperature is maintained between 5 to 50 C 6 there is enough clearance for maintenance and maintenance work can be easily done 7 drainage can be provided 3 1 3 Installation Installation of the scattered light turbidimeter differs depending on whether the ...

Page 41: ...unting bracket 50 mm dia pipe F0301 ai Figure 3 1 Pipe Mounting Converter Rack mounting bracket M5 mounting screws 4 places 238 126 5 4 M5 Mounting dimensions Unit mm Detector M5 mounting screws 3 places Rack mounting bracket 190 105 3 M5 Mounting dimensions F0302 ai Figure 3 2 Rack Mounting 3rd Edition May 31 2010 00 ...

Page 42: ... that a trip does not form in the pipe If water is trapped in the drain piping the detector may be harmed by becoming flooded 3 Cleaning water piping The cleaning water inlet of the detector is sealed with a blind plug Note If a low turbidity less than 200 mg l is to be measured prepare a sampling system which allows a supply of zero calibration water tap water filtered with a zero turbidity filte...

Page 43: ...p water supplied to the detector to a drain or the like The piping connection is designed for a rigid PVC pipe of nominal size VP40 Connect such a pipe of nominal size VP40 VU40 or more and do the piping so that debris does not remain or get trapped or get trapped in the pipe Drain outlet VP40 pipe Tap water inlet VP16 pipe Sample inlet VP16 pipe F0304 ai Figure 3 4 Piping Connections for Turbidim...

Page 44: ...ro calibration contact output Receiving instrument Turbidity converter Remote range selection contact input Range contact output Digital output RS 232C POWER L1 L2 MAINT FAIL AUX F0305 ai ANSWER BACK DIGITAL OUTPUT GroundTo power supply Figure 3 5 External Wiring Diagram Wiring terminal brock External wiring cable glands 5 places F0306 ai Figure 3 6 Converter External Wiring Terminal Block and Cab...

Page 45: ...ng to the output range to a receiving instrument such as a recorder For Wiring use a 2 conductor shielded cable of finished OD 6 to 12 mm The cable end treatment procedure and connection procedure on the connecting side to the converter are shown below 1 Strip off about 40 mm of the insulation covering and shield from the cable end and solder a leadwire to the root of the exposed shield Protect th...

Page 46: ... range selection only is used and a 4 conductor cable when only range contact output is used The on and off contact statues are identified with the resistance value conditions shown in Table 3 1 In doing wiring confirm that a contact meeting these conditions is used Table 3 1 On off Identification of Contact Input for Switching Remote Range On status identification Off status identification Resist...

Page 47: ...missible contact power 60 W 125 VA Connect each conductor of the cable to terminals F1 F2 M1 M2 C1 and C2 respectively Before connection end treat the cable conductors Strip off the cable insulation covering by about 40 mm and attach crimp terminal lugs conforming to M4 4 mm screws to each conductor Table 3 4 shows the operation of each contact output Table 3 4 Contact Output Operation Contact Ope...

Page 48: ...ly 1 1 4 5 4 5 AR2 AR2 S G L1 G L2 L2 L1 G CB1 AR1 1 2 G L1 L2 AR1 AR2 Arrestor CB1 Circuit breaker 1 Ground terminal on the outside of the converter case with a grounding resistance of 100 Ω or less Ground the power cord instead only if the above grounding is not feasible Note Do not use two point grounding 2 Remote range swiching method 3 Output range swiching method 4 In the case of with automa...

Page 49: ...Blank Page ...

Page 50: ... the specifications Also check that the cap of the fuse holder in the converter is securely tightened Turn on the power switch in the converter Then press the MODE key on the converter to go to the MAINT mode 4 1 3 Supplying Zero Water If the turbidity to be measured is higher than 200 mg l remove the filter element and use tap water directly as zero water 1 Supply tap water of the predetermined s...

Page 51: ...evel so that the detector is level in two orthogonal directions with the B screws in four places shown in Figure 4 1 see Figure 4 3 If a level is not available visual adjustment may be acceptable In this case make the adjustment so that water spills out uniformly from the drain outlet of the measuring cell Adjustment screw Lock nut F0403 ai Measuring cell First loosen the lock nut and then turn th...

Page 52: ...n 1 Set FUNCTION D In the PROGRAM1 mode and confirm that on is displayed on means the calibration using the calibration plate on is set when shipped from the factory 2 Set FUNCTION 4 in the MAINT mode Turbidity valve is displayed 3 Set to the drain status Close V2 and open V5 for Suffix code A1 Close V2 and open SV1 for Suffix code A2 Close SV3 SV4 and open SV1 for Suffix code A3 4 Loosen screw A ...

Page 53: ... Table 4 1 shows valve status in the MEAS mode Valves SV1 to SV4 automatically operate according to the predetermined specifications The statuses shows in Table 4 1 are those when no automatic cleaning or automatic zero calibration operates Table 4 1 Value Statuses When Measurement Is Carried Out Suffix codes V1 V2 V3 V4 V5 SV1 SV2 SV3 SV4 A1 Open Closed Closed Closed Closed A2 Open Open Closed Op...

Page 54: ...mode F0405 ai Figure 4 5 Cleaning Period Figure 4 6 shows tha automatic cleaning operation time chart and Table 4 2 the list of settings for automatic cleaning Valve used SV1 Drain valve SV2 Cleaning water valve Time chart Example N number of cleaning repetitions 4 F0406 ai 1 During cleaning the output is always in the hold state The display is also set to be held using FUNCTION 8 in the PROGRAM1 ...

Page 55: ...en shipped from the factory The internal timer operation is shown in Figure 4 7 As shown in the figure the automatic cleaning operation is repeated at every set time of the cleaning period A and automatic zero calibration is implemented once in every 3 repetitions for cleaning calibration ratio B 3 A A A A A A Measurement start 1 F0407 ai B 1 2 3 1 2 3 Cleaning Cleaning Calibrattion Cleaning Clean...

Page 56: ...CTION E in the PROGRAM1 mode Note 1 N Number of cleaning repetitions Note 2 One automatic cleaning cycle N draining filling cleaning draining filling recovery Figure 4 8 Automatic cleaning Operation Time Cheat Suffix code A3 Table 4 3 Setpoints for Automatic Cleaning and Automatic Zero Calibration Item Setting range Factory setting Unit Setting mode Mode FUNCTION Cleaning period 0 1 to 24 0 2 0 Ho...

Page 57: ...pped from the factory Figure 4 9 shows the automatic zero calibration operation time chart For the setting see Table 4 3 Valves used SV1 Drain valve SV2 Cleaning water valve SV3 Measuring water valve SV4 Zero water valve Time chart N number of cleaning repetitions 4 Example F0409 ai 1 During cleaning the output is always in the hold state The display is also set to be held using FUNCTION 8 in the ...

Page 58: ...levant user s manuals Improper installation may result in malfunction or failure This instrument starts with the supply of water sample to each equipment Refer to Section 2 6 Piping System Diagrams operate the relevant valves and set the flow rate of the equipment as follows 1 pH flow through holder 3 to 11 l min 2 Non reagent type free available chlorine detector 0 1 to 2 5 l min For the operatio...

Page 59: ...Blank Page ...

Page 60: ...s of the converter For each function the relevant topics are listed For the setting procedures see Chapter 6 the operation procedure for each FUNCTION in each mode 5 1 Functions Related to Failure Detection Table 5 1 shows the failure detection functions 3rd Edition May 31 2010 00 ...

Page 61: ...t be accepted When power is turned on Err17 8 Reference signal voltage failure If the reference signal from the detector is out of the permissible range this item is detected The permissible range is approximately 0 5 V to 2 45 V across terminals S2 and AG MEAS Err18 PRO GRAM 2 6 9 Zerocalibration range exceeded Detected when the input value in zero calibration is out of the permissible range The ...

Page 62: ...Selection The output range can be set up in three ways auto range remote range and local range The relationship between these is as shown in Figure 5 1 Table 5 2 shows the setting modes and function numbers related to the output range selection F0501 ai Auto range Execution Stop Remote range Execution Stop Operation Auto range Remote range Local range Note The turbidimeter is shipped with the outp...

Page 63: ... Related to Output Table 5 3 shows other functions related to analog output and the operation modes and function numbers for setting Table 5 3 Other Functions Related to Output Detected item Details Mode FUNCTION 1 Bi linear output Setting of break points when an analog signal is output with linesegment approximation PROGRAM 1 6 2 Output hold during maintenance When maintained other than the MEAS ...

Page 64: ...g 0 In the case of setting 100 Output signal Output signal Figure 5 3 Output When the Break Point Is Set at 0 and 100 of the Output Range 5 3 Manual Cleaning and Calibration Functions Table 5 4 shows a list of manual cleaning and calibration functions For operation and setting procedures see the procedures for each mode and the functions in Chapter 6 3rd Edition May 31 2010 00 ...

Page 65: ...tem 3 can be displayed and changed PROGRAM 1 B 12 Setting of sensitivity correction factor The sensitivity correction factor obtained in item 5 can be displayed and changed PROGRAM 1 C 13 Selection of calibration plate standard solution Which span reference is used either the calibration plate or the standard solution for span calibration in item 4 is selected PROGRAM 1 D 1 The difference in the z...

Page 66: ...that measures scatterd light is displayed in the current value MEAS 3 4 Reference signal voltage display The signal of the receiving element that controls tha lamp light quantity is displayed in the voltage value MEAS 4 5 Analog output display The analog output is displayed after being converted into FS MEAS 5 6 Analog output mA display The analog output is displayed after being converted into 4 t...

Page 67: ...or on the sample surface A head tank is supplied when the TB400G with a sampling system is specified It is for removing air bubbles and thus for preventing them from reaching the detector In rare cases however air bubbles occur and grow in the pipe between the head tank and the detector and rise to the surface of the measuring cell resulting in reading fluctuation The converter has a signal averag...

Page 68: ... The function may have prevented the turbidimeter from giving readings properly 5 6 2 Settings of Spike Detection Function To enable the function set necessary parameters in PROGRAM1 mode following the procedure below Turn ON the function FUNCTION F Set the Detection Level FUNCTION D Set the Hold Time FUNCTION E Set the Sampling Time FUNCTION F a Detection Level The Detection Level is a value used...

Page 69: ...on works only in MEAS mode As soon as the mode is changed the Hold or Sampling timer is reset and the function stops working 2 The function does not work during automatic zero calibration or automatic cleaning If automatic zero calibration or automatic cleaning begins when the function is active i e during a Hold Time or Sampling Time period the function immediately stops running and the timer is ...

Page 70: ...ccess to all function in obtained through keys on the control panel The panel includes display areas for data modes function codes etc in which measured values and operating statuses are displayed Figure 6 1 and Table 6 1 show the control panel components and their functions mg l FTU nA mA V MEAS MAINT PROGRAM 1 PROGRAM 2 FAIL LAMP AMG1 AMG2 AMG3 SV1 SV2 SV3 SV4 FUNC FUNC ENT MODE DATA SET SV 1 MA...

Page 71: ...ication area green LED of active status is lit Lights up goes out or flashes corresponding to the output hold calibration and cleaning statuses 9 Mode key Used when selecting an operation mode 10 Function key Used when selecting the function code 11 Data set keys Used when changing data settings or implementing calibration 12 Valve operation keys Used when turning solenoid valves on or off Every t...

Page 72: ...e detection can be selected setting items are selected using the FUNC key The data set key and valve operation keys can be operated 6 2 1 Functions in MEAS Mode Table 6 3 gives details on the functions in the MEAS mode Table 6 3 Function in MEAS Mode F Indication Display range Example of indication Initial default value Unit Remarks 1 Turbidity 10 00 to 2200 150 0 mg l Degree FTU is also possible ...

Page 73: ... calibration A_CAL Effective for the model with automatic zero calibration Suffix code A3 8 Reference sensitivity calibration 1 Measured turbidity value Criteria for slope failure 9 Converter check operation C CHEC Checked by switching to dummy input Display 50 0 mg l deg Output 12 mA A Error code indication E CHEC B Error reset CL_Er C Calibration of lamp control reference value 0 2000 to 2 3000 ...

Page 74: ..._ 1 1 No hold 2 Hold 3 Preset 6 Setting to output hold for 4 mA or less ON OFF OFF ON Execution OFF Stop 7 Setting to hold negative turbidity display ON OFF OFF ON Execution OFF Stop 8 Setting to display hold in automatic cleaning or automatic calibration ON OFF OFF ON Execution OFF Stop 9 Basic code sampling specifications setting _ _ 1 _ _ 2 _ _ 3 _ _ 3 1 NN A1 2 A2 3 A3 A Automatic cleaning fun...

Page 75: ...f execution stopping of turbidity rangeover detection function ON OFF ON ON Execution OFF Stop 2 Selection of execution stopping of disconnectedlamp detection function ON OFF ON ON Execution OFF Stop 3 Selection of execution stopping of lamp failure detection function ON OFF ON ON Execution OFF Stop 4 Selection of execution stopping of A D circuit failure detection function ON OFF ON ON Execution ...

Page 76: ...nction code set to a code other than 1 the function code returns to 1 Figure 6 3 Function Code Switching by FUNC Key Operation 6 3 3 Numerical Input Numerical input is made with the data set keys Operation of the data set keys becomes effective in the modes other than the MEAS mode The data set keys include the following four keys a Key Digit selection key This is used select the digits of a value...

Page 77: ...the specification with automatic cleaning and automatic calibration the predetermined sequential operation is performed and the solenoid valves automatically open or close Table 6 7 shows the use of solenoid valves based on the sampling specifications Suffix code Table 6 7 Sampling Specifications Suffix Code and Use of Solenoid Valves Suffix code SV1 SV2 SV3 SV4 NN A1 A2 A3 Used Not used Note SV1 ...

Page 78: ...layed in a value converted to mA The value is directly displayed for a 4 to 20 mA output but for a 1 to 5 V output it is displayed by converting it into a 4 to 20 mA output 7 Zero point error FUNCTION 7 The measuring voltage signal for zero water or with the light source turned off at zero calibration is displayed in a value converted to turbidity If the measuring signal at zero calibration exceed...

Page 79: ...e is displayed see Section 5 3 3 In this case the FAIL lamp is not lit and a FAIL contact is not output An error message can be reset by pressing the ENT key and the display returns to the turbidity indication Wait until the display becomes stable and then begin from step 2 again At any stage of zero calibration operation pressing the MODE key or FUNC key allows switching to another mode or functi...

Page 80: ...actor from the zero shift calibration zero correction in 3 or span calibration sensitivity correction in 5 is displayed 3 Zero shift Calibration FUNCTION 3 At any turbidity value this is an operation to zero shift a turbidity reading within the permissible range 9 mg l For details on the function see Section 5 3 3 The zero correction factor obtained in this calibration can be displayed and directl...

Page 81: ...ON 4 in the MAINT mode 0090 5 mg l 2 Wait until the display becomes stable and 0090 5 mg l then press the ENT key The CAL lamp flashes 3 Press the key 0090 0 mg l The preset turbidity value of the calibration plate is displayed 4 Press the ENT key to terminate calibration 0090 0 mg l The display flashes once and the CAL lamp goes out In operation 4 check the difference between the current turbidit...

Page 82: ...not is displayed In this case the FAIL lamp is not lit and a FAIL contact is not output Reset the error message by pressing the ENT key and continue operation from step 2 Also check the ratio of the current sensitivity slope to the reference sensitivity If it exceeds the permissible range 50 to 400 Err22 is displayed see Section 5 3 3 The error message is reset by pressing the ENT key Perform oper...

Page 83: ... the ratio of the sensitivity correction to the current sensitivity If it exceeds the permissible range 0 25 to 4 Err22 is displayed The error message is reset by pressing the ENT key Perform operation from step 2 again 6 Manual Start of Automatic Cleaning FUNCTION 6 This is the operation to manually start the automatic cleaning operation For specification of automatic cleaning Suffix code A2 or A...

Page 84: ...eturns to the statuses at the start of measurement If a similar operation is performed after completing the calibration computation that calibration becomes effective 8 Reference Sensitivity Calibration FUNCTION 8 The reference sensitivity is determined in this operation using the standard solution upon the shipment from the factory The sensitivity obtained at that time is the basis for an abnorma...

Page 85: ...ration sensitivity correction in 5 is displayed 9 Converter Check Operation FUNCTION 9 This operation checks the operation of the converter by switching the converter input signal from a measured signal to a simulated signal The following is the procedure for this function Example of display 1 Select FUNCTION 9 in the MAINT mode C CHEC is displayed 2 Press the ENT key 0050 0 mg l The converter is ...

Page 86: ...e error even if the causes are not removed However if the causes of the error still remain when the mode is changed after resetting and moved to each error detection mode that error is again detected The following is the procedure for this function Example of display 1 Select FUNCTION B in the MAINT mode CL_Er is displayed 2 Press the ENT key CL_Er display flashes once and the error is reset For t...

Page 87: ...gawa Thus this function is not usually operated 6 6 Operation in PROGRAM1 Mode In the PROGRAM1 mode data setting operations such as output range and operating status setting operations such as auto range selection are carried out Function 1 to F Data settings Function 1 to F Operating status settings Section 6 6 describes key operations which specify each function in the PROGRAM1 mode and the disp...

Page 88: ...setting of upper and lower limit values in output ranges 1 2 and 3 is described taking output range 1 as an example Example of display 1 Select FUNCTION 1 in the PROGRAM1 L00 00 mg l mode If the lower limit is not to be changed start operation from step 6 2 Press the key L0000 mg l This display is now ready for determination of the decimal point position 3 Determine the decimal point position with...

Page 89: ...s does not meet the following conditions when checked not is displayed Reset the message by pressing the key in a similar manner and repeat the operations from step 2 Range span Upper limit lower limit 20 of the upper limit 2 00 mg l If the upper and lower limits are only to be confirmed pressing the ENT key alternately displays L and H If the auto range switching function is to be used set the ra...

Page 90: ...ote If calibration is performed using the calibration plate in FUNCTION 4 in the MAINT mode the averaging coefficient automatically changes to 10 regardless of this setting 3 Setting Output Value If an Error Occurs FUNCTION 5 If preset _ _3 is selected in the output mode setting FUNCTION 5 in the PROGRAM1 mode when an error occurs the analog output when the error occurs is fixed at this setting va...

Page 91: ...nd the permissible range 0 to 100 not is displayed Reset the message by pressing the key and repeat the operations from step 2 5 Setting Change over Point in Auto ranging FUNCTION 7 If auto range is used the range is changed over at the point set here The change over point is displayed and set at a ratio to the upper limit setpoint of the range The following shows the operating manner The time to ...

Page 92: ...lue is beyond the permissible range 10 to 2200 mg l not is displayed Reset the message by pressing the key and repeat the operations from step 2 7 Setting Low Alarm Value FUNCTION 9 In the high and low alarm detection function is set to execution FUNCTION 9 in PROGRAM2 mode when a measured value is below this setpoint the MEAS lamp flashes and if AUX C1 C2 contacts are set for high and low alarms ...

Page 93: ...zero correction FUNCTION 3 in MAINT mode can be displayed or directly changed For details on the zero shift calibration function see Section 5 3 3 The following shows the setting key operations Example of display 1 Select FUNCTION B in the PROGRAM1 00 000 mg l mode If the display is only to be confirmed operations of 2 3 and 4 are not necessary 2 Press the key 00 000 mg l The most significant digi...

Page 94: ...icant digit flashes 3 Select a digit with the key and set it to the 00010 desired value using the or v key The flashing digit moves to the right and when the least significant digit is reached it returns to the most significant digit 4 Press the ENT key to enter the set value 00010 The entire display flashes once In step 4 if the set value is beyond the permissible range 1 to 100 not is displayed ...

Page 95: ...onding to the selected output range Note Confirm that the range 1 2 or 3 setting satisfies the conditions in Section 6 6 1 If the conditions are not satisfied auto range switching does not take place The following describes the setting key operations Example of display 1 Select FUNCTION 1 in the PROGRAM1 OFF stop mode The current set status is displayed 2 Press the key to select on off ON executio...

Page 96: ...code _ _2 Range 2 F6602 ai _ _1 _ _2 Range 1 Range 2 _ _3 Range 3 3 Press the ENT key to enter the setting _ _2 The display flashes once 17 Setting Output Hold in Maintenance FUNCTION 4 This function sets execution stop of output hold in maintenance MAINT or PROGRAM1 2 mode If execution is selected the output value immediately before operation holds when the maintenance mode is selected The follow...

Page 97: ..._2 The display flashes once In this function if _ _2 hold or _ _3 preset is selected this setting has priority over the setting in FUNCTION 4 19 Setting Output Hold for 4 mA or Less FUNCTION 6 By setting on execution in this function the analog output does not fall below 4 mA or 1 V The following describes the setting key operations Example of display 1 Select FUNCTION 6 in the PROGRAM1 OFF stop m...

Page 98: ...Suffix Codes sampling specifications FUNCTION 9 Select sampling specifications Suffix codes Usually this is set upon shipment from the factory Thus no setting is necessary before use Table 6 11 shows the relationship between sampling specifications and Suffix code Table 6 11 ME Codes and Settings Suffix code Sampling specification Setting code NN Without sampling system _ _1 A1 With sampling syste...

Page 99: ... function started with the internal timer when the Suffix code sampling specifications is A3 If off stop is selected in the automatic calibration function the manual start operation in FUNCTION 7 in the MAINT mode can be exceeded As this function is set to on execution upon shipment from the factory if it becomes necessary to select off stop perform the key operations in the following procedure Ex...

Page 100: ...perations in the following procedure Example of display 1 Select FUNCTION D in the PROGRAM1 ON calibration plate mode The current set status is displayed 2 Press the key to select on off OFF standard solution F6601 ai ON OFF 3 Press the ENT key to enter the setting OFF The display flashes once 27 Selecting AUX C1 C2 Contact Output FUNCTION E The operating conditions for AUX contact output C1 C2 ar...

Page 101: ...aning and Automatic Zero Calibration FUNCTION 1 to FUNCTION A Table 6 12 shows a list of setting times and operation functions For details on automatic cleaning and automatic zero calibration operations see subsections 4 2 2 and 4 2 3 For specification without automatic cleaning or automatic zero calibration Suffix codes NN A1 this setting is non operative Table 6 12 Time Settings for Automatic Cl...

Page 102: ... for the contact output when operated Table 6 13 shows the types of contact outputs and corresponding functions Table 6 13 Contact Outputs and Operating Functions Contact output FUNCTION Output terminal Factory setting Maintenance contact output C M1 M2 Closed FAIL contact output D F1 F2 Open High and low alarm contact output E C1 C2 Open Contact output during automatic cleaning and automatic zero...

Page 103: ...Operation Table 6 15 shows the valve on off statuses in measurement draining or zero calibration for each sampling specification However for operations in automatic cleaning or automatic zero calibration see Section 4 2 Table 6 15 Valve Statuses in Each Operation Operation Sampling specification Suffix code V1 V2 V3 V4 V5 SV1 SV2 SV3 SV4 Measurement A1 A2 A3 Open Open Open Open Open Open Closed Cl...

Page 104: ...x Code A2 or A3 Yearly 1 This is a guide for the replacement period if the meter is operated at a flow rate of 2 l min using tap water having an average turbidity of 0 4 mg l 7 2 Washing with Cleaning Water For the specification without automatic cleaning Suffix code A1 washing is carried out by opening and closing the values manually For the specification with automatic cleaning Suffix code A2 or...

Page 105: ...etector with a soft brush sponge or the like Be careful not to mar or scratch the inside and not to splash the lenses in the light source and light receiving part with water 5 Open valves V4 and SV2 to supply cleaning water and discharge the dirt with the water Also in this case gradually open valve V4 so as not to splash the lenses in the light source and light receiving part with water 6 Tighten...

Page 106: ...No good F0702 ai Align bleeder holes down After washing head tank align bleeder holes down If you align bleeder holes up then bubbles froth may cause problems Drain pipe NOTE After washing head tank be sure to align holes down If you align bleeder holes up then bubbles froth may cause problems 7 5 Lamp Replacement The lamp s service life is more than year However it is recommended that it be repla...

Page 107: ...ol reference value calibration Select FUNCTION C in the MAINT mode 11 Press the ENT key and the reference signal voltage is displayed and the lamp voltage is fixed at about 3 6 V 12 Set the calibration plate to the detector 13 Connect a tester or relevant device between terminals S1 and AG to measure DC voltage While checking the voltage slowly move the lamp up and down to determine the position w...

Page 108: ...d in Section 7 7 If the measuring range is 200 mg l degrees or less perform a zero calibration see Section 7 6 before the span calibration 7 6 Zero Calibration 7 6 1 Zero Calibration with Zero Water Zero calibration using zero water is described in this subsection 1 For specification with automatic cleaning and automatic zero calibration Suffix code A3 Carry out zero calibration using the manual s...

Page 109: ...between this method and the zero water method is about 1 mg l 1 Select FUNCTION 2 in the MAINT mode Turbidity value is displayed 2 The lamp goes out when the ENT key is pressed once 3 Wait one minute or more until the reading becomes stable and then press the and ENT keys in this order Now calibration is over 4 Finished 7 7 Span Calibration 7 7 1 Span Calibration Using Calibration Plate In normal ...

Page 110: ...r dirt is not removed merely by wiping wash the surface letting tap water flow on the surface After cleaning drain off the water and wipe up the remaining water with the Silicone cloth or tissue In doing this do not rub the surface 2 Cleaning with detergent If dirt is stuck on the surface through contact with your hand or dirt cannot be removes even with wiping as described in 1 clean the plate wi...

Page 111: ... times using zero water and remove the dirt on the detector and header tank Finally stop the zero water and drain off the detector and the header tank so that no water remains in them 6 Connect the standard solution tank to the measuring water feed inlet and supply the standard solution at 2 l min using a pump Supply the standard solution agitating it with a magnetic stirrer 7 When the standard so...

Page 112: ... valves V2 and V3 3 Turn the filter case to remove it Exercise care because water inside the case may spill out 4 Wipe the inside wall of the case with a brush or the like if it is dirty 5 Replace the filter element with a new one 6 Reassemble the filter in the reverse order of disassembly In this case be sure that the O ring for preventing water leakage is not damaged 7 Open valves V2 and V3 let ...

Page 113: ...f one year As there are both 1A and 3A fuses do not mix them up 1 Turn off the power switch 2 Remove the caps of the fuse holders on the front panel of the converter turn counterclockwise see Figure 7 6 3 Replace the fuses 4 Close the caps now the procedure is completed 5 Finished POWER FUSE 1A FUSE FUSE FUSE 3A ON OFF FUNC ENT SV4 SV3 2 RATION M1 M2 G L1 L2 V1 V2 V3 V4 V5 V8 7 V9 V10 V11 V12 2 Fu...

Page 114: ...f the piping with tap water 4 When the spike detection function is specified also clean the pipe assembly for the spike detection function Disconnect the PVC pipe by loosening the clamps at the detector side 5 Attach the piping again in the reverse order of removal 6 Finished Air vent Detector Clamp Pipe assembly for spike detection function Clamp Piping between the detector and the head tank Clam...

Page 115: ...nd if necessary clean it If cleaning is performed be sure to calibrate zero and span 5 Checking is finished by closing the detector 6 Finished The measuring surface is like a mirror finish F0709 ai Figure 7 8 Measuring Water Surface As shown in Figure 7 1 lift the detector cover and check whether the cleaning water flowrate is sufficient 7 13 Operation If Water Supply is Suspended If the supply of...

Page 116: ... calibration operations start to operate at the measurement start point in Figure 7 9 A A B B B B B B Cleaning Calibration Cleaning Calibration Cleaning Cleaning Measuring start 1 Calibration period A and cleaning period B F0710 ai 1 Measuring start means the time point when other mode MEAS mode or power off power on MEAS mode Figure 7 9 Automatic Cleaning and Automatic Zero Calibration Periods IF...

Page 117: ...rations defined in the JIS K0101 standard However kaolin differs in viscosity distribution particle shape and colour depending on its place of production quality and production batches leading to an error Therefore Yokogawa employs a method to define formazin FTU as the standard solution and to convert it to kaolin concentration The turbidity indication of degree is based on the polystyrene latex ...

Page 118: ...pipe Wet these connections to make insertion easier 4 Make sure the drain pipe is visible at the top of the head tank 5 Fasten the clamp 6 Place the lower end of the tube into the drain pipe NOTE The valve becomes extremely hot when left electrified for about 10 minutes Be careful not to burn yourself on it The valve may not open if the tube is not threaded properly or the tube adheres If this occ...

Page 119: ...Blank Page ...

Page 120: ...the failure If resetting be sure to first check the details by the error code checking operation before resetting 1 Err11 turbidity overrange Carry out checking in the following order Operation and checking procedure Failure Mode and Corrective Action 1 Measure the DC voltage across the converter connection terminals S1 and AG to make sure of it and confirm that it is smaller than 2 45 V or larger...

Page 121: ...g element is assumed Request checking and or repair of the control preamplifier 3 Err13 lamp voltage failure Carry out checking in the following order Operation and checking procedure Failure Mode and Corrective Action 1 Measure the DC voltage across the converter connection terminals P1 and P2 and confirm that it exceeds the range of 3 to 6 V 2 Check for shortcircuiting between the converter and ...

Page 122: ...he computation buffer is assumed Request checking and or repair of the converter CPU board Note Err16 is detected only when the power is turned on All functions of the converter are suspended when a failure occurs 7 Err17 EEPROM failure A failure of the data memory IC EEPROM is assumed Request checking and or repair of the converter CPU board Note Err17 is detected only when the power is turned on...

Page 123: ...erated drain valve SV1 or motor operated measuring water valve SV3 clogging of the piping between the detector and the head tank etc Operation and checking procedure Failure Mode and Corrective Action 1 Select the MAINT mode and check the open shut operations by turning valves SV1 and SV3 on and off 2 If the valve s does do not operate properly turn off the power to the converter one time and remo...

Page 124: ...rroundings 5 The reading may fluctuate due to suspended substances in the sample water Open the detector and if the water surface is not like a mirror finish adjust the flowrate Check the level adjustment Confirm the tightness of the anchor bolts or the like Change the signal averaging coefficient greatly If the vibrations are violent change the installation location Greatly change the signal aver...

Page 125: ...Blank Page ...

Page 126: ...idental failures It is subject to change depending on field experiences and others Table 9 1 Spare Parts List Item Part Number Recommended Replacement Interval Lamp K9410DA Yearly Filter 1 μm K9008ZD Yearly Filter 0 2 μm When PSL option is specified K9726EH Yearly Fuse 1A A1109EF Yearly Fuse 3A A1094EF Yearly Drain tube When A2 or A3 is specified K9411JM Yearly Replacement intervals vary depending...

Page 127: ...Blank Page ...

Page 128: ...lve Tank Assembly with Pinch Valve for 100 110 V AC for 200 220 V AC Option Code in case of L for 100 110 V AC Option Code in case of L for 200 220 V AC Head Tank Option Code in case of L Pinch Valve 1 1 1 1 1 Item Part No Description Qty 7 8 9 SV2 SV4 SV3 K9411JG K9411JH K9411YA K9411BB K9411JM A1014MZ A1015MZ A1016MZ A1017MZ K9411DP K9411DT K9411DQ K9411DU for 100 110 V AC for 200 220 V AC Pipe ...

Page 129: ... TB400G 4 1 and TB400G 4 3 for TB400G 5 1 and TB400G 5 3 for TB400G 4 6 and TB400G 4 7 for TB400G 5 6 and TB400G 5 7 CPU Assembly Analog Assembly for 100 110 VAC 4 to 20 mA DC output for 100 110 VAC 1 to 5V DC output for 200 220 VAC 4 to 20 mA DC output for 200 220 VAC 1 to 5V DC output 1 1 Item Part No Description Qty 5 6 A1109EF A1094EF Fuse 1A Fuse 3A 1 1 1 1 K9411ZG K9411ZH K9410NN K9410NP K94...

Page 130: ... Description Qty 1 2 3 4 5 6 K9410DC K9410DE L9813WE K9410DA K9410BK L9811CV K9410CQ Mounting hardware Option Code in case of P Option Code in case of R Clamp Lamp Assembly Holder Cable Gland Cable Assembly 1 1 1 1 1 2 8 Item Part No Description Qty 7 8 9 10 11 12 K9410CA Y9208XB K9410AA K9410AB K9410BB L9814CS Y9306LU Cell O ring Cell Assembly Option Code in case of S Cell Hinge Screw ...

Page 131: ...tion K9411UA ZERO FILTER 1 micron filter K9726EF ZERO FILTER 0 2 micron filter 1 1 1 1 1 1 1 Item Part No Description Qty 1 2 3 4 5 6 7 K9008ZD K9726EH K9411UB K9008ZE K9411UD K9411UC K9411UE K9411UF Filter Element for 1 micron filter for 0 2 micron filter Case Plate O ring O ring O ring Head 4 5 6 1 7 3 ...

Page 132: ...CMPL part number change and amount of change May 2010 3rd Edition Style of TB400G has been changed to S3 P2 5 Style code of TB400G MS code changed to S3 P4 2 Some change of step 1 on Sec 4 1 4 P4 3 Some change of step 3 on Sec 4 1 8 P6 4 Some error correction of item 7 B C and F on Table 6 4 P6 15 Some error correction of step 1 on item 7 P6 16 Some error correction of step 2 on item 9 P6 25 to 6 ...

Page 133: ...Blank Page ...

Page 134: ...n your copy with the attached revised pages Revisions Page 2 2 Some revision of Contact Ratings in Standard Specifications Page 2 5 Some revision of Model and Suffix Codes Note Page 6 16 Some revision of note in 9 Converter Check Operation FUNCTION 9 Page 9 1 P N change of Fuse 3 A for spare parts Customer Maintenance Parts Lists CMPL 12E04A02 03E some P N added for item 4 and item 6 3 of page 1 P...

Page 135: ...en Closed Fail Open Closed Open High low alarm Closed Closed Open Auto zero calibration cleaning Closed Open Closed Contact status open closed when power is turned on is user configurable Contact Rating Maximum switching voltage 250 V AC or 220 V DC resistive load Maximum carrying current 2 AAC or 2 A DC resistive load Maximum switching capacity 120 VA or 60 W resistive load Contact Input Remote r...

Page 136: ... the specified flow 1 5 to 2 l min 2 Optional specifications for selecting without sampling system code NN 3 Optional specifications for selecting with sampling system code A1 A2 or A3 4 For applications where the measuring range is low 200 mg l or less and air bubbles are likely to occur add the L option spike detection function This option is not available for higher measuring range 5 A pH meter...

Page 137: ...rter by switching the converter input signal from a measured signal to a simulated signal The following is the procedure for this function Example of display 1 Select FUNCTION 9 in the MAINT mode C CHEC is displayed 2 Press the ENT key 0050 0 mg l The converter is normal if the turbidity reading and analog output satisfy the following conditions Turbidity reading 50 0 0 5 mg l Analog output 12 00 ...

Page 138: ...dental failures It is subject to change depending on field experiences and others Table 9 1 Spare Parts List Item Part Number Recommended Replacement Interval Lamp K9410DA Yearly Filter 1 μm K9008ZD Yearly Filter 0 2 μm When PSL option is specified K9726EH Yearly Fuse 1 A A1109EF Yearly Fuse 3 A A1113EF Yearly Drain tube When A2 or A3 is specified K9411JM Yearly Replacement intervals vary dependin...

Page 139: ... 2 micron filter Tube 2m Tank Assembly without Pinch Valve Option Code in case of L Tank Assembly with Pinch Valve for 100 110 V AC for 200 220 V AC Option Code in case of L for 100 110 V AC Option Code in case of L for 200 220 V AC Head Tank Option Code in case of L Pinch Valve for 100 110 V AC for 200 220 V AC Head Tank Cover 1 1 1 1 1 Item Part No Description Qty 7 8 9 SV2 SV4 SV3 K9411YA K9411...

Page 140: ...ing hardware Option Code in case of P Option Code in case of R Converter CPU Assembly Analog Assembly for 100 110 VAC 4 to 20 mA DC output for 100 110 VAC 1 to 5V DC output for 200 220 VAC 4 to 20 mA DC output for 200 220 VAC 1 to 5V DC output 1 1 Item Part No Description Qty 5 6 A1109EF A1113EF Fuse 1A Fuse 3A 1 1 1 1 K9411ZG K9411ZH K9410XA K9410WA K9410WB K9410WC K9410WD ...

Reviews: