background image

 SHOULD YOU REQUIRE ANY ASSISTANCE REGARDING THIS PRODUCT PLEASE CONTACT YORK DIRECTLY. 

*

*

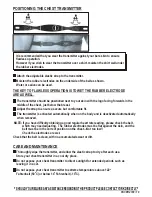
POSITIONING THE CHEST TRANSMITTER

It is recommended that you wear the transmitter against your bare skin to ensure 

flawless operation.

However if you wish to wear the transmitter over a shirt, moisten the shirt well under 

the rubber electrodes.

Attach the adjustable elastic strap to the transmitter.

THE KEY TO FLAWLESS OPERATION IS TO WET THE RUBBER ELECTRODE 

AREAS WELL.

The transmitter should be positioned next to your skin with the logo facing forwards in the

middle of the chest, just below the breast.

NOTE: If you have difficulty obtaining a good regular heart rate reading, please check the belt,

            which may need adjusting.  The rubber electrodes must be flat against the skin, and the

            belt must be in the correct position on the chest---Not too low!!

            Check the electrodes are wet.

Moisten the rubber electrodes on the underside of the belt as shown.

Water or saliva can be used. 

The transmitter is activated automatically when on the body and is deactivated automatically

when removed.

Adjust the strap to ensure a secure but comfortable fit.

Check that the belt is clean, with no accumulated sweat or dirt.

CARE AND MAINTENANCE

Thoroughly wipe the transmitter, and allow the elastic strap to dry after each use.

Store your chest transmitter in a cool dry place.

o

Do not expose your chest transmitter to extreme temperatures above 122  

o

o

o

Fahrenheit (50 C) or below 14  Fahrenheit (-10 C). 

Do not expose your chest transmitter to direct sunlight for extended periods such as 

leaving it in a car.

PACER 4700 / 18

Summary of Contents for York Pacer 4700

Page 1: ...INSTRUCTION MANUAL INSTRUCTION MANUAL 08 2003 TWN Product may vary slightly from the item pictured COMPLIESWITHEUROPEANSTANDARDEN957PT1 6CLASSHC F O L D A B L E T R E A D M I L L 4 7 O O 4 7 O O ...

Page 2: ...treadmill if the unit is disassembled in any way Keep hands away from moving parts The weight limit for this treadmill is 275 lbs 125 kgs Wear proper workout clothing Do not wear loose clothing Do not wear shoes with leather soles or high heels Tie all long hair back Don t rock the unit from side to side Care should be taken when mounting and dismounting the unit Do not place any liquids on any pa...

Page 3: ...you SPECIFICATIONS HANDLE BAR WITH FOAM GRIP MAIN FRAME FOUR WHEELS TRANSPORTATION SYSTEM ALLOWS YOU TO MOVE THE TREADMILL EASILYWHEN FOLDED HANDLE BAR POST 4 PRE SET PROGRAMS SPEED INTERVAL AEROBIC WEIGHT LOSS HILL CLIMB COMPUTER SHOWS TIME DISTANCE CALORIE PULSE SAFETY KEY BELT ADJUSTING BOLTS ADJUST BELT TENSION TO CENTRALIZE MAT RUNNING MAT FOLD TREADMILL UP AND STAND VERTICALLYFOR STORAGE POW...

Page 4: ...e floor carefully Rest the left handle bar post on your shoulder and hold the bottom end close to the handle bar mounting tube as shown NOTE We recommend you ask someone to connect the cables for you while you hold the handle bar post Connect the sensor wire socket to the middle wire plug protruding at the base of the left handle bar post Product may vary slightly from the item pictured 2 BASE CAR...

Page 5: ... post by using one long allen head bolt and star washer Secure the handle bar to the right handle bar post by using one short allen head bolt and star washer X1 5523 102 5523 09 5523 93 5523 09 TAKE CARE DO NOT TRAP CABLE DO NOT FULLY TIGHTEN BOLTS YET A B BASE FRAME FLAT SIDE FIXING BRACKET LEFT HANDLE BAR POST INSERT THIS END FIRST X1 5523 93 5523 09 RIGHT HANDLE BAR POST RIGHT HANDLE BAR POST L...

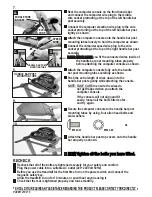
Page 6: ...ill to run for 10 minutes or so without anyone using it Check that the mat is tightened properly and runs smoothly 10 A B Connect the computer elevation wire plug to the wire socket protruding at the top of the left handle bar post tightly as shown Attach the computer console onto the handle bar post mounting tubes loosely to hold the computer as shown Attach the handle bar post top covers onto th...

Page 7: ...DESCRIPTION PACER 4700 6 ...

Page 8: ... 15 1 LOCK PIN CAP L 16 5523 16 1 LOCK PIN 17 5523 17 1 LOCK PIN SPRING 18 5523 18 1 LOCK RELEASE CABLE 19 5523 19 1 LOCK PIN CAP R 20 5523 20 6 RUNNING DECK CUSHION 21 5523 21 2 MOVING WHEEL SLEEVE 22 5523 22 2 REAR MOVING WHEEL 23 5523 23 1 LOCK HANDLE SLEEVE 24 5523 24 1 LOCK RELEASE LEVER 25 5523 25 1 LOCK RELEASE HANDLE 26 5523 26 1 ALLEN HEAD SCREW 27 5523 27 1 MAIN FRAME 28 5523 28 2 TRACK ...

Page 9: ... 15mm PHILLIPS HEAD SCREW 93 5523 93 23 M8 X 15mm ALLEN HEAD BOLT 94 5523 94 2 HANDLE BAR FOAM GRIP 95 5523 95 2 HANDLE BAR END CAP 96 5523 96 2 HANDLE PCB COVER 97 5523 97 4 TACTING KEY 98 5523 98 1 HANDLE BAR POST R 99 5523 99 1 HANDLE BAR POST FIXING BRACKET R 100 5523 100 1 HANDLE BAR POST FIXING BRACKET L 101 5523 101 1 HANDLE BAR POST L 102 5523 102 1 M8 X 55mm ALLEN HEAD BOLT 103 5523 103 1...

Page 10: ... to touch all the buttons on the console CAUTION Do not stand on the mat yet 5 Insert the safety key 6 Follow the instructions written on bottom of computer console TO OPERATE STARTING YOUR EXERCISE Stand on the running mat Once you have selected your workout the treadmill will slowly increase it s speed to the desired levels Continue to grip the handles until you are walking running normally Afte...

Page 11: ...et when finished 4 Shift your weight to the stationary foot on the foot pad and remove the other foot from the running mat and place it on the other foot pad You should now be in the starting position 3 Remove your trailing foot from the running mat and place it on the foot pad on the side of the treadmill This is very easy to do because the natural movement of walking will have shifted your weigh...

Page 12: ...left or the right then follow the instructions below to correct this Locate the adjustment screws on the end of the main frame TEST NOTE Adjust by a turn only to avoid over correcting CAUTION Only adjust the mat when the treadmill is running at a low speed Keep others away from the treadmill Connect the safety key and set to a low speed NOTE CAUTION If the mat continues to move to the left then ad...

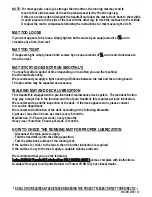
Page 13: ...g board This procedure may be repeated as necessary WALKING MAT AND DECK LUBRICATION This treadmill is equipped with a pre lubricated maintenance deck system The mat deck friction may play a major role in the function and life of your treadmill this requires periodic lubrication We recommend a periodic inspection of the deck If the deck appears worn please contact our service department We recomme...

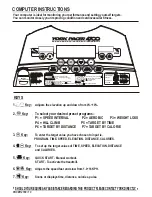
Page 14: ...IME DISTANCE or CALORIES press ENTER to confirm selection Use keys to set target value press ENTER to confirm selection Press START to activate treadmill 3 TO USE TARGETS 3 TO USE TARGETS IN EMERGENCY HOLD HANDRAIL PULL THE CORD TO STOP THE TREADMILL IN EMERGENCY HOLD HANDRAIL PULL THE CORD TO STOP THE TREADMILL EMERGENCY STOP EMERGENCY STOP SAFETY SAFETY Hold the handrail when starting or stoppin...

Page 15: ...FETY KEY When the treadmill is not in use you should remove the safety key and store it somewhere safe away from the treadmill This will prevent any unauthorised use of the treadmill Store the safety key in a safe place OUT OF REACH OF CHILDREN OUT OF REACH OF CHILDREN Before starting the treadmill attach the key to the computer then attach the clip on the other end to your clothing above the wais...

Page 16: ... to enter a workout time 7 Press ENTER to confirm 8 Use the keys to set a maximum speed NOTE All speeds will be scaled down accordingly for the entire program 9 Press ENTER to confirm 10 Press START to begin your workout ON PROGRAM ENTER ENTER ENTER START AEROBIC NOTE SPEED INTERVAL 1 Turn the power ON 2 Check the safety key Ensure the clip is secured to your clothing 3 Press PROGRAM to select SPE...

Page 17: ...e keys to enter a workout time 7 Press ENTER to confirm 8 Use the keys to set a maximum elevation NOTE All elevations will be scaled down accordingly for the entire program 9 Press ENTER to confirm 10 Press START to begin your workout ON PROGRAM ENTER ENTER ENTER START HILL CLIMB NOTE WEIGHT LOSS 1 Turn the power ON 2 Check the safety key Ensure the clip is secured to your clothing 3 Press PROGRAM...

Page 18: ...rget distance 7 Press ENTER to confirm 8 Press START to begin the workout PROGRAM TARGET BY DIST ENTER ENTER START TARGET BY CALORIES 1 Turn the power ON 2 Check the safety key and clip Ensure the clip is secured to your clothing 3 Press PROGRAM to select TARGET BY CALS 4 The display will show the program selected 5 Press ENTER to confirm 6 Use the keys to enter target calories 7 Press ENTER to co...

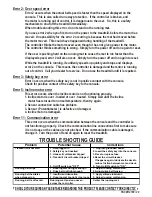
Page 19: ... may need adjusting The rubber electrodes must be flat against the skin and the belt must be in the correct position on the chest Not too low Check the electrodes are wet Moisten the rubber electrodes on the underside of the belt as shown Water or saliva can be used The transmitter is activated automatically when on the body and is deactivated automatically when removed Adjust the strap to ensure ...

Page 20: ...t operational then it is time to call the helpline NO SIGNAL ON THE CONSOLE LCD WINDOWS If there is no signal on the monitor even after you have switched the treadmill off and on again to reset check the communication cable between monitor and motor controller First make sure the connections are good and that the cable is not pinched or damaged If defective ask your dealer for a replacement cable ...

Page 21: ...on the console This means the controller is damaged and the motor is running out of control Call your dealer for service Do not use the treadmill until it is repaired If the user is pushing hard on the running mat to cause the mat to run faster than the displayed speed error 2 will also occur Simply turn the power off and on again to reset If you see error 2 when you first turn on the power to the...

Page 22: ...connections made during the assembly SEE BOLD PRINT UNPLUG If the treadmill still does not move then please contact the helpline Doing this may reset the program error and the treadmill will be ready to use This should reset the sensor and the treadmill will be ready to use Once the cables have been checked turn on the treadmill again This should eradicate the problem 1 2 3 When assembling there a...

Page 23: ...UR FITNESS Like any muscle in your body your heart can be strengthened by systematic physical exercise which requires an increased blood flow and heart rate You can measure your heart rate by taking a pulse reading Your heart of pulse rate corresponds directly to your exertion level and exercise efficiency To improve your fitness in a safe and effective way you need to exercise at a high enough le...

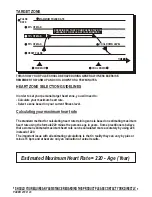
Page 24: ... target heart zone you will need to Calculate your maximum heart rate Select a zone based on your current fitness level Calculating your maximum heart rate The standard method for calculating heart rate training zone is based on estimating maximum heart rate using the formula 220 minus the persons age in years Some practitioners believe that a woman estimated maximum heart rate can be calculated m...

Page 25: ... of Max Heart Rate If you are a beginner with the goal of improving overall fitness losing weight or reducing stress exercise in this zone HEART RATE 200 180 160 140 120 100 80 60 200 180 160 140 120 100 80 60 20 30 40 50 60 70 AGE ANAEROBIC THRESHOLD ZONE 80 90 MHR RED LINE ZONE 90 100 MHR WEIGHT MANAGEMENT ZONE 60 70 MHR AEROBIC ZONE 70 80 MHR HEALTHY HEART ZONE 50 60 MHR Maximum Heart Rate MHR ...

Page 26: ...te it is determined by two thing 1 Rate How fast you exercise e g Speed you cycle run or step 2 THE PULSE RATE RULES If your pulse rate is too low exercise faster or increase load If your pulse rate is too high exercise slower or decrease load If your pulse rate goes up towards the end of your exercise you are trying to exercise for too long shorten the time If your pulse rate does not quickly ret...

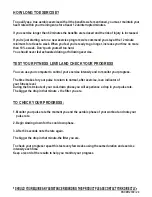
Page 27: ...uter to control your exercise intensity and to monitor your progress The time it takes for your pulse to return to normal after exercise is an indicator of your fitness level During the first minute of your cool down phase you will experience a drop in your pulse rate The bigger the drop in that minute the fitter you are TO CHECK YOUR PROGRESS 1 Monitor your pulse rate the moment you end the aerob...

Page 28: ... Department WARRANTY DOMESTIC U K AUSTRALIA N Z YORK BARBELL U K LTD CHURCHILL WAY DAVENTRY NORTHANTS NN11 4YB ENGLAND TEL 01327 701 824 FAX 01327 706 704 E MAIL helpdesk yorkfitness co uk HELP LINE 8 00am 4 00pm BERNSPORT 1995 LTD PO BOX 33 973 TAKAPUNA AUCKLAND NEW ZEALAND TEL 64 9 488 4750 FAX 64 9 488 4759 E MAIL luanam bernsport co nz HELP LINE 8 30am 4 30pm CANADA TAIWAN HELP LINE 9 00am 6 0...

Page 29: ...PRODUCT DATE REGISTERED YORK WARRANTY REGISTRATION CUSTOMER NAME ADDRESS PRODUCT DATE OF PURCHASE COMMENTS YORK WARRANTY REGISTRATION ...

Page 30: ...for replacement parts Date of purchase Name of location where purchased Model number Last name First name Telephone number Address City State Zip Postcode Send your order to YORK BARBELL AUST LTD UNIT 1 LOT 2 SWAFFHAM ROAD MINTO N S W 2566 AUSTRALIA YORK BARBELL U K LTD CHURCHILL WAY DAVENTRY NORTHANTS ENGLAND NN11 4YB Part ...

Reviews: