background image

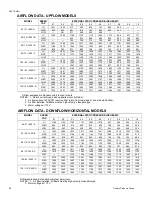
AIRFLOW DATA - UPFLOW MODELS

MODEL

SPEED

TAP

EXTERNAL STATIC PRESSURE, INCHES WC

0.1

0.2

0.3

0.4

0.5

0.6

0.7

0.8

0.9

1.0

40 / 37 / 800 / A

HI

1182

1164

1136

1101

1063

1018

967

904

824

724

MED

954

938

919

899

876

838

798

744

686

588

LOW

650

643

634

620

602

577

542

494

440

335

60 / 55 / 1200 / B

HI

1567

1552

1532

1517

1484

1441

1384

1315

1243

1166

MED

1175

1173

1169

1159

1144

1126

1089

1039

985

910

LOW

881

879

871

861

842

826

795

756

724

664

80 / 75 / 1200 / B

HI

1603

1579

1558

1522

1485

1433

1380

1311

1233

1139

MED

1250

1230

1210

1190

1160

1125

1083

1029

955

889

LOW

925

904

891

873

845

829

793

761

685

618

80 / 75 / 1600 / C

HI

2024

1960

1911

1855

1780

1698

1627

1540

1458

1387

MED

1479

1471

1465

1452

1429

1393

1359

1300

1238

1163

LOW

1210

1208

1198

1175

1149

1110

1052

982

100 / 95 / 2000 / C

HI

2272

2200

2128

2061

1984

1890

1810

1710

1627

1519

MED

1980

1933

1887

1838

1769

1701

1626

1535

1426

1328

LOW

1573

1546

1526

1498

1464

1417

1359

1290

1222

1132

120 / 112 / 2000 / D

HI

2281

2215

2144

2065

2002

1903

1820

1720

1618

1505

MED

1945

1902

1849

1794

1738

1675

1604

1535

1426

1343

LOW

1507

1485

1463

1433

1398

1358

1305

1249

1172

1095

  Airflow expressed in standard cubic feet per minute.
    NOTES:   1.  Air filter installed. All filters must be high velocity, cleanable type.
      2. Motor voltage at 115 V.

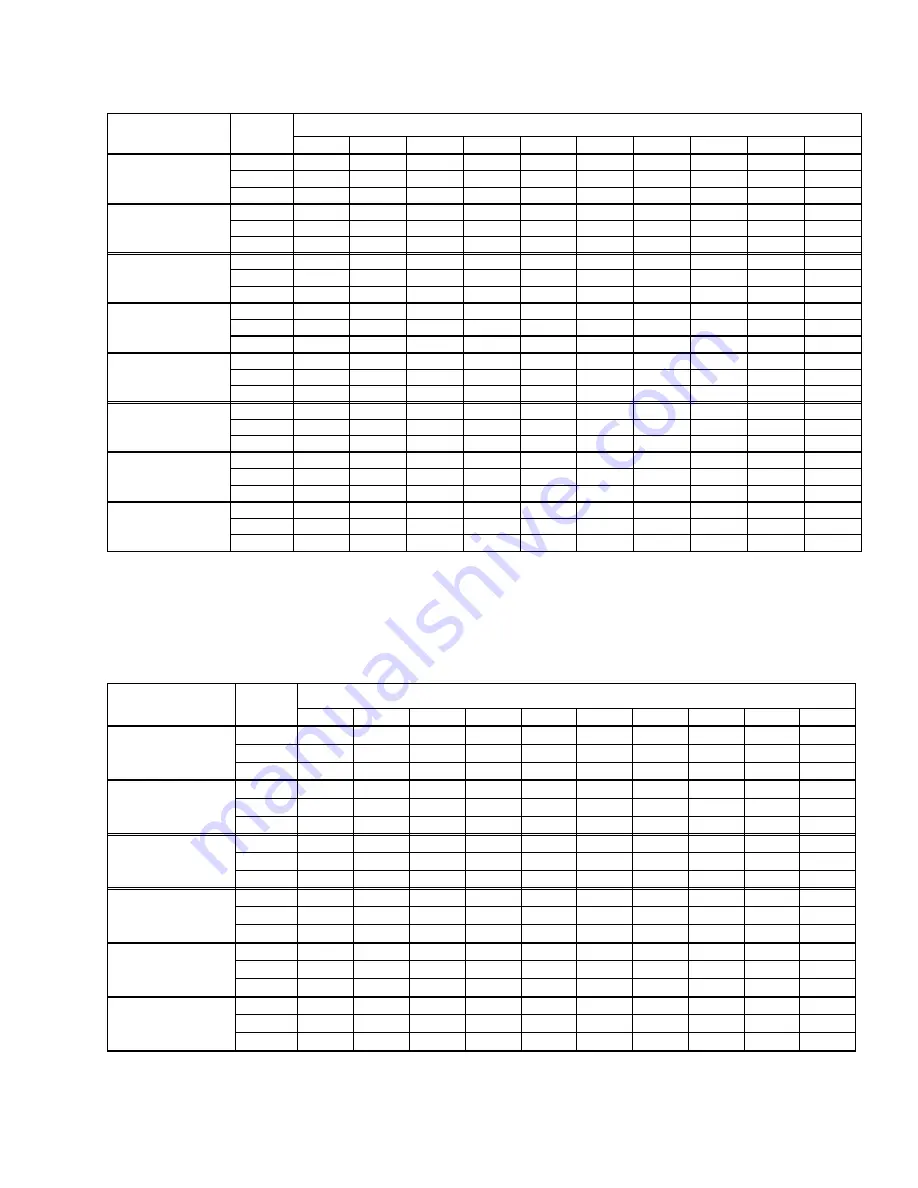
MODEL

SPEED

TAP

EXTERNAL STATIC PRESSURE, INCHES WC

0.1

0.2

0.3

0.4

0.5

0.6

0.7

0.8

0.9

1.0

40 / 37 / 800 / A

HI

1051

1005

977

985

835

757

665

450

MED

900

887

851

810

752

693

609

403

LOW

581

577

569

542

468

60 / 55 / 1000 / B

HI

1220

1200

1190

1152

1115

1065

1012

950

872

771

MED

920

915

900

880

842

803

740

650

LOW

725

729

715

700

681

653

600

525

80 / 75 / 1200 / B

HI

1431

1395

1355

1317

1263

1226

1165

1101

1029

937

MED

1188

1076

1065

1046

1023

994

955

906

842

752

LOW

832

823

811

805

794

766

742

672

624

561

80 / 75 / 1600 / C

HI

1879

1837

1794

1740

1688

1627

1559

1485

1406

1314

MED

1379

1374

1348

1340

1313

1271

1232

1158

1978

LOW

1196

1181

1141

1095

1053

1001

936

100 / 95 / 1400 / C

HI

1742

1672

1602

1519

1433

1348

1232

1098

934

766

MED

1390

1360

1320

1265

1176

1082

965

810

656

LOW

1097

1061

1035

1000

927

830

708

574

100 / 95 / 2000 / C

HI

2300

2229

2168

2100

2026

1939

1855

1758

1661

1546

MED

1937

1897

1855

1808

1737

1673

1597

1511

1425

1305

LOW

1579

1564

1533

1481

1461

1415

1350

1291

1205

1093

120 / 112 / 2000 / D

HI

2366

2298

2226

2153

2065

1988

1890

1808

1712

1600

MED

2000

1961

1920

1874

1821

1757

1685

1606

1510

1430

LOW

1588

1578

1545

1525

1492

1455

1399

1340

1260

1163

140 / 130 / 2000 / D

HI

2343

2275

2204

2132

2047

1968

1871

1791

1695

1585

MED

1981

1942

1901

1856

1803

1740

1669

1591

1490

1416

LOW

1575

1562

1530

1510

1477

1440

1386

1327

1248

1152

    Airflow expressed in standard cubic feet per minute.
    NOTES:  1.  Return air is through side opposite motor (left side).
            2.  Air flows above 1800 CFM require either return from two sides or one side plus bottom.
            3.  Air filter installed. All filters must be high velocity, cleanable type.
      4. Motor voltage at 115 V.

AIRFLOW DATA - DOWNFLOW/HORIZONTAL MODELS

650.75-N4U

28

Unitary Products Group

Summary of Contents for 65075-N4U

Page 1: ...r other flammable vapors and liquids in the vicinity of this or any other appliance WARNING IMPROPER INSTALLATION ADJUSTMENT AL TERATION SERVICE OR MAINTENANCE CAN CAUSE INJURY OR PROPERTY DAMAGE RE F...

Page 2: ...ce since it requires separate properly sized air intake and vent lines The furnace shall not be connected to any type of B BW or L vent or vent connector and not connected to any portion of a factory...

Page 3: ...e access is required for passage to the front when servicing or for inspection or replacement of flue vent connections NOTE In all cases accessibility clearances shall take prece dence over clearances...

Page 4: ...95 2000 C 21 19 3 4 16 5 8 2 2 120 112 2000 D 24 1 2 23 1 4 20 1 8 3 2 3 140 130 2000 D 24 1 2 23 1 4 20 1 8 3 2 3 Vent pipe must be increased to 3 on this model INPUT MBH OUTPUT MBH NOM CFM CAB WIDTH...

Page 5: ...75 1200 17 1 2 91 0 35 65 1370 165 11 8 1 2 9 0 20 14 80 75 1600 21 91 0 30 60 1563 160 11 8 3 4 12 0 20 14 100 95 2000 21 91 0 40 70 1582 170 11 10 1 12 0 20 14 120 112 2000 24 1 2 91 0 40 70 1885 1...

Page 6: ...ambient temperature may drop below 32 F a UL listed self regulated heat tape must be installed It is recommended that self regulating heat tape rated at 3 watts per foot be used This must be installe...

Page 7: ...r sides of the cabinet wall NOTE Air velocity through throw away type filters may not exceed 300 feet per minute All velocities over this require the use of high velocity filters Side Return External...

Page 8: ...n sions Install the plenum following instructions under Ductwork in this instruction SUPPLY AIR DUCTS Installations on combustible material or floors must usea combus tible floor base shown in Figure...

Page 9: ...ezing are possible refer to Page 6 Below Freezing Locations GAS PIPING The gas supply must be installed in accordance with the current National Fuel Gas Code ANSI Z223 1 in the U S or CAN CGA B149 1 o...

Page 10: ...switch should be close to the unit for convenience in servicing With the disconnect switch in the OFF position check all wiring against the unit wiring label Also see the wiring diagram in this instru...

Page 11: ...nnection top right of unit back to the outdoors See Figure 13 or 14 The intake vent should be located either through the wall horizontal or side vent or through the roof vertical vent Care should be t...

Page 12: ...roofor sidewall NOTE Accessory concentric intake vent terminations models 1CT0302 and 1CT0303 are available and approved for use with these furnaces Refer to Form 650 75 N2 4V for installation details...

Page 13: ...ning at the furnace 2 Deburr the piping inside and outside 3 Chamfer the outer edges of the piping 4 Dry fit the entire vent combustion air piping assembly 5 Disassemble the piping and apply cement pr...

Page 14: ...the furnace This may be from within the space in a non confined location or it may be brought into the furnace area from outdoors It is not directly ducted into the furnace A single properly sized pi...

Page 15: ...m dimension of rectangular ducts shall be three inches 2 One permanent opening commencing within 12 inches of the top of the enclosure shall be permitted where the equipment has clearances of at least...

Page 16: ...t connections NOTE An offset using two 45 degree elbows may be required for plenum clearance when the vent is increased to 3 1 Long radius elbows are required for all units 2 Elbows are assumed to be...

Page 17: ...on may require seal ing or shielding of building surfaces with a corrosive resistant material due to vent system corrosive combus tion products PIPING ASSEMBLY The final assembly procedure for the ven...

Page 18: ...e allowable locations shown in Figure 24 and Section 7 8 in the National Fuel Gas Code ANSI Z223 1 current edition Follow all local agency and utility requirements if more restrictive than those shown...

Page 19: ...w the instructions with the coil for trapping the drain SAFETY CONTROLS Control Circuit Fuse A 3 amp fuse is provided to protect the 24 volt transformer from overload caused by control circuit wiring...

Page 20: ...blower motor failure START UP AND ADJUSTMENTS The initial start up of the furnace requires the following addi tional procedures 1 When the gas supply is initially connected to the furnace the gas pip...

Page 21: ...MPLE CHECKING GAS INPUT It is found by measurement that it takes 26 seconds for the hand on the 1 cubic foot dial to make a revolution with only a 120 000 Btuh furnace running Using this information l...

Page 22: ...and electrical supplies ON Start furnace and observe manifold pressure on manometer 5 Adjust manifold pressure by adjusting gas valve regulator screw for natural gas set at 3 5 W C If gas valve regula...

Page 23: ...or lead Place all unused motor leads on Park terminals Two Park terminals are provided CAUTION Do not energize more than one motor speed at a time or damage to the motor will result ADJUSTMENT OF FAN...

Page 24: ...the thermostat circuit opens the ignition control is deener gized Withtheignitioncontroldeenergized thegasflowstopsand the burner flames are extinguished The venter continues to operate for 15 seconds...

Page 25: ...me Lift filter slightly to dislodge and remove for service 3 Remove the filter and follow the cleaning instructions above DO NOT remove the filter stiffener rods if provided When reinstalling the filt...

Page 26: ...blower and the condensate pan The turbulators can then be gently re moved from the secondary heat exchanger 3 With a stiff wire brush brush out loose scale or soot 4 Vacuum the secondary heat exchang...

Page 27: ...e is lost 5 times during the heating cycle This could be caused by low gas pressure or faulty gas valve 9 FLASH TI61F 2 CONTROL ONLY Indicates reversed line voltage polarity Check incoming power wirin...

Page 28: ...985 835 757 665 450 MED 900 887 851 810 752 693 609 403 LOW 581 577 569 542 468 60 55 1000 B HI 1220 1200 1190 1152 1115 1065 1012 950 872 771 MED 920 915 900 880 842 803 740 650 LOW 725 729 715 700...

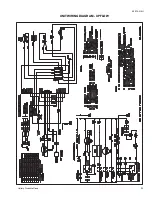
Page 29: ...UNIT WIRING DIAGRAM UPFLOW 650 75 N4U Unitary Products Group 29...
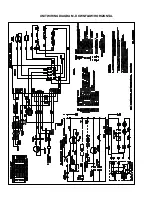
Page 30: ...UNIT WIRING DIAGRAM DOWNFLOW HORIZONTAL...

Page 31: ...NOTES 650 75 N4U Unitary Products Group 31...
Page 32: ...ect to change without notice Printed in U S A Copyright by Unitary Products Group 1998 All rights reserved 650 75 N4U Supercedes 650 75 N4U 498 5005 York Drive Norman OK 73069 Unitary Products Group 6...

Reviews: