background image

YORK CASSETTE (EN) 035T76015-000

CASSETTE

5

5 - INSTALLATION

Unit installation details:

- unit mounting
- refrigerant piping connections
- condensate water drainage connections
- unit wiring connections.

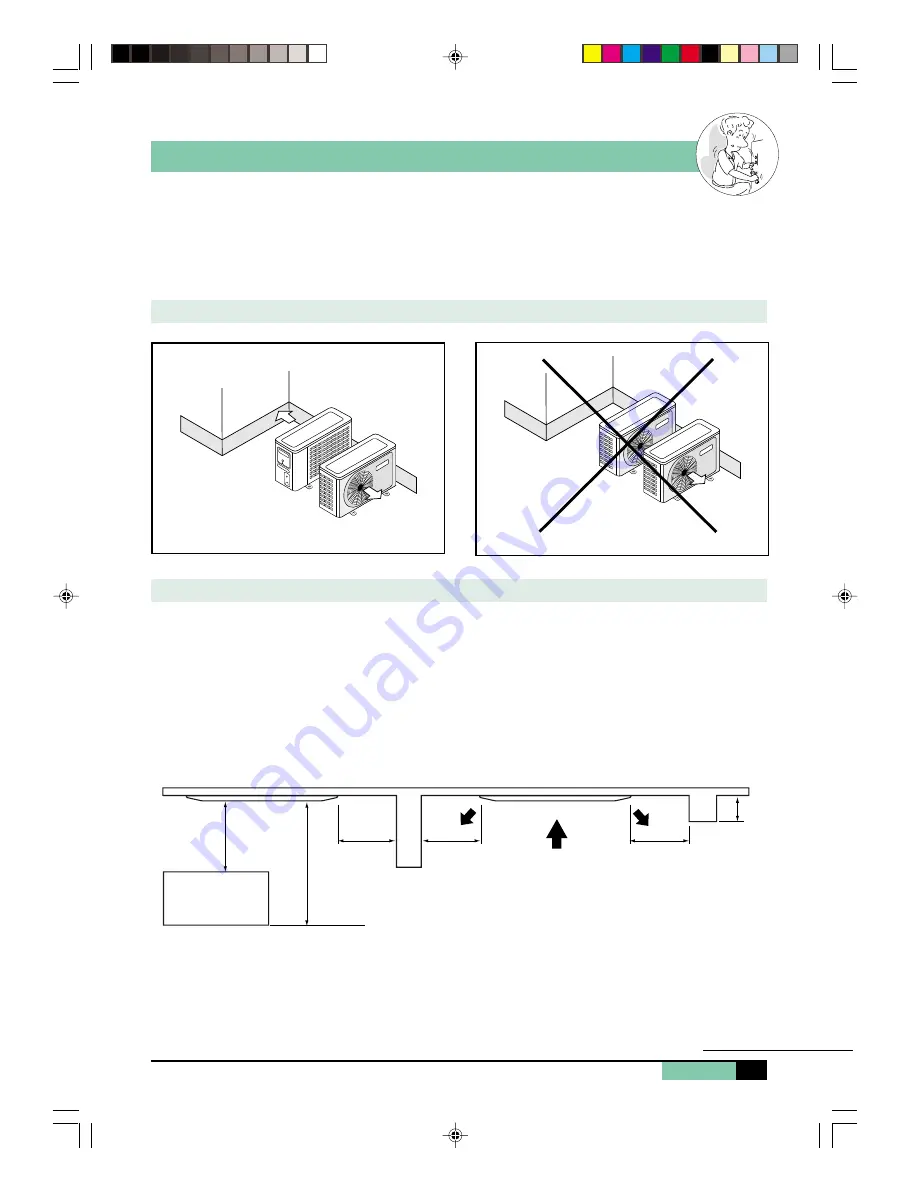
OUTDOOR UNIT INSTALLATION

OK

INSTALLATION OF INDOOR UNIT

Preliminary Site Survey

Electrical supply and installation is to conform to local authority’s (e.g. National Electrical Board) codes and
regulations.

Voltage supply fluctuation must not exceed ±10% of rated voltage. Electricity supply lines must be independent of
welding transformers which can cause high supply fluctuation.

Ensure that the location is convenient for wiring, piping and drainage.

The indoor unit must be installed in such that is free from any obstacles in path of cool air discharge and warm air
return, and must allow spreading of air throughout the room (near the center of the room).

Must be provide clearance for the indoor unit from the wall and obstacles as shown in the figure.

The installation place must be strong enough  to support a load 4 times the indoor unit weight to avoid amplifying
noise and vibration.

The installation place (handling ceiling surface) must be assuring levelness and the height in the ceiling is 350mm
os more.

The indoor unit must be away from heat and steam sources (avoid installing it near an entrance).

Max. 3.0 m

Max. 3.0 m

Max. 3.0 m

Beam

Floor

Obstacle

Min. 0.5 m

Min. 0.5 m

Min. 0.5 m

(continued)

02_MKL-MKM.p65

13/6/02, 11:08 am

5

Summary of Contents for MOL/MOM 25

Page 1: ...YORK CASSETTE EN 035T76012 000 035T76015 000 MINISPLIT CASSETTE MODELS MKL MKM G MOL MOM 25 55 TECHNICAL GUIDE 01_MKL MKM p65 13 6 02 2 01 pm 1 ...

Page 2: ... undertaking any work on the unit make sure that the power supply has been disconnected ELECTRICAL CONNECTIONS All electrical wiring and connections must comply with local standards Power supply cord and interconnection cord used must not be lighter than Polychloroprene sheated cord 245 IEC 57 or H05RN F Disconnecting device must have a contact separation of at least 3 mm GENERAL PRECAUTIONS Check...

Page 3: ...3 250 47 650 6 23 8 00 13 98 13 95 5 367 6 892 12 038 12 007 20 130 26 986 42 350 45 635 5 89 7 901 12 4 13 36 5 072 6 800 10 672 11 499 220 240 1 50 1 184 1 358 1 637 1 740 0 15 0 207 0 207 0 259 0 4 0 53 0 53 0 64 288 288 288 288 836 5 836 5 836 5 836 5 827 5 827 5 827 5 827 5 60 60 60 60 Wireless Remote Control 220 240 1 50 380 415 3 50 1 1 1 1 Rotary Scroll R407C 696 900 1 142 1 142 850 1 060 ...

Page 4: ...0 800 800 800 Clearance required for outdoor units Overall unit dimensions are shown in the Technical Specifications table B A D C I H F E G C B A W D H F E A B W H D F C E MODELS A B C D E F G H I MKL MKM 25 827 5 836 5 380 288 950 950 636 629 505 MKL MKM 35 827 5 836 5 380 288 950 950 636 629 505 MKL MKM 45 827 5 836 5 380 288 950 950 636 629 505 MKL MKM 55 827 5 836 5 380 288 950 950 636 629 50...

Page 5: ...for wiring piping and drainage The indoor unit must be installed in such that is free from any obstacles in path of cool air discharge and warm air return and must allow spreading of air throughout the room near the center of the room Must be provide clearance for the indoor unit from the wall and obstacles as shown in the figure The installation place must be strong enough to support a load 4 tim...

Page 6: ...Be sure to discuss the ceiling drilling work with the installers concerned Unit Hanging Confirm the pitch of the hanging rod is 525 0 mm x 786 0 mm sharp Hold the unit and hang it on the hanging rod with the nut and washer Adjust the unit height to 60 0 mm between the indoor unit bottom surface and the ceiling surface Confirm with a level gauge that the unit is installed horizontally and tighten t...

Page 7: ... mm on the drain piping to avoid the condensed water dripping inside the room Drain Test Connect the main drain pipe to the flexible drain hose Feed water from flexible drain hose to check the piping for leakage When the test is completed connect the flexible drain hose to the drain connector on the indoor unit 6 2 CAUTION MULTIPLE CASSETTE UNIT INSTALLATIONS When a common drainage line is require...

Page 8: ... the service valve 2 Connect the line to a vacuum pump and pump down to 5 Pa 3 When pump down is finished wait 15 minutes to detect potential circuit leakage Open service valves on the outdoor unit Table 2 Maximum piping lengths Note Where the difference in elevation is greater than 5 meters install an oil trap every 5 meters Unit size D m L m H m 25 35 45 55 20 20 24 24 25 25 30 30 22 22 26 26 In...

Page 9: ...sed through coil and joints while the brazing work is being done This will eliminate soot formation on the inside wall of copper tubing Cut the pipe stages by stages advancing the blade of pipe cutter slowly Extra force and a deep cut will cause more distortion of pipe and therefore extra burr Remove burrs from cut edges of pipes with a remover This will avoid unevenness on the flare face which wi...

Page 10: ...d tightened plug the access holes with the rubber plugs provided The outer end of the rubber plugs is inclined and should be installed flush with the slope Turn the plugs to suit their location and press gently into place Panel Installation The front panel can only be fitted in one direction follow the piping direction Follow piping arrow sticker on front panel Be sure to remove the installation t...

Page 11: ...nstall the air intake grille together with the air filter to the front panel The grille can be fit in any direction when selecting direction the ceiling design and grille operability should be considered if the unit comes with ionizer filter optional item make sure to fix the ionizer filter to the air filter before installing the air intake grille Fix the ionizer filter to the air filter with the ...

Page 12: ...ide a return grille 2 Air flow rate should be approximately 25 against the nominal air flow rate In this case the external static pressure of duct side is 1 1 5 mm Aq Therefore the external static pressure will be adjusted by ducting side Resistance on the ducting side See Figure B Possible openning Dimension For Duct Connection Partition Return Grill Return Grill Example Small room Return Grill O...

Page 13: ... sealing material is the same length as the longer air discharge outlet If it is desired to seal the shorter air discharge outlet cut the scaling material to shorten it push the sealing material in about 10 mm beyond the bottom surface of the indoor unit so that it does not touch the air louver Be sure not to push the sealing material in any farther than about 10 mm Fresh Air Intake for 4 way Cass...

Page 14: ...ntil the coil temperature reaches predetermined set points at which time the unit will resume normal operation LOW VOLTAGE The feature is used to protect against any damage to the unit caused by fluctuation of voltage If voltage is lower than the lower limit for approximately 10 seconds or longer compressor operation will be temporarily stopped Normal operation will resume when the voltage returns...

Page 15: ...rt or stop button must be pressed again to reset the timer function To cancel either the Start or Stop Timer setting press the Cancel button To check the time that has been entered either for starting or stopping the unit press the appropriate start stop button and the time will be displayed Press the button again to go back to the clock display SLEEP TIMER FUNCTION Sleep mode which can be used in...

Page 16: ...hat the units is held off due to Low Voltage If the voltage has passed through the reset voltage and the unit is waiting for the time delay the lights will go to normal operation 3 The lights will show the LED Diagnostic Code even when the unit is off 11 WIRING DIAGRAM For details of indoor unit and outdoor unit wiring see the diagram supplied inside the units Start the unit and check operation bo...

Page 17: ... warm water 40 C with a mild detergent 2 Rinse and dry before replacing on unit 3 Never use petrol alcohol or any oter chemical product 1 Remove dust from the front panel with a soft duster or wipe a dump cloth with a mild soap solution 2 Never use petrol alcohol or any other chemical product 1 Clean and check for obstructions 1 Check condition and remove dust from between coil fins 1 No maintenan...

Page 18: ... 03_MKL MKM p65 13 6 02 11 08 am 18 ...

Page 19: ... 03_MKL MKM p65 13 6 02 11 08 am 19 ...

Page 20: ... may then be re used if appropriate or returned to the manufacturer for disposal Under No circumstances should refrigerant be vented to atmosphere Where appropriate drain the refrigerant oil from each system into a suitable container and dispose of according to local laws and regulations governing disposal of oily wastes 3 Packaged unit can generally be removed in one piece after disconnection as ...

Reviews: