background image

FORM 150.66-NM2 

ISSUE DATE: 09/25/2020

137

JOHNSON CONTROLS

SECTION 8 - UNIT OPERATION

8

CONFIGURATION (JUMPERS AND  

POTENTIOMETERS)

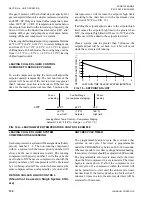
Each VFD  is  pre-configured  at  the  factory  prior  to 

shipping and should be ready for operation when 

it arrives onsite.  A quick check of the settings is 

recommended.  The jumpers must be in the positions 

shown in the following table.  

Chillers built in 2005 and early 2006 were 

configured with J4 IN.  This jumper must 

be removed.  Also be sure to check J2 and 

remove if necessary.

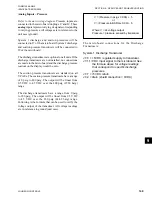
VFD JUMPERS

J2

REMOVE

J3

IN

J4

REMOVE

J5

IN

J6

IN

J7

IN

J8

IN

J9

IN FOR 60 hZ

REMOVE FOR 50 hZ

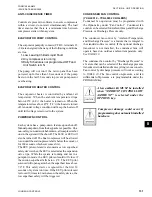
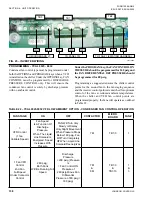
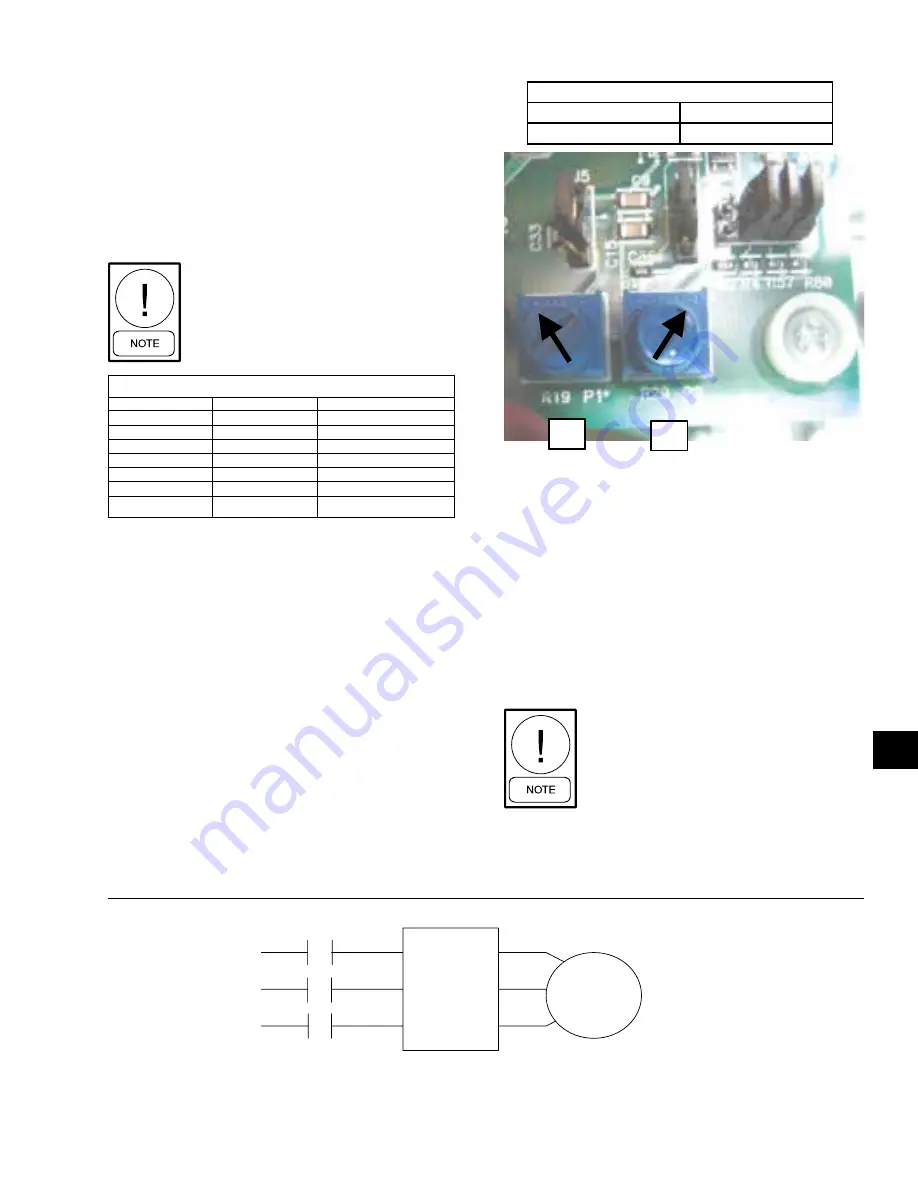
Potentiometer settings are also preset at the factory.  The 

potentiometers should be in the positions shown in Fig. 

24.  The pots do not have numerical settings and are set 

according to the arrow positions indicated.  DO NOT 

change the potentiometer settings unless they do not 

match the positioning of the potentiometers shown in 

Fig. 24.  P1 should be full CW (180 psig) and P2 should 

be full CCW (20 psig).  Modifying these settings may 

cause damage to the chiller or control problems.

The P1 pot sets the setpoint which is the top end of the 

control range.  This setting is the discharge pressure at 

which the fan will be operating at full speed.  The P2 

pot sets the range.  This is the range of pressure where 

the VSD modulates the fan speed from 0 RPM to full 

speed.  The range is subtracted from the setpoint to 

calculate the 0 RPM pressure.

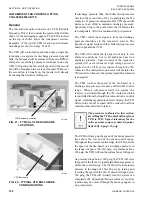
Wiring

VFD wiring is simple and requires only 3-phase power 

in, 3-phase power out, and a 2-wire signal from the 

transducer.  No start, stop, or other alternate power 

requirements are needed to run the VFD.  Fig’s 23 and 

25 show the power and control wiring schematically as 

well as the actual connections.  The VFD controlled fan 

will operate whenever the liquid line solenoid on the 

respective system is energized

On chillers with low ambient option, 

wire 127 is removed from TB7­9 and 

connected to TB7­3.

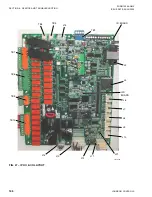
FIG. 23 – INVERTER POWER WIRING SCHEMATIC

lD11301a

150A

L1

T1

150

151A

L2

T2

151

152A

L3

T3

152

CONDENSER 

FAN NO. 1

SPEED 

CONTR.

7M

POTENTIOMETER SETTINGS

P1

P2

180 PSI

20 PSI

FIG. 24 – POTENTIOMETER SETTINGS

P1

P2

P1

P2

lD11300A

Summary of Contents for YCAL0012EC

Page 1: ...ILLERS STYLE D WITH IPU II and I O BOARDS 60 Hz 9 1 2 TON TO 28 TON INSTALLATION OPERATION MAINTENANCE AIR COOLED LIQUID CHILLERS HERMETIC SCROLL Supersedes 150 66 NM2 608 Form 150 66 NM2 920 R 410A 0...

Page 2: ...s this document and any referenced materials This in dividual shall also be familiar with and comply with all applicable industry and governmental standards and regulations pertaining to the task in q...

Page 3: ...icability of these documents rig ging lifting and operating service personnel should verify whether the equipment has been modified and if current literature is available from the owner of the equipme...

Page 4: ...rigerants and Oils 15 High Temperature and Pressure Cleaning 15 Emergency Shutdown 15 SECTION 2 PRODUCT DESCRIPTION 17 INTRODUCTION 17 GENERAL SYSTEM DESCRIPTION 17 Compressors 17 Cooler 17 Condenser...

Page 5: ...IQUID PIPING 34 DUCT WORK CONNECTION 35 WIRING 35 Evaporator Pump Start Contacts 36 System Run Contacts 36 Alarm Status Contacts 36 Remote Start Stop Contacts 36 Remote Emergency Cutoff 36 PWM Input 3...

Page 6: ...Temperatures and Flows 45 Voltage Limitations 45 Ethylene Glycol Correction Factors 46 OPERATIONAL LIMITATIONS SI 47 Temperatures and Flows 47 Voltage Limitations 47 Ethylene Glycol Correction Factor...

Page 7: ...ce Day Key 117 Program Key 119 System Trip Volts 120 Unit Trip Volts 121 Unit Trip Volts 121 Program Key Limits and Defaults 121 Setpoints Quick Reference List 122 UNIT KEYS 123 Options Key 123 CLOCK...

Page 8: ...0 SECTION 9 SERVICE AND TROUBLESHOOTING 143 CLEARING HISTORY BUFFERS 143 SERVICE MODE 143 SERVICE MODE OUTPUTS 143 SERVICE MODE CHILLER CONFIGURATION 143 SERVICE MODE INPUTS 144 CONTROL INPUTS OUTPUTS...

Page 9: ...SPECTION 156 ISN CONTROL 157 Received Data Control Data 157 Transmitted Data 157 ISN Operational and Fault Codes 159 BACNET AND MODBUS DATA COMMUNICATION 160 SERIAL COMMUNICATION ANALOG VALUE DATA 162...

Page 10: ...13 CONNECTION DIAGRAM 64 FIG 14 CONNECTION DIAGRAM STANDARD UNIT 65 FIG 15 UNIT CLEARANCES 90 FIG 16A LEAVING WATER TEMPERATURE CONTROL EXAMPLE 130 FIG 16 SETPOINT ADJUST 130 FIG 17 TYPICAL VFD LOCAT...

Page 11: ...CAL0012 YCAL0032 CONDENSER FAN CONTROL USING OUTDOOR AMBIENT TEMPERATURE AND DISCHARGE PRESSURE 132 TABLE 20 YCAL0012 YCAL0032 CONDENSER FAN CONTROL USING DISCHARGE PRESSURE ONLY 132 TABLE 21 YCAL0012...

Page 12: ...JOHNSON CONTROLS 12 FORM 150 66 NM2 ISSUE DATE 09 25 2020 THIS PAGE INTENTIONALLY LEFT BLANK...

Page 13: ...he failure has occurred within the warranty period and that the unit has been operated within the designed parameters specified All warranty claims must specify the unit model serial number order numb...

Page 14: ...tions This manual and any other document supplied with the unit are the property of YORK which reserves all rights They may not be reproduced in whole or in part without prior written authorization fr...

Page 15: ...of injury from rotating fans Sharp Edges The fins on the air cooled condenser coils have sharp metal edges Reasonable care should be taken when working in contact with the coils to avoid the risk of...

Page 16: ...JOHNSON CONTROLS 16 FORM 150 66 NM2 ISSUE DATE 09 25 2020 THIS PAGE INTENTIONALLY LEFT BLANK...

Page 17: ...1654 rating of 6 Corrosion resistant wire mesh panels are added to protect the condenser coil from incidental damage and restrict unauthorized access to internal components Units are designed in acco...

Page 18: ...n a NEMA3R 12 and equiv alent to IP55 cabinet and includes Liquid Crystal Display with Light Emitting Diode back lighting for outdoor viewing Two display lines Twenty characters per line Color coded 1...

Page 19: ...nning Liquid solenoid valve status Load unload timer status Water pump status Intensity of Protection European Standard International Electrotechnical Commission Provisions are included for pumpdown a...

Page 20: ...nser Louvered Enclosure Panels also be included Factory Mounted AMBIENT KIT HIGH Required if units are to operate when the ambient temperature is above 115 F 46 C Includes discharge pressure transduce...

Page 21: ...ng pressure SPDT 5 amp 125 250 VAC switch Range 0 40 psid deadband 0 5 0 8 psi with 1 4 in NPTE Pressure Connections REMOTE DX COOLER Asplit system arrangement with the cooler leaving and return water...

Page 22: ...RACOUSTIC SOUND BLANKET Each compressor is individually enclosed by an acoustic sound blanket The sound blankets are made with one layer of acoustical absorbent textile fiber of 5 8 in 15 mm thickness...

Page 23: ...M 150 66 NM2 ISSUE DATE 09 25 2020 23 JOHNSON CONTROLS SECTION 2 Product description 2 COMPRESSORS UNIT COMPONENTS FAN ASSEMBLIES CONDENSER COILS CONTROL POWER PANEL HEAT EXCHANGER FIG 1 UNIT COMPONEN...

Page 24: ...RM 150 66 NM2 ISSUE DATE 09 25 2020 SECTION 2 Product description KEYPAD AND DISPLAY UNIT SWITCH COMPRESSOR CONTACTORS USER TERMINAL BLOCK CONTROL POWER PANEL COMPONENTS CIRCUIT BREAKER FIG 2 CONTROL...

Page 25: ...es PIN 14 D Design Series D DEV Development Level PIN 15 A Development Level A POWER Power Field PIN 16 17 SX Single Point Terminal Block SD Single Point Non Fused Disconnect BX Single Point Circuit B...

Page 26: ...ed T BAS Reset Offset Required Q Special BAS Reset Offset Required LCD Language PIN 22 X English S Spanish F French G German Q Special Language Required RDOUT Readout Kits PIN 23 X No Readout Kit Requ...

Page 27: ...OAD Overload PIN 35 X No Option Required Q Special Quote PIN 36 PIN 36 X No Option Required Q Special Quote HTR Crankcase Heater PIN 37 X Crankcase Heater Standard Q Special Crankcase Heater Required...

Page 28: ...ors Q Special Fan Motors Required ENCL Enclosure Panel PIN 48 1 Wire Enclosures Factory 7 Louvered Enclosure Factory 8 Louvered Enclosures Field Q Special Enclosures Panels ACOUSTIC Acoustic Blanket P...

Page 29: ...d Container Shipping Kit C Container Shipping Q Special Quote PIN 58 PIN 58 X No Option Required Q Special Quote PKG Pump Package PIN 59 X No Pump Package Required A Pump Package Kit A B Pump Package...

Page 30: ...25 2020 SECTION 2 Product description REFRIGERANT FLOW DIAGRAM FIG 3 REFRIGERANT FLOW DIAGRAM LD11417A OPTIONAL AIRCOOLEDCONDENSERS OPTIONAL DISCHARGE LINE BALL VALVE HOT DISCHARGE GAS LINE OPTIONAL...

Page 31: ...the unit is periodically inspected during storage INSPECTION Remove any transit packing and inspect the unit to ensure that all components have been delivered and that no damage has occurred during tr...

Page 32: ...ions are placed on a label on the chiller and on the shipping bag LD11837 LD11838 Forks must extend beyond the width of the unit for proper lift The thick ness of the fork blade must be smaller then t...

Page 33: ...t is installed and operated within limitations Refer to LIMITATIONS The following pages outline detailed procedures to be followed to install and start up the chiller SECTION 4 INSTALLATION HANDLING T...

Page 34: ...mpressor and fan operation Considerations should be made utilizing noise levels published in the YORK Engineering Guide for the specific chiller model Sound blankets for the compressors and low sound...

Page 35: ...tch The switch is to be wired to terminals 13 14 of CTB1 located in the control panel as shown on the unit wiring diagram The Flow Switch MUST NOT be used to start and stop the chiller i e starting an...

Page 36: ...down on a unit fault or locked out on a system fault Field connections are at TB1 terminals 29 to 30 system 1 Refer to FIG 6 and the unit wiring dia gram Remote Start Stop Contacts To remotely start...

Page 37: ...orator heater uses 120 VAC Disconnecting 120 VAC power from the unit at or below freezing temperatures can result in damage to the evaporator and unit as a result of the chilled liquid freezing LD0771...

Page 38: ...possible that multiple sources of power can be supplying the unit power panel To pre vent serious injury or death the technician should verify that NO LETHAL VOLTAGES are present inside the panelAFTE...

Page 39: ...il to a circuit connect a YORK hand oil pump Part No 470 10654 000 to the 1 4 in oil charging valve on the oil separator piping with a length of clean hose or copper line but do not tighten the flare...

Page 40: ...oler Purge air from the top of the cooler using the plugged air vent mounted on the top of the cooler body Flow rates and pressure drops must be within the limits given in the Technical Data Section O...

Page 41: ...atastrophic damage to the evaporator EQUIPMENT STARTUP CHECKLIST 7 Check the control panel to ensure it is free of foreign material wires metal chips etc 8 Visually inspect wiring power and control Wi...

Page 42: ...emporarily lowered to ensure all compressors cycle on This unit uses scroll compressors which can only operate in one direc tion Failure to observe this will lead to compressor failure The chilled liq...

Page 43: ...5 56 C 8 33 C 18 in 46 cm from the cooler Superheat should typically be set forno less than 10 F with only a single compressor running on a circuit The superheat is calculated as the difference betwe...

Page 44: ...is made whenever all systems shut down 4 Several seconds after the compressor starts that systems first condenser fan will be cycled on out door air temperature 25 F 4 C or discharge pressure See SECT...

Page 45: ...w 40 F 4 4 C contact your nearest YORK Office for application requirements 2 For leaving water temperature higher than 55 F 12 8 C contact the nearest YORK Office for application guidelines 3 The evap...

Page 46: ...OL kW P TON 10 994 997 1 03 24 1 26 20 986 993 1 06 24 9 16 30 979 990 1 09 25 9 5 40 970 985 1 13 27 3 10 50 959 980 1 16 29 0 32 TABLE 4 ETHYLENE GLYCOL CORRECTION FACTORS LD10955 HEAT EXCHANGER FLO...

Page 47: ...est YORK Office for application requirements 2 For leaving water temperature higher than 55 F 12 8 C contact the nearest YORK Office for application guidelines 3 The evaporator is protected against fr...

Page 48: ...03 24 1 26 20 986 993 1 06 24 9 16 30 979 990 1 09 25 9 5 40 970 985 1 13 27 3 10 50 959 980 1 16 29 0 32 TABLE 7 ETHYLENE GLYCOL CORRECTION FACTORS OPERATIONAL LIMITATIONS SI LD10956 HEAT EXCHANGER F...

Page 49: ...0 23 9 1 45 2 188 1977 2183 2014 2220 15 13 0032 118 6 44 7 50 0 28 0 1 50 2 188 2034 2240 2077 2283 15 15 Shipping Operating weights shown are for units without pump options Model No Condenser Conde...

Page 50: ...3 125 250 500 1000 2000 4000 8000 DBA YCAL0012 80 81 80 79 78 73 68 63 82 YCAL0018 83 82 81 79 78 73 68 64 82 YCAL0021 84 83 82 80 78 73 68 65 82 YCAL0025 91 91 92 89 84 80 76 73 91 YCAL0027 91 91 92...

Page 51: ...FORM 150 66 NM2 ISSUE DATE 09 25 2020 51 JOHNSON CONTROLS SECTION 6 technical data 6 THIS PAGE INTENTIONALLY LEFT BLANK...

Page 52: ...100 110 14 2 0 1 230 79 100 90 110 90 110 14 2 0 1 380 46 60 60 60 60 60 14 2 0 1 460 38 60 45 60 45 60 14 2 0 1 575 31 60 35 40 35 40 14 2 0 1 YCAL0021EC 200 94 100 110 125 110 125 14 2 0 1 230 88 1...

Page 53: ...0 1 14 2 1 1 14 2 1 5kA 5kA 5kA 65kA 39 1 250 39 1 250 2 2 6 5 0 1 14 2 1 1 14 2 1 5kA 5kA 5kA 65kA 36 2 250 36 2 250 2 1 6 5 0 1 14 2 1 1 14 2 1 5kA 5kA 5kA 65kA 20 9 155 20 9 155 2 1 6 3 0 1 14 2 1...

Page 54: ...L DATA TABLE 11 MICRO PANEL POWER SUPPLY VOLTAGE RANGE VOLTAGE CODE UNIT POWER MIN MAX 17 200 3 60 180 220 28 230 3 60 207 253 40 380 415 3 60 342 440 46 460 3 60 414 506 50 380 415 3 50 342 440 58 57...

Page 55: ...25 of the rated load amps for the largest motor plus 100 of the rated load amps for all other loads included in the circuit Otherwise an HACR type circuit breakers must be used Maximum HACR circuit br...

Page 56: ...JOHNSON CONTROLS 56 FORM 150 66 NM2 ISSUE DATE 09 25 2020 SECTION 6 technical data LD13257 ELEMENTARY DIAGRAM FIG 7 CONTROL CIRCUIT SINGLE 0012 0032 STANDARD LOW SOUND ULTRA LOW SOUND 460V...

Page 57: ...FORM 150 66 NM2 ISSUE DATE 09 25 2020 57 JOHNSON CONTROLS SECTION 6 technical data 6 LD13258 ELEMENTARY DIAGRAM CON T...

Page 58: ...JOHNSON CONTROLS 58 FORM 150 66 NM2 ISSUE DATE 09 25 2020 SECTION 6 technical data LD11799 ELEMENTARY DIAGRAM FIG 8 CONTROL CIRCUIT SINGLE 0025 0032 ULTRA LOW SOUND 200V 230V 380V 575V...

Page 59: ...FORM 150 66 NM2 ISSUE DATE 09 25 2020 59 JOHNSON CONTROLS SECTION 6 technical data 6 LD12241 ELEMENTARY DIAGRAM CON T...

Page 60: ...JOHNSON CONTROLS 60 FORM 150 66 NM2 ISSUE DATE 09 25 2020 SECTION 6 technical data ELEMENTARY DIAGRAM FIG 9 POWER CIRCUIT SINGLE 0012 0032 STANDARD LOW SOUND 0025 0032 ULTRA LOW SOUND 460V LD13256...

Page 61: ...FORM 150 66 NM2 ISSUE DATE 09 25 2020 61 JOHNSON CONTROLS SECTION 6 technical data 6 ELEMENTARY DIAGRAM FIG 10 POWER CIRCUIT SINGLE 0025 0032 ULTRA LOW SOUND 200V 230V 380V 575V LD13265...

Page 62: ...JOHNSON CONTROLS 62 FORM 150 66 NM2 ISSUE DATE 09 25 2020 SECTION 6 technical data FIG 11 CONNECTION DIAGRAM 0012 0032 STANDARD LOW SOUND 0025 0032 ULTRA LOW SOUND 460V CONNECTION DIAGRAM LD13254...

Page 63: ...FORM 150 66 NM2 ISSUE DATE 09 25 2020 63 JOHNSON CONTROLS SECTION 6 technical data 6 CONNECTION DIAGRAM FIG 12 CONNECTION DIAGRAM 0025 0032 ULTRA LOW SOUND 200V 230V 380V 575V LD13266...

Page 64: ...JOHNSON CONTROLS 64 FORM 150 66 NM2 ISSUE DATE 09 25 2020 SECTION 6 technical data CONNECTION DIAGRAM FIG 13 CONNECTION DIAGRAM 0012 0032 ALL UNITS LD13253...

Page 65: ...FORM 150 66 NM2 ISSUE DATE 09 25 2020 65 JOHNSON CONTROLS SECTION 6 technical data 6 FIG 14 CONNECTION DIAGRAM STANDARD UNIT CONNECTION DIAGRAM LD11796A BACNET MICROGATEWAY OPTION ALL MODELS...

Page 66: ...ance high pressure safety cutouts however the system designer must consider potential performance degradation Recommended minimum clearances front to wall 6 rear to wall 6 cooler end to wall 4 0 coil...

Page 67: ...T TOP VIEW 9 16 DIA MOUNTING HOLES typ COMPR END 1 1 16 5 17 2 1 4 ORIGIN Y C G X 44 3 8 32 1 8 6 1 8 1 1 16 CONTROL PANEL END END CAP WIDTH FRONT VIEW 109 3 16 RIGGING HOLES 2 3 0 X 1 50 BOTH SIDES...

Page 68: ...ance high pressure safety cutouts however the system designer must consider potential performance degradation Recommended minimum clearances front to wall 6 rear to wall 6 cooler end to wall 4 0 coil...

Page 69: ...T TOP VIEW 9 16 DIA MOUNTING HOLES typ COMPR END 1 1 16 5 17 2 1 4 ORIGIN Y C G X 44 3 8 32 1 8 6 1 8 1 1 16 CONTROL PANEL END END CAP WIDTH FRONT VIEW 109 3 16 RIGGING HOLES 2 3 0 X 1 50 BOTH SIDES...

Page 70: ...ance high pressure safety cutouts however the system designer must consider potential performance degradation Recommended minimum clearances front to wall 6 rear to wall 6 cooler end to wall 4 0 coil...

Page 71: ...T TOP VIEW 9 16 DIA MOUNTING HOLES typ COMPR END 1 1 16 5 17 2 1 4 ORIGIN Y C G X 44 3 8 32 1 8 6 1 8 1 1 16 CONTROL PANEL END END CAP WIDTH FRONT VIEW 109 3 16 RIGGING HOLES 2 3 0 X 1 50 BOTH SIDES...

Page 72: ...peration without nuisance high pressure safety cutouts however the system designer must consider potential performance degradation Recommended minimum clearances front to wall 6 rear to wall 6 cooler...

Page 73: ...ON T 2 1 4 3 3 8 17 3 4 42 1 8 9 44 3 8 32 1 8 15 5 8 50 1 2 80 1 2 105 1 16 6 1 8 1 1 1 16 1 1 16 5 17 FRONT VIEW TOP VIEW 9 16 DIA MOUNTING HOLES typ CONTROL PANEL CONTROL PANEL END COMPR END ORIGIN...

Page 74: ...e high pressure safety cutouts however the system designer must consider potential performance degradation Recommended minimum clearances front to wall 6 rear to wall 6 cooler end to wall 4 0 coil end...

Page 75: ...ON T 2 1 4 3 3 8 17 3 4 42 1 8 9 44 3 8 32 1 8 15 5 8 50 1 2 80 1 2 105 1 16 6 1 8 1 1 1 16 1 1 16 5 17 FRONT VIEW TOP VIEW 9 16 DIA MOUNTING HOLES typ CONTROL PANEL CONTROL PANEL END COMPR END ORIGIN...

Page 76: ...peration without nuisance high pressure safety cutouts however the system designer must consider potential performance degradation Recommended minimum clearances front to wall 6 rear to wall 6 cooler...

Page 77: ...ON T 2 1 4 3 3 8 17 3 4 42 1 8 9 44 3 8 32 1 8 15 5 8 50 1 2 80 1 2 105 1 16 6 1 8 1 1 1 16 1 1 16 5 17 FRONT VIEW TOP VIEW 9 16 DIA MOUNTING HOLES typ CONTROL PANEL CONTROL PANEL END COMPR END ORIGIN...

Page 78: ...essure safety cutouts however the system designer must consider potential performance degradation Recommended minimum clearances front to wall 2m rear to wall 2m cooler end to wall 1 2m coil end to wa...

Page 79: ...NSIONS YCAL0012 SI CON T TOP VIEW 14 DIA MOUNTING HOLES typ COMPR END 28 126 431 58 ORIGIN Y C G X 1128 815 156 28 CONTROL PANEL END END CAP WIDTH FRONT VIEW 2774 RIGGING HOLES 2 76 X 38 BOTH SIDES 39...

Page 80: ...he system designer must consider potential performance degradation Recommended minimum clearances front to wall 2m rear to wall 2m cooler end to wall 1 2m coil end to wall 2m top no obstructions allow...

Page 81: ...NSIONS YCAL0018 SI CON T TOP VIEW 14 DIA MOUNTING HOLES typ COMPR END 28 126 431 58 ORIGIN Y C G X 1128 815 156 28 CONTROL PANEL END END CAP WIDTH FRONT VIEW 2774 RIGGING HOLES 2 76 X 38 BOTH SIDES 39...

Page 82: ...irflow patterns and possible diminished performance YORK s unit controls will optimize operation without nuisance high pressure safety cutouts however the system designer must consider potential perfo...

Page 83: ...28 DIMENSIONS YCAL0021 SI CON T TOP VIEW 14 DIA MOUNTING HOLES typ COMPR END 28 126 431 58 ORIGIN G X 1128 815 156 28 CONTROL PANEL END END CAP WIDTH FRONT VIEW 2774 RIGGING HOLES 2 76 X 38 BOTH SIDES...

Page 84: ...sure safety cutouts however the system designer must consider potential performance degradation Recommended minimum clearances front to wall 2m rear to wall 2m cooler end to wall 1 2m coil end to wall...

Page 85: ...NSIONS YCAL0025 SI CON T 58 86 450 1070 229 1128 815 398 1282 2044 2669 156 25 28 28 126 431 FRONT VIEW TOP VIEW 14 DIA MOUNTING HOLES typ CONTROL PANEL CONTROL PANEL END COMPR END ORIGIN Y C G X C G...

Page 86: ...sure safety cutouts however the system designer must consider potential performance degradation Recommended minimum clearances front to wall 2m rear to wall 2m cooler end to wall 1 2m coil end to wall...

Page 87: ...NSIONS YCAL0027 SI CON T 58 86 450 1070 229 1128 815 398 1282 2044 2669 156 25 28 28 126 431 FRONT VIEW TOP VIEW 14 DIA MOUNTING HOLES typ CONTROL PANEL CONTROL PANEL END COMPR END ORIGIN Y C G X C G...

Page 88: ...sure safety cutouts however the system designer must consider potential performance degradation Recommended minimum clearances front to wall 2m rear to wall 2m cooler end to wall 1 2m coil end to wall...

Page 89: ...NSIONS YCAL0032 SI CON T 58 86 450 1070 229 1128 815 398 1282 2044 2669 156 25 28 28 126 431 FRONT VIEW TOP VIEW 14 DIA MOUNTING HOLES typ CONTROL PANEL CONTROL PANEL END COMPR END ORIGIN Y C G X C G...

Page 90: ...25 2020 SECTION 6 technical data TECHNICAL DATA CLEARANCES NOTES 1 No obstructions allowed above the unit 2 Only one adjacent wall may be higher than the unit 3 Adjacent units should be 10 ft 3 m apar...

Page 91: ...750 CIP B 450 CIP B 750 CIP B 450 CIP B 750 Neoprene ND C ND C ND C ND C ND C ND C ND C ND C Seismic SLRS 2 C2 420 SLRS 2 C2 660 SLRS 2 C2 420 SLRS 2 C2 660 SLRS 2 C2 520 SLRS 2 C2 660 SLRS 2 C2 520...

Page 92: ...in the control panel information packet is a drawing and table specifically for each chiller based on the option selection The drawing and table will be similar to the ones shown below The drawing wi...

Page 93: ...TERNAL ADJUSTMENT BOLT Turn clockwise to load spring and maintain Free Operating Height Dowel Pin is 3 8 dia for CIP A 1 2 thereafter Mounting may be operated 1 2 above Free Operating Height NOTE CIP...

Page 94: ...d free height of the isolator To use the isolator as blocking for the equipment insert a 10 mm 1 4 in shim between the upper load plate and vertical uprights Lower the equipment on the blocking or shi...

Page 95: ...N Up to 751 lbs Up to 341 kg ND C Yellow 029 24585 006 CS Cap Screw BC MBD Max Bolt Dia Steel Plate Top Bottom Neoprene covered to prevent corrosion L T H W D ENGLISH Size D H L T W BC CS MBD ND C 2...

Page 96: ...kg SLRS 2 C2 Gray 029 24585 011 1497 to 2058 lbs 679 to 933 kg SLRS 2 C2 Silver 029 24585 012 2058 to 2619 lbs 933 to 1188 kg SLRS 2 C2 Gray w red 029 24585 013 2619 to 3180 lbs 1188 to 1442 kg SLRS 2...

Page 97: ...and the steel washer 8 Turn adjustment bolt 8 turns on each mount 9 Take one additional complete turn on each adjustment bolt in sequence until the top plate lifts off of the lower restraining nuts T...

Page 98: ...JOHNSON CONTROLS 98 FORM 150 66 NM2 ISSUE DATE 09 25 2020 THIS PAGE INTENTIONALLY LEFT BLANK...

Page 99: ...s pressure transducers and temperature sensors are connected directly to the Microprocessor Board The Microprocessor Board circuitry multiplexes the analog inputs digitizes them and scans them to keep...

Page 100: ...em parameters such as system pressures temperatures compressor running times and starts option information on the chiller and system setpoints This data is useful for monitoring chiller operation diag...

Page 101: ...ystem units all SYS 2 messages will be blank This message informs the operator that the UNIT switch on the control panel is in the OFF position which will not allow the unit to run The REMOTE CONTROLL...

Page 102: ...occur when the discharge pressure gets within 15 psig of the programmed discharge pressure cutout This will only happen if the system is fully loaded and will shut only one compressor off If the syste...

Page 103: ...D S C H P R E S S Y S 1 L O W S U C T P R E S S The PUMPING DOWN message indicates that a compressor in the respective system is presently in the process of pumping the system down When pumpdown is in...

Page 104: ...ERVICE Mode This safety is ignored for the first 15 seconds of system runtime The internal motor protector opens at 185 F 248 F 85 C 120 C andautoresets ThemechanicalHPswitch opens at 405 psig 10 psig...

Page 105: ...cle timers have finished counting down When the CURRENT FEEDBACK ONE PER UNIT option is selected under the OPTIONS Key the unit will shut down when the voltage exceeds the programmed trip voltage for...

Page 106: ...g System X Suction Limiting System X Percentage Load Limiting Manual Overide Status System X Pumping Down on shutdown Unit Safeties Warning Messages System Safeties Low Ambient Temp System X High Disc...

Page 107: ...scrolled through by using the UP and DOWN arrow keys or the ENTER ADV key located under the ENTRY section DISPLAY PRINT KEYS With the UNIT TYPE set as a liquid chiller via no jumper between J4 11 and...

Page 108: ...tual number of systems and compressors on the unit A total of 99 999 hours and starts can be logged before the counter rolls over to 0 This display of the load and unload timers indicate the time in s...

Page 109: ...e When the ambient temperature drops below 40 F the heater is turned on When the temperature rises above 45 F the heater is turned off An under voltage condition will keep the heater off until full vo...

Page 110: ...is a quick reference list for information available under the OPER DATA key TABLE 14 OPERATION DATA Block of information repeats for each system LD07381a Oper Data Key Leaving Chilled Liquid Temps Am...

Page 111: ...LEAD LAG CONTROL AUTOMATIC FAN CONTROL AMB DSCH PRESS CURRENT FEEDBACK NONE SOFT START ENABLED EXPANSION VALVE THERMO STATIC PROGRAM VALUES DSCH PRESS CUTOUT 395 psig SUCT PRESS CUTOUT 44 psig LOW AMB...

Page 112: ...emory battery backup is built into the circuit board or manual resetting of a fault lock out When the HISTORY key is pressed a printout is transmitted of all system operating conditions which were sto...

Page 113: ...ischarge Pressure Displays whether Manual Override was Enabled or Disabled Displays type of Current Feedback utilized Displays whether the optional European Soft Start was installed and selected Displ...

Page 114: ...ITundertheprogramkey the display will be the first display prior to the SYS 1 info If the micro is programmed for CURRENT FEEDBACK NONE no current display will appear Displays for System 1 starting wi...

Page 115: ...ey and DOWN arrow key are also used for programming the control panel such as changing numerical or text values when programming cooling setpoints setting the daily schedule changing safety setpoints...

Page 116: ...ED LIQUID CONTROL The above message shows the current chilled water temperature SETPOINT at 45 0 F notice the cursor po sitioned under the number 0 Pressing either the UP or DOWN arrow will change the...

Page 117: ...nt or the range In the above example control will be in the range of 43 F to 47 F RETURN CHILLED LIQUID CONTROL In return chilled liquid control the range no longer has a X X F but only a X X F RANGE...

Page 118: ...he UP and DOWN arrow and ENTER ADV keys After SUN Sunday schedule appears on the display a subsequent press of the SCHEDULE ADVANCE DAY key will display the Holiday schedule This is a two part display...

Page 119: ...BIENT TEMP CUTOUT allows the user to select the chiller outside ambient temperature cutout point If the ambient falls below this point the chiller will shut down Restart can occur when temperature ris...

Page 120: ...FFERENTIAL OFF PRESSURE below 160 psig This ensures discharge pressure does not drop too low The Fan Differential Off Pressure is the programmed differential pressure value that is used to stage the c...

Page 121: ...BLE 16 PROGRAM KEY LIMITS AND DEFAULTS The minimum discharge pressure allowed is 160 psig The fan differential Off Pressure will be lowered to prevent going below 160 psig based on where the fan contr...

Page 122: ...nt Pressure Cutout Range Remote Setpoint Low Ambient Temp Cutout Range Display Only Leaving Liquid EMS PWM Temperature Remote Temp Cutout Reset Setpoint Anti Recycle Timer Fan Control On Pressure Fan...

Page 123: ...key is used to scroll through the list of options by repeatedly pressing the OPTIONS key After the selected option has been displayed the UP and DOWN arrow keys are then used to change that particular...

Page 124: ...ssion for 5 minutes it will revert back to the locally programmed values Option 6 Unit Control Mode Unit control is based on return or leaving chilled liq uid temp Only leaving temp control mode shoul...

Page 125: ...pressure This mode must be chosen if the discharge pressure transducers are not installed Option 10 Manual Override Mode This option allows overriding of the daily schedule that is programmed MANUAL O...

Page 126: ...code and no reboot will occur If the update resulted in an error the original program will still be active When an error occurs ensure the correct Flash Card was utilized Incorrect chiller software wi...

Page 127: ...important that the date and time be correct otherwise the daily schedule will not function as desired if programmed In addition for ease of troubleshooting via the History printouts the day time and d...

Page 128: ...QUICK REFERENCE LIST Table 18 provides a quick reference list for the Unit key setpoints Programmed under Service Mode Programmed under Service Mode Viewable Only Viewable Only Chiller MUST be Selecte...

Page 129: ...iquid Control is the temperature the unit will control to within the control cooling range The Setpoint High Limit is the Setpoint plus the Cooling Range The Setpoint Low Limit is the Setpoint minus t...

Page 130: ...r will always be the next compressor to start The running compressor with priority number 1 will always be the next to shut off Whenever a compressor is shut off the priority numbers of all compressor...

Page 131: ...utout or for 180 seconds whichever comes first The EEV pilot solenoid is also used as a low superheat safety device when the EEV is selected as the expansion valve type While the system is running and...

Page 132: ...DUCER IS INSTALLED LD12211 STANDARD CONDENSER FAN CONTROL YCAL0012 YCAL0032 FAN STAGE ON OFF CONTACTOR MICROBOARD OUTPUT FAN 1 OAT 25 F 3 9 C or DP Fan Ctrl On Press OAT 20 F 6 7 C and DP Fan Ctrl On...

Page 133: ...F the VFD will shut off the motor even though the VFD is powered by 7M The VFD control signal is sent from a liquid temperature sensor connected to a condenser coil return bend The sensor is connecte...

Page 134: ...requires only single phase power in single phase power out and a 2 wire signal from the liquid line temperature sensor No start stop or other alternate power requirements are needed to operate the VF...

Page 135: ...inverter control points are matched for optimum control of the fans at reduced ambient temperatures assuring superheat and oil control is not compromised When the chiller and VFD fan control points ar...

Page 136: ...ssure Speed control of the respective system will occur whenever high voltage power is applied to the VFD power inputs through the 7M contactor The chiller microprocessor will energize the 7M contacto...

Page 137: ...be full CCW 20 psig Modifying these settings may cause damage to the chiller or control problems The P1 pot sets the setpoint which is the top end of the control range This setting is the discharge p...

Page 138: ...ints are programmed properly the fans will operate as outlined in Table 22 FAN STAGE ON OFF CONTACTOR MICRO BOARD FAN 1 VFD Control 1 fan Variable Speed Fan Speed Is A Function Of Discharge Pressure W...

Page 139: ...nd causes the Chilled Liquid Setpoint to revert back to the Local programmed value The reset value is always added to the Chilled Liquid Setpoint meaning that this function never lowers the Chilled Li...

Page 140: ...x 11 11 C 6 67 C Reset 10 New Setpoint 7 22 C 6 67 C 13 89 C MaxResetValueisthe MaxEMS PWMRemoteTemp Reset setpoint valuedescribedintheprogram mingsectionunderCoolingSetpoints Programmable values are...

Page 141: ...FORM 150 66 NM2 ISSUE DATE 09 25 2020 141 JOHNSON CONTROLS SECTION 8 UNIT OPERATION 8 FIG 26 FIELD AND FACTORY ELECTRICAL CONNECTIONS OPTIONAL REMOTE TEMPERATURE RESET BOARD LD03875a 035 15961 000...

Page 142: ...JOHNSON CONTROLS 142 FORM 150 66 NM2 ISSUE DATE 09 25 2020 THIS PAGE INTENTIONALLY LEFT BLANK...

Page 143: ...TROUBLESHOOTING CLEARING HISTORY BUFFERS The history buffers may be cleared by pressing the HIS TORY key and then repeatedly pressing the UP arrow key until you scroll past the last history buffer cho...

Page 144: ...e order of analog and digital inputs that will appear when sequenced with the Down arrow key analog inputs SYS 1 SUCT PRESSURE UNIT TYPE SYS 1 DISCH PRESSURE SYS 1 COOLER INLET REFRIG TEMP SYS 1 SUCTI...

Page 145: ...ve TB7 8 Sys 1 Condenser Fan Output 1 TB7 9 Sys 1 Condenser Fan Output 2 TB7 10 Sys 1 Condenser Fan Output 3 TB8 2 Evaporator Heater TB8 3 Sys 1 Alarm TB8 6 7 Evaporator Pump Starter TB8 4 Evaporator...

Page 146: ...146 FORM 150 66 NM2 ISSUE DATE 09 25 2020 SECTION 9 SERVICE AND TROUBLESHOOTING FIG 27 IPU II I O LAYOUT LD12721 TB5 TB1 TB6 TB7 TB8 TB9 TB10 J14 J13 J12 J15 J11 J10 J9 J8 J7 J6 J5 J3 I O BOARD IPU B...

Page 147: ...lar digital input Typically voltages as high as 34 VDC could be mea sured for the DC voltage on the digital inputs This voltage is in reference to ground The unit case should be sufficient as a refere...

Page 148: ...age readings that corre spond to specific liquid temperatures J6 1 drain shield connection 0 VDC Return TABLE 29 ENTERING LEAVING CHILLED LIQUID TEMP SENSOR COOLER INLET TEMPERATURE SENSOR AND SUCTION...

Page 149: ...he suction pressure transducers are standard on all YCAL s The suction pressure transducers have a range of 0 psig to 400 psig The output will be linear from 0 5 VDC to 4 5 VDC over the 400 psig 27 58...

Page 150: ...5VDC return J7 1 drain shield connection 0VDC Digital Outputs Refer to the unit wiring diagram and Fig 28 The digital outputs are located on TB7 TB8 TB9 and TB10 of the microboard ALL OUTPUTS ARE 120...

Page 151: ...for YORK is P N 950915576 The cable to connect the printer can either be locally assembled from the parts listed or ordered directly from WEIGH TRONIX under part number 287 040018 Parts The following...

Page 152: ...ducers Microboard to isolate 5 Defective IPU I O board 5 Replace Microboard or Display board Contact YORK Service before Replacingcircuit Boards FLOW SWITCH REM 1 No chilled liquid flow 1 Check chille...

Page 153: ...tactors Ensure fan blows air upward 2 Too much refrigerant 2 Remove refrigerant 3 Air in refrigerant system 3 Evacuate and recharge system 4 Defective discharge 4 Replace discharge pressure pressure t...

Page 154: ...roblem Consult START Installation Manual to aid in understanding compres sor operation and capacity control 2 Defective water temperature 2 Compare the display with a sensor thermometer Should be with...

Page 155: ...should be taken and analyzed If contaminants are present the system must be cleaned to prevent compressor failure Never use the scroll compressor to pump the refrigerant system down into a vacuum Doi...

Page 156: ...INSPECTION In addition to the checks listed on this page periodic overall inspections of the unit should be accomplished to ensure proper equipment operation Items such as loose hardware component op...

Page 157: ...DATA The Middle Market receives 8 data values from the ISN The first 4 are analog values and the last 4 are digital values These 8 data values are used as control parameters when in REMOTE mode When t...

Page 158: ...ed Spare P59 131 Coded Spare P60 132 Coded P61 133 Coded SYS 1 Condenser Fan Stage ISN PAGE CHARACTER TYPE DATA P62 134 Coded P63 135 Coded Spare P64 136 Coded P65 137 Coded Unit Control Mode 0 Leavin...

Page 159: ...NO RUN PERMISSIVE 8 HIGH MOTOR CURRENT 9 NO COOL LOAD 9 LLSV NOT ON 10 ANTI COINCIDENCE TIMER ACTIVE 10 LOW BATTERY WARNING 11 ANTI RECYCLE TIMER ACTIVE 11 HIGH OIL TEMPERATURE 12 MANUAL OVERRIDE 12 H...

Page 160: ...es BACnet parameters may need to be DE MODIFIER ADDRESS XXXXX DE MODIFIER OFFSET XX P1 PROTOCOL XXXXXX P1 MANUAL MAC ADDRESS XXX P1 BAUD RATE XXXXX P1 PARITY XXXXX P1 STOP BITS X P2 PROTOCOL XXXXXXXXX...

Page 161: ...EVEN ODD IGNORE SELECTABLE P1 PROTOCOL BACNET API BACNET BACNET API SELECTABLE P2 PROTOCOL TERMINAL MODBUS CLIENT API TERMINAL MODBUS IO MODBUS SERVER API MODBUS CLIENT SELECTABLE P1 P2 STOP BITS 1 2...

Page 162: ...r Address for these points is 1537 BV BV BACNET NAME BINARY VALUE DESCRIPTION 1 START_STOP START STOP COMMAND 2 SS_SYS1 SYS 1 START STOP COMMAND SUCTION PRESSURE CONTROL 3 SS_SYS2 SYS 2 START STOP COM...

Page 163: ...WATER 2 RETURN WATER 3 DISCHARGE AIR 4 SUCTION PRESS 5 COOLING 6 HEATING 36 AR_TIME ANTI RECYCLE TIME PROGRAMMED 37 LCHLT_CUT LEAVING CHILLED LIQUID TEMP CUTOUT 38 LOW_AMB_CUT LOW AMBIENT TEMPERATURE...

Page 164: ...S 4 EVAP_PUMP EVAPORATOR PUMP STATUS 5 SI_C1_RUN SYS COMP 1 RUN 6 7 S1_LLSV SYS 1 LIQUID LINE SOLENOID VALVE 8 S1_MODE_SV SYS 1 MODE SOLENOID VALVE HP ONLY 9 S1_HGBV SYS 1 HOT GAS BYPASS VALVE 10 S1_B...

Page 165: ...FORM 150 66 NM2 ISSUE DATE 09 25 2020 165 JOHNSON CONTROLS NOTES...

Page 166: ...nnsylvania USA 17349 Subject to change without notice Printed in USA Copyright by Johnson Controls 2020 ALL RIGHTS RESERVED Form 150 66 NM2 920 Issue Date September 25 2020 Supersedes 150 66 NM2 608 1...

Reviews: