APPENDIX 1 - CHECKLIST
FORM 155.32-ICOM2.EN.UL
ISSUE DATE:1/10/2018
174
JOHNSON CONTROLS
JOHNSON CONTROLS
2
FORM 155.32-CL1
ISSUE DATE: 03/31/2017
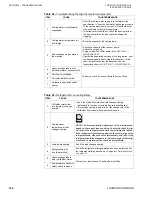
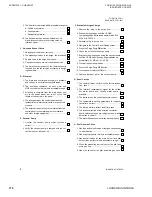
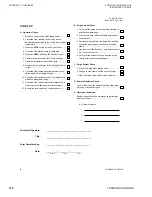
9. The flow rate is adjusted within acceptable range for:
a. Chilled or hot water. .............................................
b. Cooling water. ......................................................
c. Residential hot water .......................................... .
10. The flue damper has an open limit switch. Its
signal is connected to the control panel as an
interlock signal. ....................................................... .
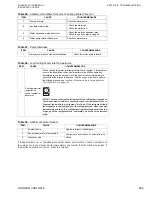
C. Valve and Sensor Check
1. Adjusting valves are set correctly.............................
2. The diaphragm valves in the purge line are closed
3. Spindle valve in the purge line is open. ...................
4. Changeover valves are set in operation mode........
5. The detection component of the thermosensor is
inserted into the thermowell according to design
requirements.............................................................
D. Electrical
1. The main and control power supply is available,
and voltage is set within acceptable range.............
2. The insulation resistance of each motor and
MCB secondary side is within acceptable range....
3. All wiring is complete from the main power sup-
ply to the power panel, but is not cut to final
length or connected to the panel.............................
4. The wiring between the control panel and the
residential hot water control valve are connected
properly ....................................................................
5. The external control wiring is completed from the
control panel to the water pump motor starters,
and other related equipment. ...................................
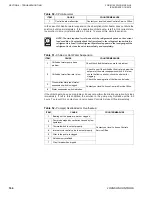
E. Vacuum Pump
1. Confirm the vacuum pump motor rotation is
correct........................................................................
2. Verify the vacuum pump is charged with the cor-
rect amount of lubricant oil....................................
F. Evacuate Nitrogen Charge
1. Remove the plug in the purge line.......................
2. Evacuate nitrogen gas until the HT-GEN
compound gauge indicates approximately 0.005
MP.a.G (0.725 PSI) ..................................................
3. Reinstall plug in purge line.....................................
4. Navigate to the Control Panel Setting screen. .........
5. Press the Purge Pump
ON
button ...........................
6. Check the oil level in the purge pump ......................
7. Evacuate the nitrogen gas using the vacuum pump
until the HT-GEN compound gauge indicates ap-
proximately -0.1 MP.a.G (-14.5 PSI) ........................
8. Close all open manual valves. .................................
9. Press the Purge Pump
OFF
button. .........................
10. Turn the power switch (MCB) off. .............................
11. Replace lubricant oil for the vacuum pump...........
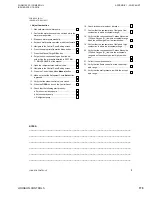
G. Panel Checks
1. The thermal relays conform to the factory inspec-
tion sheet..................................................................
2. The interlock (answerback) signal for the chilled/
hot water pump and cooling water pump is
available....................................................................
3. The indicators on the control panel are correct ........
4. The temperature setting parameters for capacity
control are correct.....................................................
5. The date and time reflect local time zone..............
6. The rotation direction of the solution circulation
pump, solution spray pump, refrigerant pump, and
burner fan is correct... ............................................ ..
7. The water flow suspension switch works properly ...
H. Fuel Gas Line Check
1. Gas type and calorific value of fuel gas corresponds
to specification..........................................................
2. Gas supply pressure is within acceptable range.....
3. Gas shut-off valves for the main burner and pilot
burner lines perform within acceptable range........
4. Close the measuring port valves for the pilot and
main gas line.............................................................
5. Open the valves for the pilot and main gas lines....

