7. Press the Enter key. The following steps will be performed:
a. Erasing - During this procedure, the program in the microboard Flash Memory will be
erased. A green bar reflects the progress of this procedure. The red LED next to this bar
illuminates while this procedure is in progress.
b. Programming - During this procedure, the program in the Program card is downloaded
into the microboard Flash memory. A green bar reflects the progress of this procedure.
The red LED next to this bar illuminates while this procedure is in progress.
c. Verifying - During this procedure, a check- sum test is performed on the new program in
the microboard Flash Memory. A green bar reflects the progress of this procedure. The
red LED next to this bar illuminates while this procedure is in progress.
The microboard 7-segment LED Displays (U25 and U26) display the steps of the
programming process while they are in effect. During the Erasing procedure, “Er”
displayed. During the Programming procedure, “Pr” is displayed. During the Verifying
procedure, “Ch” is displayed.
At the completion of the re-programming process, if it is successful, “Flash Has Been
Successfully Programmed” is displayed and “Operation Successful” is displayed in the
Status Code box. Otherwise, a message in the status box indicates the step that failed.
8. Remove power from OptiView™ Control Center.
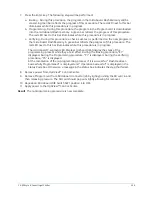
9. Remove Program card from Microboard connector J26 by lightly pushing the SD card in and
then releasing pressure. The SD card should pop out slightly allowing for removal.
10. Reposition Microboard DIP Switch SW1 position 4 to OFF.
11. Apply power to the OptiView™ Control Center.
Result
The re-programming procedure is now complete.
259
YK-EP Style B Centrifugal Chiller
Summary of Contents for YK-EP
Page 2: ...2 YK EP Style B Centrifugal Chiller...
Page 6: ...6 YK EP Style B Centrifugal Chiller...
Page 227: ...Figure 72 Sample printout of Status 227 YK EP Style B Centrifugal Chiller...
Page 228: ...Figure 73 Sample printout of Status cont YK EP Style B Centrifugal Chiller 228...
Page 229: ...Figure 74 Sample printout of Setpoints 229 YK EP Style B Centrifugal Chiller...
Page 230: ...Figure 75 Sample printout of Setpoints cont YK EP Style B Centrifugal Chiller 230...
Page 231: ...Figure 76 Sample printout of Schedule 231 YK EP Style B Centrifugal Chiller...
Page 232: ...Figure 77 Sample printout of a Sales order YK EP Style B Centrifugal Chiller 232...
Page 233: ...Figure 78 Sample printout of a Sales order cont 233 YK EP Style B Centrifugal Chiller...
Page 234: ...Figure 79 Sample printout of History YK EP Style B Centrifugal Chiller 234...
Page 235: ...Figure 80 Sample printout of History cont 235 YK EP Style B Centrifugal Chiller...
Page 236: ...Figure 81 Sample printout of a security log report YK EP Style B Centrifugal Chiller 236...

