w w w . y o r k v i l l e . c o m
REAL Gear.
REAL People.
Yorkville Sound
550 Granite Court
Pickering, Ontario
L1W-3Y8 CANADA
Canada
Voice: (905) 837-8481
Fax: (905) 837-8746
Yorkville Sound Inc.
4625 Witmer Industrial Estate
Niagara Falls, New York
14305 USA
U.S.A.
Voice: (716) 297-2920
Fax: (716) 297-3689
1
1
SERVICE BULLETIN
SERVICE BULLETIN
Quick Fix for M1146 & M1126
To speed up the servicing of the AP4020 or AP4040 on your bench, Yorkville
Sound’s service department has developed a method to replace the compo-
nents most likely to fail when a M1146 amplifier board requires service.
This Quick Fix kit contains the procedure, assembly drawings, and compo-
nents to perform the Quick Fix to a M1146 or M1126 board.
It should be understood that the person using this procedure knows how to
test resistors, diodes, and transistors to determine if they are defective. This pro-
cedure is not intended to be a substitute for one’s lack of electronic capability.
Before starting, look at the board for repair and locate the version number.
It is very important that you follow the procedure for the appropriate circuit
board version number.
A complimentary service manual for the AP4020 power amplifier is sup-
plied with this M1146KIT.
STEP 1.
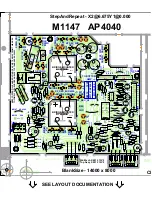
Locate the assembly drawing for the version number printed
on the M1146 or M1126 circuit board to be serviced.
STEP 2
. Remove all of the transistors coloured RED on the assem-
bly drawing.
STEP 3.
Measure and remove any of the diodes coloured BLUE on the
assembly drawing that may be damaged. Replace a 1N4732A 1W
4V7 zener (#6459) ZD12 along with a series 0.5 ohm R85 resistor.
STEP 4.
Rotate the trim pot RT1 fully counter - clockwise as in figure 1.
Inspect and replace any resistors that look burnt. Measure all of
the resistor values coloured YELLOW on the assembly drawing.
The value that you measure may not be exactly what is shown
on the assembly drawing but if the resistor doesn’t look dam-
aged it should measure or – 5% of the printed value.
STEP 5
. Measure the resistor coloured GREEN. The measured value
should measure or – 5% value listed in the table
below. Replace any resistor that measured beyond the + or –
5% value listed in the table below.
Figure 1
RESISTOR
NUMBER
R10
PRINTED
VALUE
4K7
CORRECT
MEASURED
VALUE
-5%
3K08
3K25
+5%
3K41
AP4020 &
AP4040
AP4020 &
AP4040


