background image

Instructions for use: preparing to express

Instructions for use: operating the breast pump

If you wish to convert to

size 21, place breast shield

converter into the size 24

breast shield; push it in as

far as it will go.

Note: 

While preparing your

pump, place the converter

dust cap on the breast

shield to keep the silicone

free from dust.

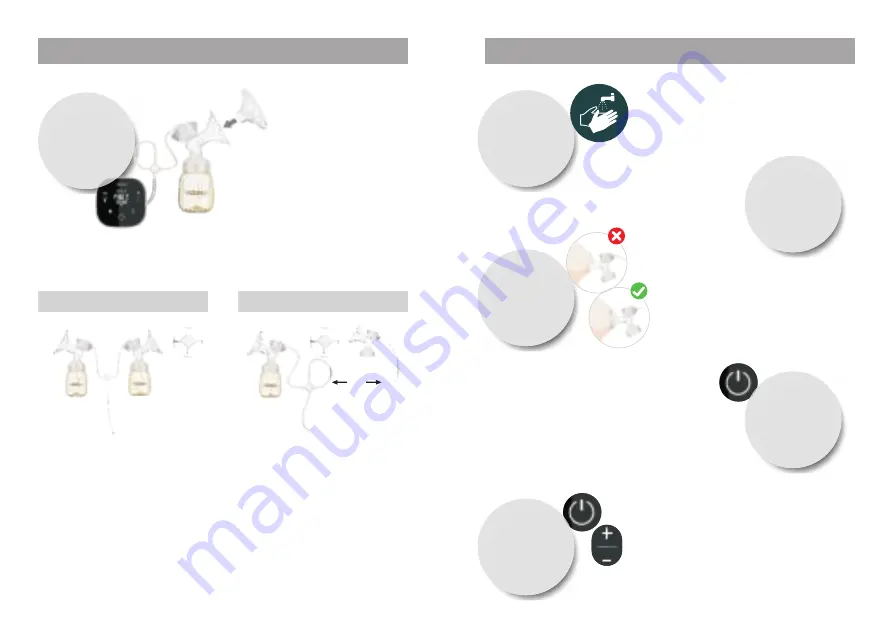
If using a breast shield converter, ensure that it completely seals by pressing 

the converter down along the rim of the breast shield. Press in between the 

petals to remove any trapped air.

Double breast pumping

Or

Single breast pumping

For double breast pumping, use

Y-shape tubing. Connect each

short end into membrane cap of

each pumping kit. Connect long

end into right side of motor unit.

For single breast pumping, insert

unused short tubing back into

Y-shape tubing connector. This 

closes the vacuum loop. Or, swap 

Y-shape tubing with single tubing.

How to charge:

If battery indicator flashes red, battery requires charging.

To charge, insert power cable into connection point on left side of motor unit, 

plug into a power outlet and switch on at the outlet. Charge until battery 

indicator green light to stop blinking, it is fully charged. Switch power off at 

outlet. Disconnect both pump and power outlet before use.

13

14

1

Wash your hands with soap and

water, dry them thoroughly before

assembling parts for expressing.

2

3

Relax in a

comfortable chair.

To lock, hold the On/Off button for five 

seconds until ‘lock’ appears on the screen 

and you hear a beep. To unlock, hold the 

On/Off button for five seconds while a 

countdown from five to zero displays on 

the screen and until you hear a double 

peep. These functions can be used while 

the pump is in operation or switched off.

Position the breast shield against

your breast. Make sure that your

nipple is centred so that breast

shield creates an airtight seal.

4

The breast pump will automatically

start in massage mode. To change

the level of the massage, use the

Increase and Reduce buttons.

Press the On/Off button.

5

5

Summary of Contents for TheOne

Page 1: ...perfect care for mama baby Double Electric Breast Pump Instructions for use...

Page 2: ...lection is designed to use anytime you like wherever you like Sleek and compact design Quiet and convenient operation Easy to use touchscreen Efficient and effective breastmilk expression Ideal for us...

Page 3: ...gle breast pumping 13 How to charge 13 Instructions for use preparing to express 12 You can pair this system with The ONE Express Cups to achieve a hands free more versatile and enjoyable way to expre...

Page 4: ...may scratch or damage the product Exposure to detergent may make the silicone appear cloudy over time Use of certain electric steam sterilisers which may overheat parts or UV sterilisers is not recom...

Page 5: ...pump that do not come in contact with breastmilk do not require cleaning on each use Clean these parts prior to the first use per instructions below and again whenever you see necessary All other part...

Page 6: ...e rubbing between fingers 4 Rinse well 5 Shake of excess water and air dry on a dedicated rack or clean cloth B After each use Follow cleaning step B1 4 Submerge parts in a pot of water and boil for 3...

Page 7: ...If battery indicator flashes red battery requires charging To charge insert power cable into connection point on left side of motor unit plug into a power outlet and switch on at the outlet Charge un...

Page 8: ...t teat to the bottle If you are storing the breastmilk connect the cap to seal the milk for storage Note take care when storing breastmilk and follow professional health guidelines Clean and sanitise...

Page 9: ...icons appear to indicate that you are in mixed mode Manual mode Instructions 17 18 Press the Manual button Press the Vacuum Setting button and use the Increase and Reduce buttons to set the most suita...

Page 10: ...st appropriate size for you If using as a single pump with y shape tubing check that the other side of the tubing is firmly connected into the top of the y shape tubing connector Check that all parts...

Reviews: