background image

36 

YOWZA BOCA PLUS  TREADMILL 

WARRANTY 

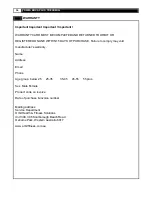
Important Important Important ! Important !

WARRANTY CARD MUST BE COMPLETED AND RETURNED TO ORBIT OR 

REGISTERED ONLINE WITHIN 15 DAYS OF PURCHASE. Failure to comply may void 

manufacturer’s warranty.

Name

Address

Email

Phone

Age group  below 25      25-35         35-45      45-55     55 plus

Sex  Male Female

Product code on invoice

Date of purchase & invoice number

Mailing address

Service Department

Orbit Health & Fitness Solutions

Unit 308, 396 Scarborough Beach Road

Osborne Park, Western Australia 6017

www.orbitfitness.com.au 

Summary of Contents for BOCA PLUS

Page 1: ... 8 FOLDING INSTRUCTIONS UNFOLDING INSTRUCTIONS P23 P24 9 TRANSPORT INSTRUCTIONS CORRECT USE P25 P26 10 MAINTAINENCE P27 P28 11 IMPORTANT STEPS P29 12 MUSCLE CHART P30 13 STRETCHING ROUTINE P31 14 TROUBLESHOOTING P32 15 WARRANTY P33 P34 16 COMPUTER OPERATION P35 P45 Yowza Technical Support 877 969 9240 Enter Serial Number ________________________ Enter Original Sales Order ________________________ ...

Page 2: ...readmill Athletic support clothes are recommended for both men and women Always wear athletic shoes Never use the treadmill with bare feet wearing only stockings or in sandals When connecting the power cord plug the power cord into a grounded circuit No other appliance should be on the same circuit Always straddle the belt and allow it to start moving before stepping onto the belt Always examine y...

Page 3: ...tores The manufacturer recommends a single outlet surge protector with a UL 1449 rating as a Transient Voltage Surge Suppressor TVSS with a UL suppressed voltage rating of 400V or less and an electrical rating 110VAC 15 amps This treadmill must be grounded to reduce the risk of electrical shock Grounding provides a path of least resistance for electric current should the treadmill malfunction This...

Page 4: ...ite a friend Some of the assembly steps may require heavy lifting It is recommended that you obtain the assistance of another person when assembling this product User Weight Limitation Please note that there is a weight limitation for this product If you weigh more than 400LBS Approx 182 Kgs It is not recommended that you use this product Serious injury may occur if the user s weight exceeds the l...

Page 5: ...l use to assemble this product No Description Qty 108 Computer Key board 1 109 Pad soft cushion 1 202 Handle bar cover Left 2 203 Handle bar cover Right 2 204 Upright tube lower cover 2 205 Handle Bar sets 2 208 Handlebar cover insert 2 C Power cord 1 E Silicone bottle 1 903 IWM weight scale 1 903 1X ...

Page 6: ... use the scale below to measure them and compare them to the sizes listed No Description Qty 844 M4X15 screw 6 845 M4X12 screw 2 808 Curve washer 8 5X20 5X2 6 810 Button head inner hexagon M8X18 2 806 Button head inner hexagon M8X42x10 8 824 Button head inner hexagon M8X52x17 2 826 Washer 8X17X1 5 2 223 Upright rubber cap OD14X6 5 1 A 5mm Allen Wrench 1 B Screw driver 1 MILLIMETERS ...

Page 7: ...om au 7 TREADMILL OVERVIEW LCD Hand pulse sensor Operation board Safety key Handle bar Motor hood Upright Running belt Side rail Side rail end cap Motion control sensor Rear caster Transport wheel Electric outlet Power switch ...

Page 8: ...oor in an open area B Remove the treadmill and all the components and hardware from the box C Check the quantities of all components and hardware with the component and hardware lists on pages 5 6 D After verifying inventory if there are any missing parts please contact Yowza fitness at 877 969 9240 ...

Page 9: ...prights up to vertical position STEP1 B Using the Washer 826 and M8x58mm Bolt 824 to secure the upright to frame by Allen wrench A STEP1 C Using the Washer 8X17X1 5 826 and M8X52x17 Bolt 824 to secure the upright to frame by Allen wrench A 808 X2 810 X2 826 X2 824 X2 ...

Page 10: ...CA PLUS TREADMILL STEP2 ASSEMBLY STEP2 Attach the Upright tube lower cover 204 to the upright lower section using the M4X15 screw 844 to fasten Then insert the Upright rubber cap OD14X6 5 223 844 X2 204 X2 223 X2 ...

Page 11: ...1 STEP3 ASSEMBLY STEP3 Hold up the console Semi finished product assembly and put it onto the upright bracket Please make sure that the holes must be aligned Using the Button head inner hexagon M8X42x10 806 to fasten slightly 806 X2 ...

Page 12: ...12 YOWZA BOCA PLUS TREADMILL STEP4 ASSEMBLY STEP4 Attach the Handlebar 205 into the Console Support Tube up 205 X2 ...

Page 13: ...http www orbitfitness com au 13 STEP5 ASSEMBLY STEP5 Using the Button head inner hexagon M8X42x10 806 and Curve washer 8 5X20 5X2 808 to fix them together by 5mm Allen Wrench A 806 X6 808 X4 ...

Page 14: ...14 YOWZA BOCA PLUS TREADMILL STEP6 ASSEMBLY STEP6 Connecting the cables plug between console and upright User need to look out the right direction ...

Page 15: ...ss com au 15 STEP7 ASSEMBLY STEP7 A Attach the Handle bar cover Left 202 and Handle bar cover Right 203 STEP7 B Connecting the motion control sensor plug STEP7 C Insert the Handlebar cover insert 208 208 X2 202 X2 203 X2 ...

Page 16: ...e bar cover Left position keep the cover in the side of upright then push in STEP3 B Adjust the Handle bar cover Right position keep the plastic PIN is relative then push in STEP3 C Fixed Handle bar cover together using M4X15 screw 844 and M4X12 screw 845 844 X4 845 X2 ...

Page 17: ...http www orbitfitness com au 17 STEP2 ASSEMBLY Your treadmill is now fully assembled ...

Page 18: ...18 YOWZA BOCA PLUS TREADMILL ADJUSTABLE CUSHION How to adjust the level for treadmill You can adjust the Rear adjustment cushion as following show when you unfold treadmill on the floor ...

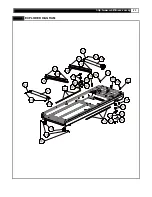
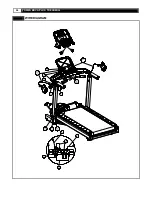
Page 19: ...1 202 203 202 203 201 201 114 115 112 113 116 811 204 844 844 808 806 806 808 806 806 117 118 109 106 106 205 205 103 119 119 107 845 845 844 844 844 844 802 857 802 845 802 802 802 802 802 817 817 802 802 207 207 108 858 858 858 858 807 807 845 208 208 845 223 223 ...

Page 20: ...14 802 829 8 1 1 802 823 812 804 324 326 804 322 812 320 825 319 318 819 316 315 847 306 378 378 855 314 802 314 802 8 0 8 8 0 8 8 1 0 8 1 0 826 826 824 824 822 822 855 309 3 0 9 813 818 308 310 311 321 305 814 812 855 301 303 812 821 304 302 855 845 307 303 304 309 8 4 4 8 4 4 313 313 ...

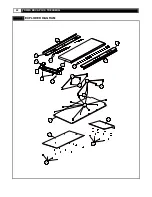
Page 21: ...D DIAGRAM 802 408 410 603 602 601 812 802 847 414 604 809 606 607 802 605 416 403 802 401 406 404 405 841 841 849 849 802 815 815 802 845 839 402 845 839 839 845 839 845 845 802 802 834 414 412 413 859 860 861 411 807 826 409 862 863 855 863 ...

Page 22: ...22 YOWZA BOCA PLUS TREADMILL EXPLODED DIAGRAM 503 503 508 817 817 504 504 501 835 507 835 848 507 507 502 508 505 802 417 418 857 857 ...

Page 23: ...http www orbitfitness com au 23 EXPLODED DIAGRAM 855 837 836 801 704 703 706 706 807 827 707 826 708 807 827 708 826 840 705 709 710 839 839 839 711 856 852 852 856 701 711 707 836 709 710 ...

Page 24: ...24 YOWZA BOCA PLUS TREADMILL WIRE DIAGRAM ...

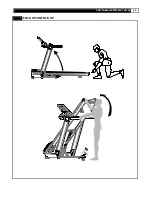
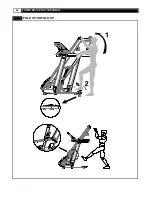
Page 25: ...http www orbitfitness com au 25 FOLD UP UNFOLD UP ...

Page 26: ...26 YOWZA BOCA PLUS TREADMILL FOLD UP UNFOLD UP ...

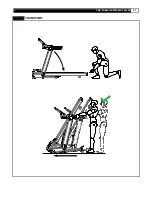
Page 27: ...http www orbitfitness com au 27 TRANSPORT ...

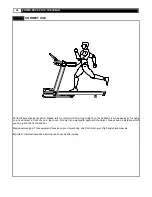
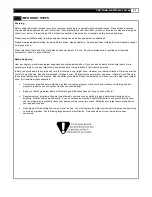
Page 28: ... easier by focusing on a fixed object in front of you in the room Run as if you wanted to approach the object Always keep a distance which you can reach the front hand bar Major exercise type This equipment focuses on your lower body and it can train your thigh and shank muscles Important Incorrect excessive training can cause health injuries ...

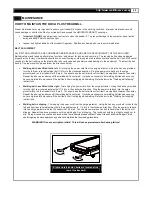
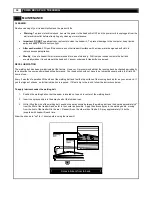
Page 29: ...e procedure until the walking belt is centered It may be necessary to set walking belt tension once you have completed this procedure if the belt feels like it is slipping while walking Refer below to the Walking belt slipping instructions Walking belt has shifted to the right First unplug the power cord from the surge protector Using the hex key provided turn the right rear roller adjustment bolt...

Page 30: ...cked periodically for lubrication to ensure optimal treadmill performance Your treadmill should not have to be lubricated usually within the first 400 hours of use Every 2 months of operation lift the sides of the walking belt and feel the top surface of the running deck as far as you can reach If you feel signs of silicone no further lubrication is required If it feels dry to the touch follow the...

Page 31: ...le to exercise only for a few minutes in your target zone However your aerobic fitness will improve over the next six to eight weeks Don t be discouraged if it takes longer It s important to work at your own pace Ultimately you ll be able to exercise continuously for 30 minutes And the better your aerobic fitness the harder you will have to work to stay in your target zone But remember these essen...

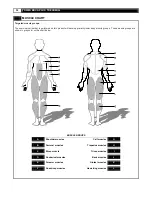
Page 32: ...lop primarily lower body muscle groups These muscle groups are shown in gray color on the chart below MUSCLE GROUPS A Shoulder muscles Calf muscles G B Pectoral muscles Trapezius muscles H C Bicep muscle Tricep muscles I D Abdominal muscles Back muscles J E Forearm muscles Gluteal muscles K F Quadricep muscles Hamstring muscles L ...

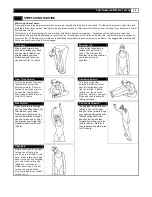
Page 33: ... Inner Thigh Stretch Sit with the soles of your feet together with your knees pointing outward Pull your feet as close into your groin as possible Gently push your knees towards the floor Hold for 15 counts Hamstring Stretch Sit with your right leg extended Rest the sole of your left foot against your right inner thigh Stretch toward your toe as far as possible Hold for 15 counts Relax and then re...

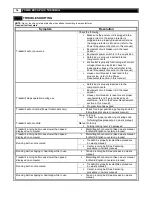
Page 34: ...quirements section in this manual Program time has expired Treadmill will not incline Power fold models only Check for proper positioning of spring knob for folding See procedure in owners manual Treadmill will not unfold Power Fold only Check for proper positioning of spring knob for folding See procedure in owners manual Manual Fold only Folding locking lever is depressed Treadmill running belt ...

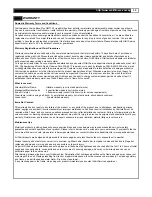
Page 35: ...ifetime warranty excl rust and paint works Mechanical Electrical parts 5 year limited warranty incl incline motor Drive DC motor Lifetime warranty consult Orbit service for service requirements Wear items motor running belt deck 2 years limited warranty incl plastic parts shock absorb cushions Labour cost 2 years limited warranty Items Not Covered This warranty does not apply to any failure of the...

Page 36: ...S OF PURCHASE Failure to comply may void manufacturer s warranty Name Address Email Phone Age group below 25 25 35 35 45 45 55 55 plus Sex Male Female Product code on invoice Date of purchase invoice number Mailing address Service Department Orbit Health Fitness Solutions Unit 308 396 Scarborough Beach Road Osborne Park Western Australia 6017 www orbitfitness com au ...

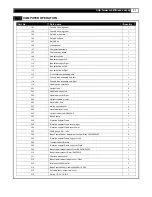
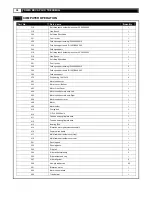
Page 37: ...bar cover Right 2 204 Upright tube lower cover 2 205 Handle Bar sets 2 207 Motion control sensor 2 208 Handlebar cover insert 2 223 Upright rubber cap OD14X6 5 2 301 Base Frame 1 302 Elevation support Frame 1 303 Elevation support Frame cover Upper 2 304 Elevation support Frame cover Lower 2 305 089 Spring 2 0X 14X4 1 306 Base Frame Rubber adjustment Cushion Rear 36X10 M8X25 2 307 Elevation suppor...

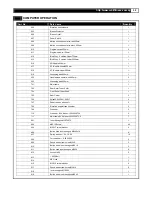
Page 38: ...aring 14X15X1 0 4 401 Motor hood cover 1 402 Motor cover Bottom 1 403 Motor Front Cover 1 404 Motor hood decorate strip Left 1 405 Motor hood decorate strip Right 1 406 Motor hood vent cover 1 408 Motor 1 409 Motor holder 1 410 Driving belt 1 410 OD19 95X39 Axis 1 411 Tension bearing fix plate base 1 412 Tension bearing fix plate base 1 413 Bearing 6004 2 414 Elevation motor gear sleeve assembly 1...

Page 39: ...re 220mm 1 701 Main frame 1 703 Rear Roller Tube Shaft 1 704 Front Roller Tube Shaft 1 705 Rear Caster 2 706 Nylon25 6X25X41 6XR17 4 707 Ruber cushion with shaft 2 708 Elevation support tube fix holder 2 709 Cross bar 2 710 Cross bar EVA sticker 15XL400XT3 0 2 711 Main frame EVA sticker 25XL300XT3 0 7 801 Inner hexagon M6X70X70 1 802 M4X15 Screw 45 804 M6X17 screw washer 2 806 Button head inner he...

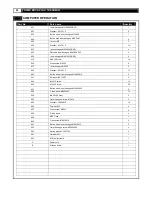
Page 40: ...M8X25 4 837 Inner hexagon M6X55 2 839 Washer 6X13X1 5 13 840 Button head inner hexagon M10X38X10 2 841 Shrapnel 21X13X0 7 2 844 M4X15 screw 10 845 M4X12 screw 58 847 Button head inner hexagon M10X30X30 2 848 Cross screw M8X30X30 10 849 M4 2X16 Screw 2 852 Outer hexagon screw M5X15 2 855 Washer 10X20X1 5 10 856 Thin Nut M5 4 857 Cross screw M4X12 2 858 Plastic insert 4 859 M20 C clip 1 860 Cross sc...

Reviews: