background image


- 9 - 


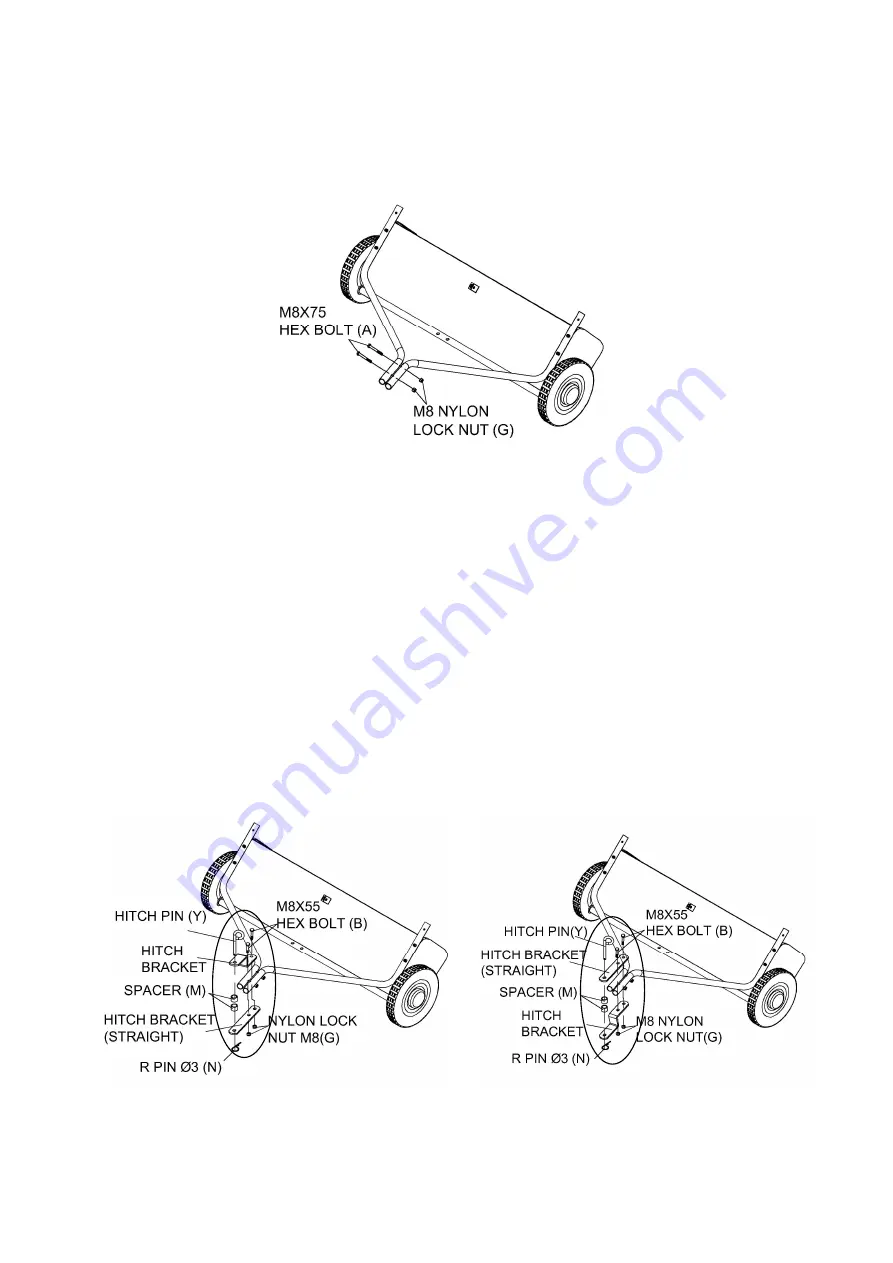
STEP 3: Secure Hitch Tubes Together 


Once the Hitch tubes are attached, pass two Hex Bolts M8x75 

(A

) through the hitch-end (away from 

the sweeper body) of the tubes to connect them together using two Nylon Lock Nuts M8 

(G

). Tighten 

loosely.   


STEP 4: Mount Hitch Assembly to Hitch Tubes 


Attach the Hitch assembly in the following order: (

see


Figure A

A)  Mount the angled hitch bracket on top of the hitch tubes, with the straight hitch bracket on the 

bottom. 

B)  Pass two Hex Bolts M8x55 (

B

) through the angled hitch bracket, premade notches in the hitch 

tubes, straight hitch bracket, and tighten loosely with two Nylon Lock Nuts M8 (

G

). 

C)  Finally,  pass  the  Hitch  Pin  (

Y

)  through  angled  hitch  bracket,  Hitch  Spacer  (

M

),  and  straight 

hitch bracket, and fasten with R Pin Ø3 (

N)


NOTE: If your vehicle’s tow hitch is between 8” and 10”, mount the angled hitch bracket on the 
bottom of the hitch tubes for best performance (See Figure B). For vehicles 11” and higher, see 
Figure A. 


STEP 5: Tighten all nuts and bolts from Steps 2 through 4.


Summary of Contents for YTL-003-048

Page 1: ...REV040819 N281 48 TOW BEHIND LAWN SWEEPER Instructions and Assembly SAVE THESE INSTRUCTIONS FOR FUTURE REFERENCE...

Page 2: ...3 4 Controls and Features Identification 5 Components and Hardware 6 7 Assembly Instructions 8 9 10 11 12 13 14 Operation Instructions 15 Maintenance and Storage 16 17 Specifications 18 Parts Drawing...

Page 3: ...sonal injury and or equipment damage DO NOT EXCEED 5MPH Always use caution when loading and unloading the hopper Only tow with recommended vehicles Lawn Garden Tractors and ATVs Always refer to the ve...

Page 4: ...ast and convenient Technical specifications on the lawn sweeper are found in the Specifications section of this manual This is the safety alert symbol It is used to alert you to potential personal inj...

Page 5: ...unction of the controls and features Save this manual for future reference 1 Hand Lever Adjusts the brush height 2 Nylon Hopper Holds all types of debris 3 Tires Wheels Semi pneumatic all terrain tire...

Page 6: ...maged pieces After inspecting components proceed to Assembly and complete steps 1 through 9 TOOLS REQUIRED Not Included 10 13 14mm Wrenches Pliers REF QTY DESCRIPTION REF QTY DESCRIPTION A B C D E F G...

Page 7: ...LH Handle Assembly Hitch Bracket Straight Hitch Bracket Sweeper House Assembly Front Support Rod Bag Arm Tube Bag Frame Strap 10 11 12 13 14 15 16 2 2 1 2 1 2 1 Hopper Support Rod Lower Hopper Side T...

Page 8: ...g make sure the angle bracket is aligned straight with the sweeper housing as shown in the diagram NOTE Right Hand RH and Left Hand LH refer to the drivers orientation when operating the vehicle STEP...

Page 9: ...with the straight hitch bracket on the bottom B Pass two Hex Bolts M8x55 B through the angled hitch bracket premade notches in the hitch tubes straight hitch bracket and tighten loosely with two Nylo...

Page 10: ...stment strap to the angle bracket mounted in Step 1 Align the round hole in the height adjustment strap with the angle bracket In the following order pass Hex Bolt M8x20 E through the angle bracket th...

Page 11: ...pper bag with the brace holes facing downward C Pass the upper hopper side tubes through the stitched sleeves on either side of the nylon fabric On each side insert the upper hopper side tube into the...

Page 12: ...g frame strap is already inserted into the sleeve H Once inserted mount the bag frame strap onto the lower hopper side tubes using Clevis Pins 6X37 Q Secure with R Pin 2 O I Locate the snap buttons on...

Page 13: ...of each of the upper hopper side tubes Locate the lower hole and pierce the nylon fabric at the location of the lower hole Note some models have rivets in the fabric and do not require piercing the fa...

Page 14: ...the sweeper housing assembly away from the hitch Secure using Clevis Pins 6X42 R and R Pin 2 O E Remove brush protection boards from inside of sweeper housing assembly F Check to see that all bolts ar...

Page 15: ...handle to set the height of the brushes For optimal results the brush height should be below the tips of the grass For sweeping other materials you may need to adjust the height of the brushes Towing...

Page 16: ...rfaces Never exceed the hopper load capacity rating as it will damage the bag Regularly grease axle and wheel bearing area or when needed LUBRICATION The bearings in the sweeper have been pre lubricat...

Page 17: ...parts that do not meet specifications may result in a safety hazard and or poor operation WARNING Empty hopper bag before storage as full or partially full bags may pop explode STORAGE Be sure to com...

Page 18: ...18 Frame Construction Steel Hopper Construction Nylon Mesh Hitch Type Pin Style Wheel Type Semi Pneumatic Working Width 48 Wheel Size 10 5 Specifications...

Page 19: ...19 Parts Drawing Parts List...

Page 20: ...20 15 N280 00043 FH Adj Washer C 2 16 N280 00046 DX Big Flat Washer 1 17 N280 00033 DX Inside Star Washer 1 18 N280 10001 DX Dust Cover Retainer 1 19 N280 10002 Brush Shaft Bushing 1 20 N281 00027 DX...

Page 21: ...5 Bag Frame Strap 1 51 N280 00005 DX Hopper Support Rod 2 52 N280 00038 Hopper Rope 1 53 N281 00009 Vinyl Cap 2 54 N280 00019 DX Height Adjustment Strap 1 55 N100 00014 Hitch Bracket 1 56 N280 00025 H...

Page 22: ...rnal Teeth Washer 6 72 N021 00003 DX Hitch Pin 1 73 N280 00026 DX Snap Ring Bearing 2 74 N280 00047 DX R Pin 3 5 75 N280 00041 DX R Pin 2 4 76 N280 00010 DX Clevis Pin B 4 77 N280 00006 CD Lower Hoppe...

Page 23: ...en normal use has exhausted the life of a part or the equipment as a whole YTL International also does not warranty consumable supply type items such as oils fluids grease etc sold with the product Th...

Reviews: