Chargers and Charging
There’s a simple rule of thumb about batteries, and if
you’re a dealer or a mechanic, you know that people
ignore it all the time: for a battery to operate the way it’s
supposed to, it has to be fully charged before it’s used...
and kept fully charged throughout its life.
A charger basically brings a new battery, or a battery
that has been discharged, to full capacity. Plugged into a
wall socket, it sends direct current, flowing in the opposite
direction of the discharge, into the battery.
Charging actually reverses the destructive chemical
process that goes on as a battery discharges: the lead
plates and electrolyte, which were being transformed into
lead sulfate and water, are restored to their original
composition. If a battery has been damaged – for
example, it’s badly sulfated, or the plates have been
damaged from overheating or freezing – it may not
accept a charge.
TYPES OF CHARGERS:
There are five basic types of
battery chargers. With all of them, hook the positive
charger lead to the positive battery terminal, and the
negative to the negative. Some chargers on the market
deliver a low charging voltage that can’t fully charge the
battery; avoid them if you’re buying a charger. A 12
volt, 900 mA charger will meet most needs.
Of course, too much of a charge can be a problem, too –
it can “cook” a battery. For small engine starting batter-
ies, don’t use a charge greater than 2 to 2.5 amps for
maintenance purposes. A badly discharged battery with
very high internal resistance may never accept a charge
from a standard charger. It would then require special
charging equipment.
ALWAYS OBSERVE PROPER SAFETY PRECAUTIONS
WHEN CHARGING BATTERIES
TRICKLE CHARGER:
This is the charger a consumer –
as opposed to a battery retailer or garage – will usually
have. It charges the battery at a fixed rate. Different
ampere-hour batteries have different charge rates.
For
most motorcycle and other small engine start-
ing batteries, charge them at 1/10 of the
rated ampere-hour values in the Yuasa
Applications Book,
see example on page 12 for ratings.
Battery voltage increases with the amount of
charge.
Find charging time for a completely discharged
battery by multiplying the ampere-hour rating by 1.3
when charging with standard current. The chart on page
21 shows the approximate time needed to fully charge
lead-antimony batteries using a trickle or taper charger.
The chart on page 32 shows the approximate time needed
to fully charge sealed VRLA batteries.
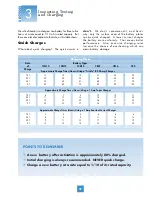
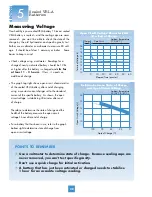
Test the battery during charging, and continue charg-
ing until all cells are gassing. Use either a voltmeter
(or multimeter) or hydrometer. The specific gravity of
the electrolyte in all cells in a fully-charged battery
should come to at least 1.265 in a conventional bat-
tery and 1.280 in a YuMicron and sealed VRLA battery
with Sulfate Stop.
19
Specific Gravity Reading Using a Hydrometer
CX &
CX &
YuMicron Conventional YuMicron Conventional
100%
1.27/
1.26/
1.28/
1.27/
1.28
1.27
1.29
1.28
75%
1.22/
1.21/
1.23/
1.22/
1.23
1.22
1.24
1.23
50%
1.17/
1.16/
1.18/
1.17/
1.18
1.17
1.19
1.18
25%
1.13/
1.12/
1.14/
1.13/
1.14
1.13
1.15
1.14
0%
1.11/
1.10/
1.12/
1.11/
or less
or less
or less
or less
Electrolyte Temperature
80
O
F
40
O
F
State
of
Charge
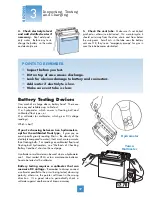
During charging, check the electrolyte level periodically
and add water – preferably distilled – to keep the
electrolyte level up to the line. If the batter y
becomes hot to the touch, stop charging. Resume after
it has cooled.
Note that permanently sealed batteries – YUASA’s
sealed VRLA battery, for example – generally can be test-
ed only with a voltmeter or multimeter. These batteries
are fully charged when the voltage peaks and then
begins to fall.
Unless using an automatic
charger, do not hook a
battery to a trickle charg-
er and leave it unchecked
for longer than overnight.
After about eight hours maxi-
mum, careful monitoring is
required.
Caps need to be replaced finger
tightened after charging’s done.
3
SECTION
Inspecting, Testing
and Charging
Summary of Contents for SmartShot YUA1201501
Page 1: ......


