background image

.3.

The manufacturer warrants the fan motor to be free from defects in workmanship and material present at 
time of shipment from the 
factory for a period of lifetime after the date of purchase by the original purchaser. The manufacturer 
warrants the light kit (excluding any glass), to be free from defects in workmanship and material at the 
time of shipment from the factory for a period of three years after the date of purchase by the original 
purchaser. The manufacturers also warrants that all other fan parts, excluding any glass or acrylic blades, 
to be free from defects in workmanship and material at the time of shipment from the factory for a period 
of one year after the date of purchase by the original purchaser. We agree to correct such defects without 
charge or at our option replace with a comparable or superior model if the product is returned. To obtain 
warranty service, you must present a copy of the receipt as proof of purchase. All costs of removing and 
reinstalling the product are your responsibility. Damage to any part such as by accident, misuse, improper 
installation or by affixing any accessories, is not covered by this warranty. Because of varying climatic 
conditions this warranty does not cover any changes in brass finish, including rusting, pitting, corroding, 
tarnishing or peeling. Brass finishes of this type give the longest useful life when protected from varying 
weather conditions. A certain amount of “wobble” is normal and should not be considered a defect. 
Servicing performed by unauthorized persons shall render the warranty invalid. There is no other express 
warranty. We hereby disclaim any and all warranties, including but not limited to those of merchantability 
and fitness for a particular purpose to the extent permitted by law. The duration of any implied warranty 
which cannot be disclaimed is limited to the time period as specified in the express warranty. Some states 
do not allow limitation on how long an implied warranty lasts, so the above limitation may not apply to you. 
The retailer shall not be liable for incidental, consequential, or special damages arising out of or in connec-
tion with product use or 
performance except as may otherwise be accorded by law. Some states do not allow the exclusion of 
incidental or consequential 
damages, so the above exclusion or limitation may not apply to you. 
This warranty gives specific legal rights, and you may also have other rights which vary from state to 
state. 
This warranty supersedes all prior warranties. Shipping costs for any return of product as part of a claim 
on the warranty must be paid by the customer.

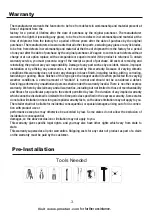
Tools Needed

Warranty

Pre-Installation

Visit www.pmwfan.com 

for further assistance.

Summary of Contents for 1086

Page 1: ...t and confidence you have placed in YUHAO through the purchase of this ceiling fan We strive to continually create quality products designed to enhance your home Vis sit us online to see our full line...

Page 2: ...com for further assistance Tools needed Installation Step 2 Ceiling bracket installation Step 1 Basic assembly of the fan Step 3 Receiver and wiring installation Step 4 Light kit installation Remote...

Page 3: ...fan must be not be moving and must have come to a complete stop before changing its direction of rotation This will prevent damage to its motor and to the control unit when applicable 9 Do not insert...

Page 4: ...inish including rusting pitting corroding tarnishing or peeling Brass finishes of this type give the longest useful life when protected from varying weather conditions A certain amount of wobble is no...

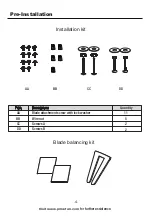
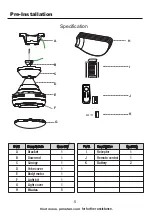
Page 5: ...on kit Blade balancing kit Pre Installation Visit www pmwfan com for further assistance AA AA BB BB CC CC DD DD Blade attachment screw with lock washer Wire nut Screws A Screws B Part Description 5 11...

Page 6: ...1H 3H Part A B C D E F G H Quantity 1 1 1 1 1 1 1 5 Description Down rod Bracket Canopy Yoke cover Body motor Light kit Light cover Blades Part I J K Quantity 1 1 2 Description Remote control Recepto...

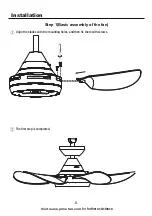
Page 7: ...6 Align the blades with the mounting holes and then fix them with screws The first step is completed Step 1 Basic assembly of the fan Installation Visit www pmwfan com for further assistance...

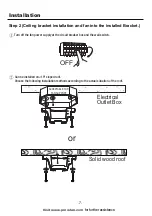
Page 8: ...ed roof Choose the following installation methods according to the actual situation of the roof OFF Turn off the fan power supply at the circuit breaker box and the wall switch Electrical Outlet Box S...

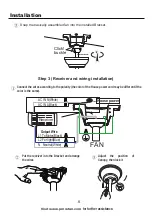
Page 9: ...wires according to the polarity the color of the House power cord may be different if the color is the same Receiver House power FAN Output Wire AC IN N White AC IN L Black N Neutral White L1 To Motor...

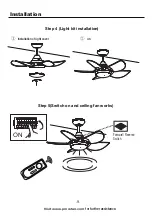
Page 10: ...9 Visit www pmwfan com for further assistance Step 4 Light kit installation Step 5 Switch on and ceiling fan works ON Installation of light cover Forward Reverse Swtich 1 2 3 1 H 3 H Installation OK...

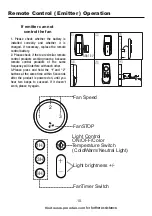
Page 11: ...working nearby because remote control products of the same frequency will interfere with each other 3 Please press and hold the 1 and 2 buttons at the same time within 5 seconds after the product is p...

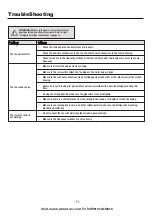
Page 12: ...attach the fan blade to the motor hub are tight Make sure the wire nut connections are not rattling against each other or the interior wall of the switch housing Allow a 24 hour breaking in period Mo...

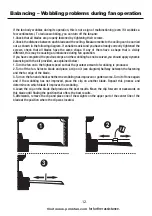
Page 13: ...lved you should apply dynamic balancing with the kit provided as explained below 1 Turn the fan on to the highest speed so that the greatest amount of wobbling is produced 2 Turn off the fan Select a...

Page 14: ...22 07 visit www pmwfan com for further assistance Retain this manual for future use Questions problems missing parts Before returning to the store...

Reviews: