background image

18

Below is the explanation about the most occurred ‘

breakdowns

’ 

when using this product.
 If you can’t solve the problem with information below, 
inquire to

 your local 

Customer service center

.

Problem

C a u s e

S o l u t i o n

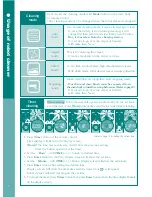
It is not 

cleaning well.

▶Dust bin is full.

▶Main brush is dirty.

▶Filter is contaminated.

▶See <Product control & maintenance> and 
   empty the dust bin.
▶See <Product control & maintenance> and 
   use main brush.
▶See <Product control & maintenance> and 
   clean the dirty filter.

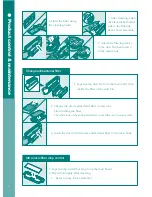
When I press 

the power button 

to turn on the 
robot cleaner, 

it turns off 

automatically.

▶Battery is low.
▶Battery is enough but the dust 
   bin is full.
▶Main brush is clogged with 
   hair and dust.

▶Charge the robot cleaner.
▶See <Product control & maintenance> and 
   empty the dust bin.
▶See <Product control & maintenance> and 
   clean main brush.

The robot cleaner 

is not responding.

▶Power switch is turned off.
▶Battery is low.

▶Battery is not inserted 
   properly to the robot cleaner.
▶Battery of remote control is out.
▶Infrared sensor & beam part 
   of the remote control is 
   blocked or dirty.
▶Remote control is too near 
   to the charging station.

▶Check the power switch on the bottom 
   of the main body.

▶Re-charge the robot cleaner.

▶Insert the battery of robot cleaner properly.

▶Change the battery of the remote control.

▶Wipe the infrared sensor & beam part 
   of the remote control with soft cloth.

▶Keep a distance from the charging station 
   and press the button again towards 
   the robot cleaner.

The robot cleaner

 is not charging.

Charging

 station or robot 

   cleaner is not connected 
   properly to the plug.

▶Connect the power of charging station & 
   robot cleaner properly.

After cleaning, 

the robot cleaner 

is not returning 

to the 

charging station.

▶Power of the charging station 
   is not connected properly.

▶Infrared generator & ejector 
   on the 

Charging

 station and 

   detector of the robot cleaner 
   is dirty.

Cleaning was start with 

   auto-mode not from 
   the charging station.

▶Connect the power of the charging station 
   properly.
▶Move the charging station. No objects must 
   be placed within left/right 50centimeters, 
   front 1.5meters from the 

Charging

 station. 

   This is to enable the robot cleaner to return 
   to the charging station automatically 
   after cleaning.

Robot cleaner must start cleaning from 

    the charging station to return to 
    the charging station after cleaning.

 Chec

k bef

or

e r
epair 

repor

t
Summary of Contents for Iclebo smart YCR-M04-01

Page 1: ...g time Battery Noise Level Energy consumption Battery 4S1P Iclebo smart Champagne Silver D 35cm H 10cm 3 9kg 30cm sec About 2 hours Maximum 70 minutes Lithium Ion 60dB Charging 41 8 Watt Standby 1 Wat...

Page 2: ...le side brush Assemble ultra microfiber mop Remove protection film Insert remote control battery Check list before cleaning Install Charging station Charging Time setting Cleaning space preparation Us...

Page 3: ...outlet It may cause electric shock or fire In case the water went inside the product you must contact service center for check up even the product was dried thoroughly Do not put or pull the power pl...

Page 4: ...operating the robot cleaner Suctioning function may not perform well if dust bin is full Check the main components such as antibacterial filter brush and dust bin are assembled properly before cleani...

Page 5: ...n case foreign substance is stuck on the sensor part it may malfunction Please clean the sensor regularly In case of cleaning the foreign substance turn OFF the power switch then use cleaning brush to...

Page 6: ...f the robot cleaner Bottom of the robot cleaner Power button Camera Mode button Start Stop button Power display lamp Lid Cleaning brush Manual charging jack Bumper Barrier sensor Motor protection filt...

Page 7: ...gh cleaning efficiency Empty the dust bin after using the robot cleaner Close the door to separate the areas for cleaning Remove all the non fixed objects such as toys magazines or shoes before cleani...

Page 8: ...ol Press the power button of the remote control to start robot cleaner Press power button to stop the operation of the robot cleaner when it s cleaning User can choose one from four modes with Mode se...

Page 9: ...e dust bin 2 Turn the robot cleaner over to separate main brush cover and side brush 3 Assemble the mop board to the fixing part on the bottom of the robot cleaner Insert the mop carrier the fixing cl...

Page 10: ...e charging station 2 Once the robot cleaner is properly placed to the charging station the status display lamp will flash as green 3 Status display lamp will appear green when the charging is complete...

Page 11: ...is not enough when the robot cleaner is operating it will return to charging station for re charge But the cleaning must start from the Charging station Note If you want to charge the robot cleaner wh...

Page 12: ...on button to move the robot cleaner to your wanted direction Also user can change the direction when the power is on but not suctioning Base message will appear on the display screen then robot cleane...

Page 13: ...r the carpet or barriers with more than 5mm This is for cleaning the carpet It moves randomly on the carpet to clean It can climb around 13mm high threshold and cleans With climb mode robot cleaner mo...

Page 14: ...4 Shake the dust bin left right to remove the waste inside Clean the inner part of the dust bin using cleaning brush 1 Follow step 1 2 in Empty dust bin section to separate the dust bin cover 2 Pull...

Page 15: ...y then divide the filter of the dust bin 2 Change the used antibacterial filter to new one after dividing the filter The white side of the antibacterial filter to the filter case then assemble 3 Inser...

Page 16: ...xed clip of the main brush 3 Separate the brush cover then divide the main brush 4 Clean the hair or foreign substance stuck on the main brush using the cleaning brush Use scissors or knife along the...

Page 17: ...hod above Side brush cleaning 1 Separate the side brush with both hands 2 Clean dust and foreign substance using the cleaning brush 1 Wipe the robot cleaner with lightly wet mop Do not use polishing p...

Page 18: ...for a long period turn off the power switch on the bottom of the main body 2 Keep the robot cleaner away from direct sunlight and well ventilated place 3 Separate the batteries from the robot cleaner...

Page 19: ...s too near to the charging station Check the power switch on the bottom of the main body Re charge the robot cleaner Insert the battery of robot cleaner properly Change the battery of the remote contr...

Page 20: ...ntrol maintenance and install properly E 4 Wheel motor overload Check if foreign substance such as hair or lint exists on the wheel See Product control maintenance and remove the foreign substance E 5...

Page 21: ...of this product is for 1 year and the battery is for 6 months Paid repair Collect the equivalent amount of paid repair service then exchange product Exchange product Exchange product or refund Exchan...

Reviews: