background image


Fuji IH Multifunction Rice Cooker by Yum Asia 


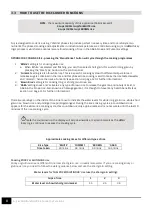
3.3.1  COOKING RICE IN FUJI 


1.


Measure


the rice

 with the measuring cup provided. Make sure the rice is level to the top of the cup – this is 

a full cup (180ml) measurement. 
 

2.


Clean


the rice

 (if needed) as directed in ‘4.1 HOW TO COOK PERFECT RICE’. Place the inner bowl into the 

appliance, 

put the rice into the inner bowl

 and 

fill to the water line

 that corresponds to the amount/type of 

rice you are cooking. 
 

3.


Close the lid and 

select

 the rice setting (and grain length, if applicable) you want to cook with. 


4.


Press 

‘Start’

 and the cooking cycle will begin. 

A countdown appears on the display to indicate Fuji is 

cooking, this is an approximate time and is not accurate until the last 10 minutes. The lights around the 

‘Start’ button will gradually light up to indicate cooking progress.


3.4  HOW TO USE THE KEEP WARM FUNCTION 


Once a cooking cycle has finished, you will hear a series of beeps and Fuji will automatically switch to ‘Keep Warm’. 

You can activate ‘Keep Warm’ when Fuji is on stand-by (i.e. when no menu functions have been selected) by 
pressing the ‘Keep Warm’ button. The keep warm light will activate and the lights around the ‘Start’ button pulse 
and a count-up clock will appear on the display for your reference. The ‘Keep Warm’ function can be used for 24 
hours but you may find that the rice is dry after 15 hours (as rice has to be kept at a safe temperature to eat). You 

can extend this by periodically adding a little water to the rice and stirring through. 
 
To cancel ‘Keep Warm’, press the ‘Menu/Cancel’ button. Fuji will then switch to stand-by mode. If left alone with no 

programme selected, Fuji 

will enter stand-by mode; the display will turn off completely and the start button lights 

will pulse

. If you unplug Fuji while in keep warm, the next time you plug it in, keep warm will activate, you need to 

cancel this before you can cook on another setting.


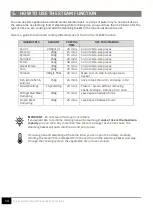
3.5  HOW TO USE THE OTHER COOKING FUNCTIONS 
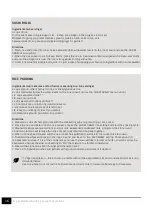
 

3.5.1   PORRIDGE 


This menu setting can be used for Asian rice porridge or oatmeal porridge. For recipes, see page 15

. The default 

cooking time for the ‘Porridge’ setting is 1 hour. You can adjust this 

up to 2 hours 

using the ‘Hr’ or ‘Min’ buttons 

once you have selected the ‘Porridge’ setting. Once the cooking cycle is complete, Fuji will make a series of beeps 
and will automatically switch to ‘Keep Warm. 


3.5.2   STEAM 


Using the provided steaming basket, you can steam different types of food. The default cooking time for the ‘Steam’ 
setting 

is 10 minutes. 

You 

can adjust this up to 1 hour in 10 minute intervals 

using the ‘Hr’ or ‘Min’ buttons once 

you have selected the ‘Steam’ setting and it is blinking on the display.  
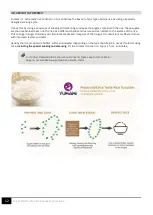
 

Also see

 the ‘Speedy Start Guide’ on the back of the warranty card for a step-by-step guide 

on how to cook rice and ‘Tips to Cooking Great Tasting Rice’ on 

page 13 

for more detailed cooking 

information and advice. 

If you want to cook 

½ a cup of rice

, there isn’t a mark on the inner bowl for this. Use the 

measuring cup to add the water – ½ of a measuring cup of water for white rice and 1 cup of water 
for brown rice.


Summary of Contents for FUJI YUM IH07

Page 1: ......

Page 2: ...E THE OTHER COOKING FUNCTIONS 9 3 6 CANCELLING PROGRAMMES 10 3 7 HOW TO USE THE DELAYED START PRESET FUNCTION 10 3 8 GABA BROWN AND YUMAMI FUNCTIONS EXPLAINED 11 4 TIPS TO COOKING GREAT TASTING RICE 1...

Page 3: ...product cooking advice or anything else then please contact us at info yumasia co uk and we will be happy to help ATTENTION Before using the appliance read these instructions carefully It contains imp...

Page 4: ...uctions and never cook the following Foods packed in plastic Dishes that use paper towels or other lids to cover the food Doing so may cause the steam vent to clog Do not immerse the rice cooker in wa...

Page 5: ...ot touch hot surfaces during or immediately after use Be careful of steam when opening the lid and be careful not to touch the inner bowl while stirring the rice Touching hot surfaces with metal parts...

Page 6: ...fan vents on the side and bottom of the rice cooker Do not splash water on the rice cooker This may cause the breakdown of the unit fire or electric shock Do not use the rice cooker in direct sunlight...

Page 7: ...ciality rice cooking white rice short grain rice brown rice Yumami and GABA brown with porridge yoghurt steam and slow cook We designed this rice cooker with additional features that any cook will fin...

Page 8: ...4 Wash the bowl and inner lid in warm soapy water with a soft sponge Dry thoroughly 5 Cook one cup of rice and throw it away 3 2 NAVIGATING THE CONTROLS The display of Fuji uses Smart button controls...

Page 9: ...to release the gamma aminobutyric acid or GABA in the brown rice Also known as hatsuga genmai it is thought to have many health benefits see section 3 8 page 11 for further information There are mark...

Page 10: ...this by periodically adding a little water to the rice and stirring through To cancel Keep Warm press the Menu Cancel button Fuji will then switch to stand by mode If left alone with no programme sel...

Page 11: ...e YOGHURT setting and it is blinking on the display You can use yoghurt jars or similar containers for this setting or just make the yoghurt in the inner bowl Once the cooking cycle is complete the ap...

Page 12: ...llowed to germinate When you select the GABA function on Fuji it will soak and activate the brown rice for you using its UMAI smart brain fuzzy logic control after which it begins to phase in the cook...

Page 13: ...as a different chemical structure and can attach to the surface of the rice This change in sugar chemistry can then activate Umami receptors of the tongue The result is more flavourful rice with impro...

Page 14: ...RICE COOKING AND GETTING PERFECT RESULTS Try and choose bags of rice with as few broken grains as possible as broken grains make rice very soggy and sticky It is important to remember that every batch...

Page 15: ...tato 300g 35 mins Cut into bite size pieces Corn 200g 30 mins Cut into bite size pieces Chicken 300g 1 fillet 30 mins Make cuts on side touching steam basket Fish white fish salmon 150g 25 mins Slice...

Page 16: ...hard 3 4 times to dislodge any sediment 3 cups water measured in the provided measuring cup 1 cup of milk dairy or plant milk whatever you prefer 3 4 spoons or more to your own taste honey or brown su...

Page 17: ...f ground cinnamon 1 lemon zest one large piece of lemon peel 1 2 teaspoon nutmeg or less if you prefer 3 tablespoons ground cinnamon to garnish Directions 1 Measure 2 cups of short grain rice with the...

Page 18: ...alised starters that you can buy in powdered form from health food shops and online Surprisingly you can also use chilli stalks i e the green part that holds the chilli to the plant which you discard...

Page 19: ...have a thicker consistency less cooking will have a thinner consistency or you can use the preset timer for when you will want to eat in the morning Once cooked you can add whatever flavouring you pre...

Page 20: ...eam cap can also be dissembled to ensure full cleaning look for a small catch that releases the two parts of the cap IMPORTANT INNER BOWL CARE Only ever use plastic silicone or wooden accessories Neve...

Page 21: ...tting you have selected and the water level you have filled to Make sure the steam vent cap is on the appliance Unable to start cooking or buttons won t respond Make sure the power cord is pushed as f...

Page 22: ...oking immediately The minimum default time is 70 minutes plus the cooking cycle time anything less than this will start the cooking cycle immediately Food isn t ready at the set time Cooking may not c...

Page 23: ...CAPACITY cups or litres FEATURE CAPACITY APPROXIMATE COOKING TIMES White Long grain rice White Short grain rice Yumami white rice Brown rice GABA brown rice 1 4 cups 0 7l 1 4 cups 0 7l 1 4 cups 0 7l 1...

Page 24: ...used This symbol means that electrical and electronic equipment when at their end of life should be disposed of separately from household waste Please dispose of this appliance at your local communit...

Page 25: ......

Reviews: