background image


The automatic folding carton sealer 

FXJ-AT5050 


Operating instruction 


NAME:              The automatic folding carton sealer         

MODEL:                    FXJ-AT5050                                       


Summary of Contents for FXJ-AT5050

Page 1: ...The automatic folding carton sealer FXJ AT5050 Operating instruction NAME The automatic folding carton sealer MODEL FXJ AT5050...

Page 2: ...s of cartons The machine is operated and maintained easily with simple structure and high quality for which it is widely used in various industries Safety precautions 1 The operator and maintenance pe...

Page 3: ...hesive tape installation and adjustment P 10 5 4 Operating instruction 8 5 Maintenance 9 6 Restrictions on cartons 9 7 Exploded figure 10 7 1 General exploded figure 10 7 2 Exploded figure of adhesive...

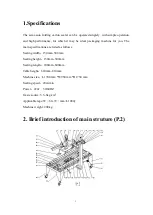
Page 4: ...ne for you The main specifications are listed as follows Sealing width 150mm 500mm Sealing height 150mm 500mm Sealing length 200mm 600mm Table height 610mm 810mm Machine size L1700 mm W950 mm H1750 mm...

Page 5: ...r transom 26 Mid short roller 9 Adhesive tape roller 27 Lower tape holder 10 Crank fixer 28 Adhesive tape adhibiting set 11 Adhesive tape adhibiting set 29 Front silk pole 12 Upper tape holder 30 Rear...

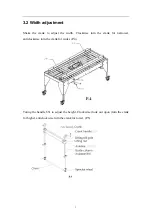
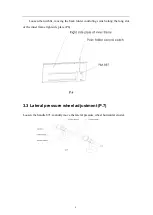
Page 6: ...to adjust the width Clockwise turn the crank for narrower anticlockwise turn the crank for wider P 4 Turing the handle b51 to adjust the height Clockwise look out upon turn the crank for higher antic...

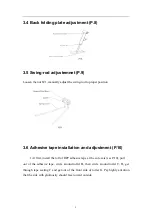
Page 7: ...oving the back folder controling switch along the long slot of the inner frame right side plate P 6 3 3 Lateral pressure wheel adjustment P 7 Loosen the handle b71 manully move the lateral pressure wh...

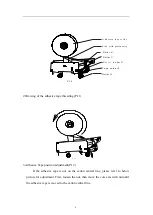
Page 8: ...ive tape installation and adjustment P 10 1 At first install the roll of OPP adhesive tape at the core axis see P 10 pull out of the adhesive tape circle around roller B then circle around roller C D...

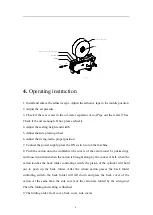
Page 9: ...a p e ro lle r P 1 0 2 Drawing of the adhesive tape threading P 11 P 1 1 3 Adhesive Tape position adjustment P 12 If the adhesive tape is not on the carton central line please refer to below picture f...

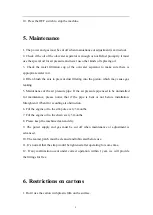
Page 10: ...ng extension spring so as to control the tape s tension Turn the knob clockwise and the tension of adhesive tape will largen turn the knob anticlockwise and the tension of adhesive tape will lessen wh...

Page 11: ...swing rod to proper position 7 Connect the power supply press the ON switch to run the machine 8 Push the carton onto the worktable the covers of the carton must be pricked up and loosen your hand whe...

Page 12: ...pipe If the air pressure pipe need to be uninstalled for maintanance please notice that if the pipe is bent or not before installation Straighten it if bent for avoiding air obstruction 6 Fill the eng...

Page 13: ...cartons are prohibited for use 5 The adhesive tape with different width and thickness can t be used 6 The adhesive tape which is produced for half a year is not suggested to use 7 Exploded figure 7 1...

Page 14: ...teral pressure wheel axis 28 Motor connecting plate 9 Lateral pressure wheel 29 Motor 1 4P 220V 1450RMP I 1 18 10 Lengthen left plate 30 Strap holder 11 Lengthen roller axis 31 Switch 12 Lengthen roll...

Page 15: ...wheel sheath 10 boltM5 8 62 Pre pressing floral whorl 11 bolt5 16 63 Pre pressing floral whorl axis 12 boltM6 12 64 Pre pressing floral whorl axis spring 13 boltM6 20 65 Pre pressing floral whorl gask...

Page 16: ...irectional axletree HF1216 91 Cutter holder 40 Axletree 635ZZ 92 Adhesive tape holder 41 Right wallboard 93 Fixed plate of adhesive tape holder 42 Left wallboard 94 Adhesive tape holder 43 Brush stanc...

Page 17: ...disqualification Adjust the pull of main spring and clear up the roller Change the adhesive tape 4 The carton is locked in the midway The nut on the pasting wheel is too tight the height adjustment o...

Page 18: ...9 1 Electric control sketch 9 2 Electric control operation It s necessary that you shoud read the manual carefully to know the perfomances of this machine s all parts and the functions of all control...

Page 19: ...the air source Attention When the machine is started please make sure that no one gets close to the front and back entrance and exit of the machine and touch the position switch A see the Part M in t...

Page 20: ...ssor s leakage Trouble shooting method maintain frequently or change a new one Faults of electromagnetic valve Reasons blockage in the electromagnetic valve and the coil is burned out Or the looseness...

Page 21: ...k whether the position switch is ok or not and check the eletromagnetic valve Notices the control voltage and power supply voltage are both 220VAC Pay attention for avoidance of eletric shock 9 5 Comm...

Page 22: ...e motor is right or not Check whether chains works properly or not Check whether motor shafts work normally or not Check whether screws loose or not 5 Belts working improperly Check whether the tightn...

Reviews: