background image

13 


Important Precaution 

1.  Please read through the entire manual before using your new robotic pool cleaner. 

We are not held liable for any loss or injury caused by improper use. Failure to comply 

with the following cautions could cause damage to pool cleaner or personal loss and 

injury. The cleaner must be operated as specified.   

2.  Use only spare parts recommened or sold by manufacturer. 

3.  Do not let children under 8 or person with psychological disease to use this 

product. Do not let anyone, especially small children, ride on the cleaner or paly 

the cleaner as a toy. 

4.  To avoid accident, make sure that the cleaner is out of water while charging. Put 

the cleaner and charger indoor or inside waterproof instruments. 

5.  Use only original charger. 

6.  Dry the charging port after removing the cleaner out of water and make sure the 

cleaner is switched off (the indicator is off) if you want to charge the cleaner.    Do 

not use the cleaner in your pool if the water temperature is above 35

 or below 

10

.   

7. Connect charger to receptacle protected by a ground fault circuit interrupter (GFCI). 

8. Use only original charger, do not use this charge for any other battery products. 

9. To avoid danger, do not operate the cleaner when there are people in the pool. 

10. Do not switch on the cleaner if it’s out of water. 

11. Always clean and wash the filter basket in the cleaner after each use.     

12. The cleaner should be stored in a cool and ventilated place, away from direct 

sunshine. 

13. Do not attempt to open the power kit by yourself. 

14. Charge the cleaner before battery is exhausted. Stop the cleaner and charge it 

when power is decreased. 

15. Do not over charge the cleaner which will reduce the battery life. 

16. Grease is contained in pump motor seals, if ever there is leakage, water can be 

slighted contaminated. 

17. Charge the cleaner between 5

 to 35

. Cool the cleaner before charge if it is too 

hot. 

18. The cleaner should be charged every 3 months if it needs to be stored for a long 

time to maintain battery life. 

Summary of Contents for SKIPPER

Page 1: ...1 ROBOT DE PISCINE AUTONOME ROBOTIC POOL CLEANER SKIPPER MANUEL D UTILISATION USER MANUAL...

Page 2: ...s assurer que le robot est arr t le voyant est compl tement teint de la machine ou il ne pourrait pas tre charg 7 Le Chargeur doit tre connect une prise dot e d un dispositif de s curit contre fuite...

Page 3: ...nal pour charger le robot et s assurer que le niveau de batterie est maintenu entre 40 et 60 18 Il est interdit de charger la batterie avec une dur e prolong e Il est conseill de ne pas charger plus d...

Page 4: ...e lentement au fond de la piscine Le robot va commencer travailler pendant environ 20 secondes arp s le d marrage Pour un fonctionnement correct du robot il faut vacuer tout l air emprisonn 2 Le robot...

Page 5: ...5 Sommaire Introduction 6 S curit 6 Caract ristiques 7 Manuel op ratoire 8 Bouton et voyant 8 Chargement 9 Nettoyage des filtres 9 Liste des pi ces 11 Garantie 12...

Page 6: ...ils 2 3 S assurer que l interrupteur du robot est sur la position arr t avant le chargement 2 4 Ne pas d marrer le robot lors du chargement 2 5 Temp rature de l eau entre10 C et 35 C 2 6 Chargez la ba...

Page 7: ...t de charge 1 8 A Autonomie Max 90 minutes D bit pompe Max 10m h Maille du filtre Max 180 microns Vitesse de d placement Max 11 m min Indice d tanch it du robot IPX8 Profondeur maximal du nettoyage 2...

Page 8: ...xion et la configuration de l Application via Bluetooth basculer vers le bas et puis vers le haut dans 5 secondes apr s le d marrage du robot voyant violet Basculer vers le bas apr s la configuration...

Page 9: ...rge et elle devient verte si le chargement est accomplie 4 2 2 Voyant du chargeur Voyant Statut Vert permanent En attente du chargement Chargeur non connect la batterie ou charge termin e Rouge perman...

Page 10: ...3 2 Rincer et nettoyer les filtres 4 5 4 5 4 3 3 R installer les filtres Aligner le filtre avec la ouverture d vacuation d eau et remettre les filtres dans le robot avant de fermer le capot 5 Appilcat...

Page 11: ...tiquement Cliquer le robot trouv pour le connecter 5 3 Configurer la piscine Apr s que le robot est connect configurer manuellement pour la premi re utilisation Les param tres seront m moris es pour l...

Page 12: ...isation de l article 4 Toute r clamation introduite ou r paration effectu e pendant la p riode de garantie sera soumise la pr sentation obligatoire de la facture d achat REMARQUES CONCERNANT LA PROTEC...

Page 13: ...the cleaner Do not use the cleaner in your pool if the water temperature is above 35 or below 10 7 Connect charger to receptacle protected by a ground fault circuit interrupter GFCI 8 Use only origin...

Page 14: ...14 19 Do not strike the cleaner with sharp objects 20 Do not charge or use or store the cleaner near hot source or extremely high temperature...

Page 15: ...ntion 16 1 Brief Introduction 17 2 security 17 3 General Specification 18 4 Operation 19 4 1 Switch button and indicator 19 4 2 How to charge 20 4 3 Filter cleaning 21 5 Bluetooth Application instruct...

Page 16: ...cleaner The cleaner will start working after 20 seconds when emptying trapped air inside make sure to empty the inside air in order to make the robot work well then the cleaner can immerse into the p...

Page 17: ...ant precaution 4 2 2 Use only original charger do not use this charge for any other battery products 2 3 Switch off the cleaner before charging 2 4 Do not switch on the cleaner while charging 2 5 Work...

Page 18: ...47 63 Hz Power 65W Max charging voltage 12 6VAC Charging current 1 8A Running time max 90min Flow rate max 10m h appr 2642gal h Filter density 180 m Running speed max 11m min appr 36ft min IP Grade IP...

Page 19: ...ter power on to connect and set Bluetooth application purple indicator Push the button downwards to finish Bluetooth application settings indicator off Push the button upwards again to power on Indica...

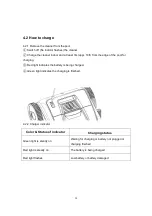
Page 20: ...he pool for charging Red light indicates the battery is being charged Green light indicates the charging is finished 4 2 2 Charger indicator Color Status of indicator Charging status Green light is st...

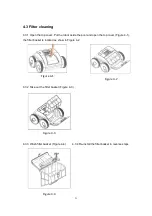
Page 21: ...he pool and open the top cover Figure 4 1 the filter basket is located as show in Figure 4 2 4 3 2 Take out the filter basket Figure 4 3 4 3 3 Wash filter basket Figure 4 4 4 3 4 Re install the filter...

Page 22: ...d on 5 2 Connect the cleaner Nearby cleaners will be listed after opening the App Click the cleaner to connect 5 3 Settings of swimming pool Input the needed information of swimming pool during first...

Page 23: ...t cover any damage resulting from mishandling of the product by the owner 4 The sales invoice must be presented for any claim or repair during the warranty period Please contact your local dealer for...

Reviews: