12
Chapter 3
Start to use the WP-520
This chapter provides instructions to setup the Wp-520 when the first time using. You
may configure your WP-520 with the following steps.
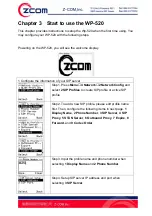
Powering on the WP-520, you will see the welcome display.
1 Configure the information of your SIP server
Step1. Press
Menu
→
4 Network
→
2 Network Config
and
select
2 SIP Profiles
to create SIP profile or active SIP
profile.
Step2. To add a new SIP profile, please edit profile name
first. Then, configure the following items in next page.
1
Display Name
,
2 Phone
Number
,
3 SIP Server
,
4 SIP
Proxy
,
5 STUN Server
,
6 Outbound
Proxy
,
7 Expire
,
8
Forward
, and
9 Codec Order
.
Step3. Input the profile name and phone number when
selecting
1 Display Name
and
2 Phone Number
.
Step4. Setup SIP server IP address and port when
selecting
3 SIP Server
.


