background image


26


Step5. Expend the left main menu first. Select the Upgrade Firmware to enter the 

firmware upload page. Click Browser icon to allocate the firmware file path, then, click 

Upload. 


Step6. When starting uploading, the screen of WP-520 will display 

Upgrading

. If the 

upgrade finished, the screen of WP-520 will display 

Upgrade success

. Power off the 

WP-520 and power on again, the new firmware will be work. 

7.2 HTTP Server 

One Access Point is required to connect with the Internet. The instructions of 

upgrading the WP-520 are as bellows:   

Summary of Contents for WP-520

Page 1: ...I IE EE EE E 8 80 02 2 1 11 1b b g g W Wi ir re el le es ss s I IP P P Ph ho on ne e Model WP 520 User Manual Version 1 0 Date of Issue September 2007...

Page 2: ...instructions may cause harmful interference to radio communications However there is no guarantee that interference will not occur in a particular installation If this equipment does cause harmful in...

Page 3: ...similar accessories that does not contain metallic components in its assembly The use of accessories that do not satisfy these requirements may not comply with FCC RF exposure requirements and should...

Page 4: ...rieval system translated into any language or transmitted in any form or by any means without the written permission of the supplier About This Manual The purpose of this manual is for the setup of th...

Page 5: ...tart to use the WP 520 12 Chapter 4 Configuring the WP 520 Settings 14 4 1 Date Time 14 4 2 Phone Setting 14 4 2 1 Language 14 4 2 2 Phone lock 14 4 2 3 Backlight 15 4 2 4 Quick Button 15 4 2 5 FW upg...

Page 6: ...unction 23 6 1 Call Hold Unhold 23 6 2 Call Transfer 23 6 3 3 Way Conference Call 23 6 4 P2P Call Peer to Peer 23 Chapter 7 Firmware Upgrade 25 7 1 Web Upgrade 25 7 2 HTTP Server 26 Chapter 8 Trouble...

Page 7: ...d secures the data connections while roaming in the wireless networking environment This small handset design is easy to transport and makes it simple to talk to family friends and colleagues all over...

Page 8: ...tial setup of the WP 520 2 1 Product Kit Before installing please make sure that you have the following items The 54Mbps Wireless VoIP Phone x 1 Power Adapter x 1 3 7V 920mAh Lithium Battery x 1 Produ...

Page 9: ...time using 2 5 Main Menu 2 5 1 LCD Screen LABLE Description The drawing shows the wireless LAN signal strength The drawing shows the current battery power remaining The drawing shows the status of pho...

Page 10: ...ls recently Received calls Display the list of received calls recently Dialed calls Display the list of dialed calls recently Delete all Delete all lists of missed calls received calls and dialed call...

Page 11: ...Volume Key tone Vol To configure the keypad tone volume to loud or soft Ring only Configure ring mode to ring only Vibrate Configure ring mode to vibrate without ring Ring and Vib Configure ring mode...

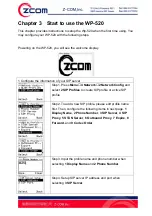
Page 12: ...Network 2 Network Config and select 2 SIP Profiles to create SIP profile or active SIP profile Step2 To add a new SIP profile please edit profile name first Then configure the following items in next...

Page 13: ...ge Step6 After editing SSID please select 2 Security Setup to establish the wireless security There are six items for selection 1 Open 2 WEP 3 WPA PSK TKIP 4 WPA2 PSK AES 5 WPA EAP 6 WPA2 EAP Step7 Af...

Page 14: ...ble this function input the NTP server IP address to sync 3 Set Time Zone You can set the local time zone 4 2 Phone Setting You may configure the basic settings of the WP 520 here Press left Menu butt...

Page 15: ...t call 2 Speaker Volume Allow you to increase or decrease the speaker volume 3 Receiver Volume Allow you to increase or decrease the receive volume 4 Profiles Allow you to enter user profile menu 4 2...

Page 16: ...number no matter you are busy or not Busy Forward the call to the forward number when you are busy No Answer Forward the call to the forward number when you are no answer You can set the no answer tim...

Page 17: ...and Security 4 4 3 SIP You may check the SIP server information that the WP 520 is registered The SIP server information is including Phone Number SIP Server IP address SIP Proxy Outbound Proxy Stun...

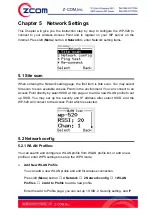
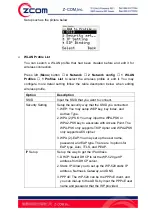
Page 18: ...Point directly by select SSID at this page or to add a new WLAN profile to set up SSID You may set up the security and IP address after select SSID and the WP 520 will connect to the Access Point whic...

Page 19: ...SSID you connected 1 WEP You may setup WEP key key index and Authen Type 2 WPA 2 PSK You may input the WPA PSK or WPA2 PSK key to associate with Access Point The WPA PSK only supports TKIP cipher and...

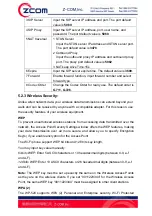
Page 20: ...and edit for SIP server register Press left Menu button 4 Network 2 Network config 2 SIP Profiles 2 Add to Profile to add a new profile After inputting SIP profile name you can set up the phone number...

Page 21: ...received by anyone with a compatible adapter For this reason use the security features of your wireless equipment WEP To prevent unauthorized wireless stations from accessing data transmitted over th...

Page 22: ...curity key length 8 HEX and input the key to Access Point which configure PIN mode 5 3 Ping test The WP 520 provides the ping test function to let you check the network You can select the ping destina...

Page 23: ...estination recipient You may transfer a call by selecting call options when you call out or answer a call Press left call option button to enter call options and select 3 Transfer You may transfer thi...

Page 24: ...24 dialing Press left button to start P2P call Note The quick button depends on the user profile that user had set up and the factory default UP button is for P2P call...

Page 25: ...upgraded by the following steps Step1 Download the firmware file in your laptop from the manufacturers websites Step2 Press left Menu button 4 Network and 1 Site scan to search the Access Point which...

Page 26: ...click Upload Step6 When starting uploading the screen of WP 520 will display Upgrading If the upgrade finished the screen of WP 520 will display Upgrade success Power off the WP 520 and power on agai...

Page 27: ...ss left Menu button 3 Setup 2 Phone Setting and 6 FW update Step3 Select 2 Server Address to input the HTTP server IP address which provided by the manufacturers and select 3 Server Port to input the...

Page 28: ...ease content to your local commercial agent 1 No WLAN Service 1 Check the power adapter of Access Point 2 Use site scan to check the Access Point signal strength 3 Let the WP 520 re associate the Acce...

Page 29: ...ollowing are special terms applicable to your hardware warranty as well as services you may use during part of the warranty period Your formal Warranty Statement including the warranty applicable to o...

Page 30: ...30 are intended and does not cover products which have been modified without the reseller s approval or which have been subjected to unusual physical or electrical demands or damaged in any way...

Page 31: ...along with your products Name Title Company Telephone Fax Email City State Zipcode Country Product Name Serial Number MAC Address Invoice Date Product Description If you have any further questions pl...

Page 32: ...usiness Center 98 Ford Road Suite 3 F Denville NJ 07834 USA Tel 1 973 664 0310 Fax 1 973 664 0313 Sales Product Inquiries sales zcomax com Tech Support Questions support zcomax com ZCOMAX United Kingd...

Reviews: