background image

ZPrinter

®

 310 Plus Hardware Manual

Overview

zcentral.zcorp.com

1

All Rights Reserved

2/11/09

1

Overview

Welcome to the exciting world of 3D Printing!

This manual will instruct you on how to take care of your printer and give you an introduction to 3D Printing. 
In addition, you can find information about 3D printing and its many applications and techniques on our 
3DP User Web site at

 zcentral.zcorp.com

.

This Web site is tailored to both beginner and advanced customers. We recommend that you register 
immediately to receive free, unlimited access to this excellent resource.

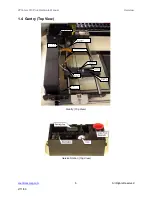
1.1 How the ZPrinter 310 Plus Works

Z Corporation 3D Printer processes are based on the Massachusetts Institute of Technology’s patented 
3DP™ (Three-Dimensional Printing) technology.

The proprietary ZPrint Software first converts a three-dimensional design file (built using 3D CAD) into 
cross-sections or slices that are between 0.0035" – .008" (0.0889 - 0.2032 mm) thick. The printer then 
prints these cross-sections, one after another, from the bottom of the design to the top.

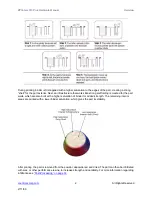
Inside the ZPrinter 310 Plus there are two pistons. In the diagram below the 

feed piston 

is on the left and is 

shown in the ‘down’ position filled with powder. The 

build piston

 is the piston on the right, shown below in 

the ‘up’ position. Also represented in the diagrams is the 

roller

 (drawn as a circle) and the 

print assembly


(drawn as a square). On the printer, the roller and the print assembly are mounted together on the 

gantry 

which moves horizontally across the build area.

To begin the 3D printing process, the printer first spreads a layer of zp

®

 series powder in the same thick-

ness as the cross section to be printed. The print head then applies a binder solution to the powder, caus-
ing the powder particles to bind to one another and to the printed cross-section one level below. 

To print the next layer, the feed piston moves up and the build piston moves down, each by the thickness of 
one layer. The roller then spreads the powder from the feed piston over onto the build piston, and the print 
assembly prints the pattern of the next layer using binder.

The printer keeps repeating this same process over and over until a 3-dimensional part is created in the 
powder.

Summary of Contents for ZPRINTER 310 PLUS

Page 1: ...2002 2009 Z Corporation All Rights Reserved 2 11 09 ZPRINTER 310 PLUS HARDWARE MANUAL Part Number 09548 Rev D December 2008...

Page 2: ...Z Corporation Recipient shall not dis close such Information to any third party and shall not use it for any purpose whatsoever other than what is required to install and use the ZPrinter 310 Use of E...

Page 3: ...NESS FOR A PARTICULAR PURPOSE AND ANY OTHER OBLIGATIONS OR LIABILITIES WHETHER IN CONTRACT WARRANTY NEGLIGENCE OR OTHERWISE THE COMPANY IS NOT LIA BLE FOR ANY DIRECT INDIRECT SPECIAL PUNITIVE CONSEQUE...

Page 4: ...4 Prepare the 3D Printer 21 4 1 Start the Printer 21 4 2 Prepare the Build 21 4 2 1 Fill the Feed Box With Powder 21 4 2 2 Remove Air from the Powder and Pack the Feed Box 23 4 2 3 Prepare the Build...

Page 5: ...us 48 7 3 1 Temporarily Remove the Scraper Blade When Using ZCast 48 7 3 2 Load ZCast Powder 53 7 3 3 Spread Over The Build Bed and Print 53 7 3 4 Set Up ZCast Builds 53 7 3 5 Post Processing 53 7 3 6...

Page 6: ...9 8 12 Check Status 68 8 13 Print Head Report 68 8 14 View Printer Log 68 8 15 Upload New Firmware 69 8 16 Upload New Printer Configuration 69 8 17 Edit INI File Send File and Receive File 69 8 18 Mac...

Page 7: ...the bottom of the design to the top Inside the ZPrinter 310 Plus there are two pistons In the diagram below the feed piston is on the left and is shown in the down position filled with powder The bui...

Page 8: ...caffolding is created for the part walls which are also built with a higher saturation of binder for added strength The remaining interior areas are printed with a lower binder saturation which gives...

Page 9: ...parts once parts are infiltrated they uniformly take on the strength characteristics of the infiltrating material The ultimate strength of the part will be affected by its orientation within the buil...

Page 10: ...l Rights Reserved 2 11 09 1 2 System Components ZPrinter 310 Plus ZD5 Powder Recycling Station 1 3 ZPrinter 310 Plus Subcomponents Top Cover Binder Bottle on top of the Top Cover Service Station Gantr...

Page 11: ...ZPrinter 310 Plus Hardware Manual Overview zcentral zcorp com 5 All Rights Reserved 2 11 09 Back Panel View...

Page 12: ...ll Rights Reserved 2 11 09 1 4 Gantry Top View Gantry Top View Service Station Top View Squ eege e Sc rap er O il F ille r H oles C arriag e As s em bl y C arria ge Latc h C arria ge Plu nge r F as t...

Page 13: ...from left to right and allows you to spread powder over the build box Holding down this button will result in continuous spreading of powder Feed Up Feed Down Allows the user to raise or lower the pi...

Page 14: ...ZPrinter 310 Plus Hardware Manual Overview zcentral zcorp com 8 All Rights Reserved 2 11 09 ZD5 Powder Recycling Station...

Page 15: ...he Build In ZPrint on page 29 Post Processing on page 33 For additional information on post processing techniques visit the Z Corp 3DP User Web site at zcentral zcorp com 2 1 Printer Preparation 1 Fil...

Page 16: ...aper with a damp paper towel See Section 4 2 6 Steps 9 and 10 5 Check the binder level and fill if necessary Fill the binder fluid to the neck of the binder bottle See Section 4 2 7 6 Check the waste...

Page 17: ...her the printer is connected through either a Serial Port or Network connection The printer will show up as an option in the text field if the software is properly communicating with the printer 4 Che...

Page 18: ...the duration of the print Click OK to start the build 1 Get a tray for transporting the part and place it beside the build box Use the tools that ship with your printer to remove excess powder from th...

Page 19: ...onal information regarding this important feature Parts printed with the High Performance Composite powders can be reliability printed to be within 1 0 or 0 005 dimensional tolerance To increase the s...

Page 20: ...inted with one of the High Performance Composite materials can be handled when it is not completely dried the part reaches full strength when it is completely dried Placing the part in an oven at temp...

Reviews: