background image

User’s Manual

63

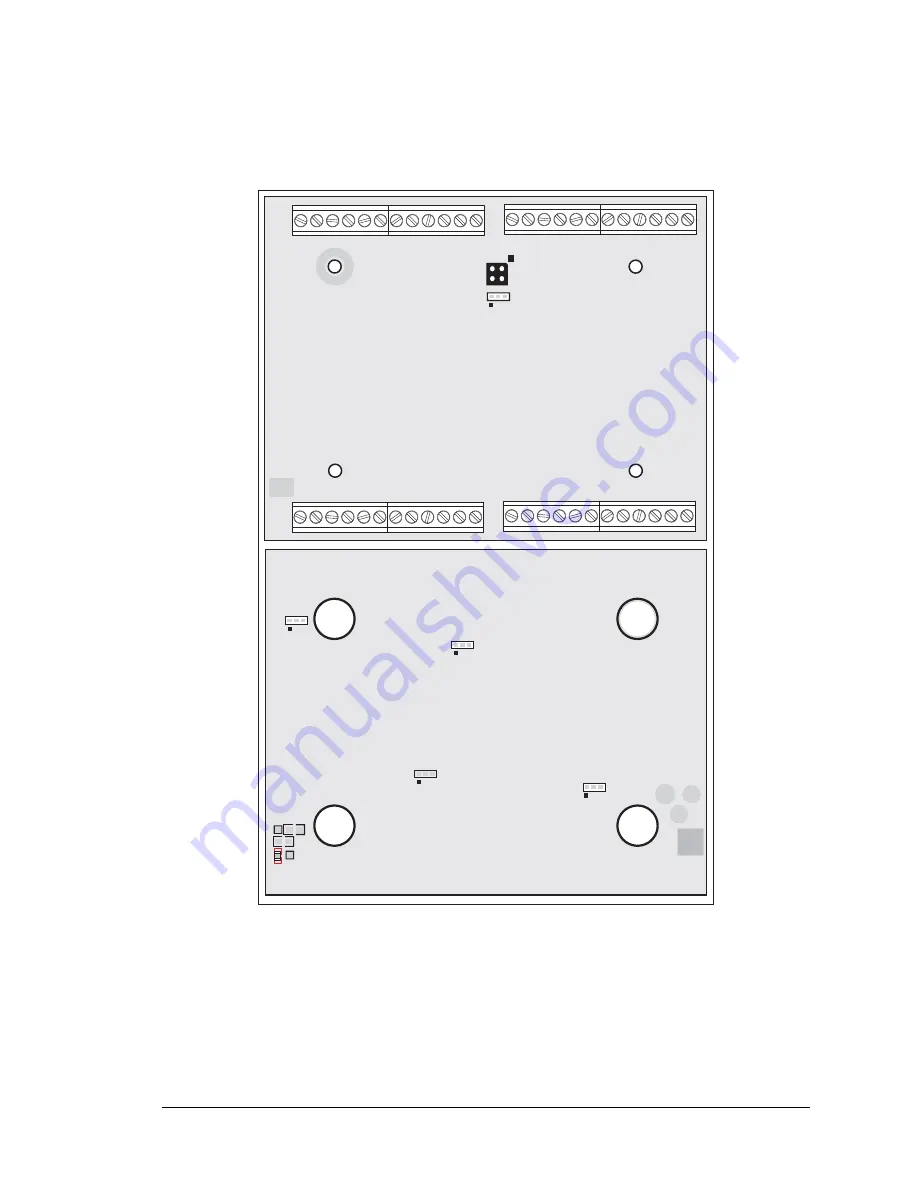
A.3  Jumper Configurations

Figure A-4 shows the header locations used to configure the various BL2000 options via jumpers. 

Figure A-4.  Location of BL2000 Configurable Positions

JP3

JP6

JP5

JP4

JP2

GND

GND

JP1

Top Side

Bottom Side

R160

R161

TP17

TP15

R118

Summary of Contents for Wildcat BL2000

Page 1: ...Wildcat BL2000 C Programmable Single Board Computer with Ethernet User s Manual 019 0094 040731 K ...

Page 2: ...BL2000 User s Manual Part Number 019 0094 040731 K Printed in U S A 2001 2004 Z World Inc All rights reserved Z World reserves the right to make changes and improvements to its products without providing notice Trademarks Rabbit and Rabbit 2000 are registered trademarks of Rabbit Semiconductor Dynamic C is a registered trademark of Z World Inc ...

Page 3: ...eaders and Screw Terminals 15 3 1 2 Power Supply Pins 15 3 2 Digital I O 16 3 2 1 Digital Inputs 16 3 2 2 Digital Outputs 18 3 3 Relay Outputs 20 3 4 Serial Communication 21 3 4 1 RS 232 21 3 4 2 RS 485 21 3 4 3 Programming Port 23 3 4 4 Ethernet Port 24 3 5 A D Converter Inputs 26 3 6 D A Converter Outputs 27 3 7 Memory 29 3 7 1 SRAM 29 3 7 2 Flash Memory 29 3 8 Programming Cable 30 3 8 1 Detaile...

Page 4: ... for a Direct Connection 54 5 3 Run the PINGME C Sample Program 55 5 4 Running More Sample Programs With a Direct Connection 56 5 5 Where Do I Go From Here 56 Appendix A Specifications 57 A 1 Electrical and Mechanical Specifications 58 A 1 1 Headers 61 A 2 Conformal Coating 62 A 3 Jumper Configurations 63 A 4 Use of Rabbit 2000 Parallel Ports 65 Appendix B Plastic Enclosure 67 B 1 Assembly 68 B 2 ...

Page 5: ...utputs an SPDT relay output and a 10Base T Ethernet port 1 2 BL2000 Features Rabbit 2000 microprocessor operating at 22 1 MHz 128K static RAM and 256K flash memory Up to 28 digital I O 11 protected digital inputs plus up to 7 dual purpose unbuffered analog inputs that may be software configured for use as digital inputs and 10 high current digital sinking outputs that may be factory configured as ...

Page 6: ...ndard screw terminal connectors supplied on BL2000 boards IDC headers bottom mount connectors and polarized friction lock terminals may be factory installed instead Visit our Web site at www zworld com or contact your Z World sales representative or authorized distributor for further information Table 1 BL2000 Series Features Model Features BL2000 Full featured single board computer BL2010 BL2000 ...

Page 7: ...t provide 9 to 40 V DC Demonstration Board with pushbutton switches and LEDs The Demonstration Board can be hooked up to the BL2000 to demonstrate the I O and the TCP IP capabilities of the BL2000 Wire assembly to connect Demonstration Board to BL2000 Plastic enclosure with four screws and eight customer installable light pipes Screwdriver Rabbit 2000 Processor Easy Reference poster Registration c...

Page 8: ...ning the popular µC OS II real time operating system as well as PPP Advanced Encryption Standard AES and other select libraries In addition to the Web based technical support included at no extra charge a one year telephone based technical support module is also available for purchase Visit our Web site at www zworld com or contact your Z World sales representative or autho rized distributor for f...

Page 9: ...ark are not CE compliant Immunity The BL2000 series of single board computers meets the following EN55024 1998 immu nity standards EN61000 4 3 Radiated Immunity EN61000 4 4 EFT EN61000 4 6 Conducted Immunity Additional shielding or filtering may be required for a heavy industrial environment Emissions The BL2000 series of single board computers meets the following emission standards using the enha...

Page 10: ...000 it is the responsibility of the end user to use proper ESD precautions to prevent ESD damage to the BL2000 Safety All inputs and outputs to and from the BL2000 series of single board computers must not be connected to voltages exceeding SELV levels 42 4 V AC peak or 60 V DC The lithium backup battery circuit on the BL2000 single board computer has been designed to protect the battery from haza...

Page 11: ...23 C25 C17 J6 C20 D1 U4 Y3 Q2 C24 R30 R 1 5 1 R4 C16 R20 R6 R12 C10 J5 R19 C80 R16 R130 U1 C2C3 C19 R153 C18 R154 R9 R13 R15 C1 Y2 R 2 7 C 2 2 C 2 7 R 2 8 9 0 1 5 6 5 4 0 U5 R5 5 R5 4 R3 7 R3 6 R3 8 R5 6 C4 0 C3 9 C3 8 R5 0 R5 1 R5 2 R5 8 R5 9 R6 0 C3 5 C3 4 C3 3 C31 C29 R33 R31 C3 6 U6 R32 R34 R35 C4 1 R5 3 R6 1 D5 D4 R41 R42 D3 R40 R5 7 R3 9 C45 C44 C43 J2 J1 J4 J3 D6 D7 D8 D9 J9 J11 R43 R44 R45...

Page 12: ...g the AC adapter then plugging it back in or by momentarily grounding the board reset input at pin 9 on screw terminal header J2 R1 C23 C25 C17 J6 C20 U4 Y3 Q2 C24 R30 R151 R4 C16 R20 R6 R12 C10 J5 R19 C80 R16 R130 U1 C2C3 C19 R153 C18 R154 R9 R13 R15 C1 Y2 R27 C22 C27 R28 90 15 65 40 U5 J2 J1 J4 J3 C8 U2 R5 R11 R10 C75 C11 R17 C4 C13 U3 R8 R18 R2 R3 R23 R22 C14 R152 R7 C78 C77 C76 C79 C5 C15 1 4 ...

Page 13: ...ed along with Dynamic C and an icon for the docu mentation menu is placed on the workstation s desktop Double click this icon to reach the menu If the icon is missing create a new desktop icon that points to default htm in the docs folder found in the Dynamic C installation folder The latest versions of all documents are always available for free unregistered download from our web sites as well Th...

Page 14: ...hardware select a different COM port within Dynamic C From the Options menu select Communications Select another COM port from the list then click OK Press Ctrl Y to force Dynamic C to recompile the BIOS If Dynamic C still reports it is unable to locate the target system repeat the above steps until you locate the active COM port You should receive a Bios compiled successfully message once this st...

Page 15: ...ME C Sample Program tests the TCP IP portion of the board 2 5 Where Do I Go From Here NOTE If you purchased your BL2000 through a distributor or Z World partner contact the distributor or Z World partner first for technical support If there are any problems at this point Check the Z World Technical Bulletin Board at www zworld com support bb Use the Technical Support e mail form at www zworld com ...

Page 16: ...12 Wildcat BL2000 ...

Page 17: ...ion A D Converter Inputs D A Converter Outputs Memory External Interrupts Figure 5 shows these Rabbit based subsystems designed into the BL2000 Figure 5 BL2000 Subsystems SRAM Flash 11 MHz osc 32 kHz osc BL2000 RABBIT 2000 RS 232 RS 485 A D Converter Digital Outputs Relay Output Programming Port Digital Inputs Ethernet D A Converter ...

Page 18: ...W GND K RESET IN1 IN0 485 485 RXD2 TXD2 RXD1 TXD1 J2 12 11 10 9 8 7 6 5 4 3 2 1 J8 AGND DAC1 DAC0 ADC8 ADC7 ADC6 ADC5 ADC4 ADC3 ADC2 ADC1 ADC0 J4 12 11 10 9 8 7 6 5 4 3 2 1 J8 J12 GND VBAT EXT GND OUT0 OUT1 OUT2 OUT3 OUT4 OUT5 OUT6 OUT7 NO COM NC GND VCC J9 1 2 3 4 5 6 7 8 9 10 11 12 J8 1 2 3 4 5 6 7 8 9 10 11 12 J8 IN2 IN3 IN4 IN5 IN6 IN7 IN8 IN9 IN10 OUT8 OUT9 GND J8 DS8 DS7 DS6 DS5 DS4 DS3 DS2 ...

Page 19: ...y GND by factory default but may be changed to Vcc by removing resistor R161 and installing resistor R160 See Appendix C Power Supply for more information on this configuration and for information on backup battery options Battery Serial Port Nomenclature HeaderJ2 TXD1 RXD1 TXD2 RXD2 Rabbit 2000 TxB RxB TxC RTS RxC CTS RAW GND GND K RESET GND IN1 IN0 GND 485 485 GND RXD2 TXD2 GND RXD1 TXD1 J1 AGND...

Page 20: ...be pulled up to 5 V but they can also be pulled down by moving the surface mounted jumper at JP6 as shown in Figure 7 Figure 7 a BL2000 Digital Inputs Pulled Up JP6 1 2 connected Figure 7 b BL2000 Digital Inputs Pulled Down JP6 2 3 connected JP6 10 nF 22 kW 27 kW Rabbit 2000 Microprocessor Factory Default Vcc 1 3 GND JP6 JP6 10 nF 22 kW 27 kW Rabbit 2000 Microprocessor Vcc 1 3 GND 5 V JP6 ...

Page 21: ...ified for the digIn software function call The default threshold for channels IN11 IN21 is also set to 2 40 V but may be changed by adding two lines to your program as dis cussed for the digIn software function call The digital inputs are each fully protected over a range of 36 V to 36 V and can handle short spikes of 40 V Figure 8 BL2000 Digital Input Protected Range JP6 10 nF 22 kW 27 kW Rabbit ...

Page 22: ...puts via 0 Ω resistors at R32 or R35 respectively or tie the outputs to GND via R34 when using the outputs as sourcing outputs K is an externally supplied voltage of up to 40 V DC and is used primarily in combination with current sourcing outputs and must also be connected to an external supply when an inductive load is connected to a sinking output NOTE Remove the 27 kΩ resistors R143 R150 from t...

Page 23: ...5 D1 Q2 R30 R55 R54 R37 R36 R38 R56 C40 C39 C38 R50 R51 R52 R58 R59 R60 C35 C34 C33 C31 C29 R33 R31 C36 U6 R32 R34 R35 C41 R53 R61 D5 D4 R41 R42 D3 R40 R57 R39 C45 C44 C43 D6 D7 D8 D9 J9 J11 R43 R44 R45 C49 C48 C47 C46 BT1 D G S Q3 Q5 C32 D10 D11 D12 R46 R47 R48 R49 C51 C52 C50 C26 Q4 R29 DS4 Q6 C37 C42 DS5 DS6 DS7 DS8 GND IN3 IN2 IN4 IN5 IN6 IN7 IN8 IN9 IN10 OUT8 OUT9 GND GND VCC OUT0 OUT1 OUT2 O...

Page 24: ...tions The relay is driven by PA0 which is the same Rabbit 2000 parallel port that drives OUT0 and LED DS4 OUT0 therefore works in parallel with the relay output The relay included on the BL2000 has contacts rated for 1 A 30 V DC or 300 mA 120 V AC When using the BL2000 in a CE certified application the voltages handled by the relay must not exceed SELV levels 42 4 V AC peak or 60 V DC 7 8 9 1 10 C...

Page 25: ... supported by an RS 232 transceiver U1 U1 provides the voltage output slew rate and input voltage immunity required to meet the RS 232 serial communication protocol Basically the chip translates the Rabbit 2000 s CMOS TTL signals to RS 232 signal levels Note that the polarity is reversed in an RS 232 circuit so that a 5 V output becomes approximately 10 V and 0 V is output as 10 V U1 also provides...

Page 26: ...1 R10 C75 C11 R17 C4 C13 U3 R8 R18 R2 R3 R23 R22 C14 R152 R7 C78 C77 C76 C79 C5 C15 Q1 R24 C21 C9 R14 C12 R21 C7 J12 DS1 DS2 GND RST IN1 IN0 485 485 RXD2 TXD2 RXD1 TXD1 AGND DAC1 DAC0 ADC8 ADC7 ADC6 ADC5 ADC4 ADC3 ADC2 ADC1 ADC0 RAW K GND GND GND GND GND GN D AGND AGND AGND AGND AGND AG ND PWR LNK JP2 C85 JP1 R157 R1 C17 C20 Y3 R4 C16 R20 R6 R12 C10 J5 R19 C80 R16 R130 U1 C2C3 C19 R153 C18 R154 R9...

Page 27: ...ed device can force the BL2000 to start up in an external bootstrap mode NOTE Refer to the Rabbit 2000 Microprocessor User s Manual for more information related to the bootstrap mode The programming port is used to start the BL2000 in a mode where the BL2000 will download a program from the port and then execute the program The programming port transmits information to and from a PC while a progra...

Page 28: ...te to the way shown in Figure 14 The transformer connector assembly ground is connected to the BL2000 printed circuit board digital ground via a 0 Ω resistor jumper R1 as shown in Figure 15 Figure 15 Isolation Resistor R1 The factory default is for the 0 Ω resistor jumper at R1 to be installed In high noise environments it may be useful to ground the transformer connector assembly directly through...

Page 29: ... shown in Figure 16 Figure 16 Recommended Location for Ring Lug R1 C23 C17 J6 C20 D1 U4 Y3 Q2 C24 R151 R4 C16 R20 R6 R12 C10 J5 R19 C80 R16 R130 C19 R153 R154 R9 R13 R15 C1 Y2 R27 C22 C27 R28 U5 J2 J1 GND RST IN1 IN0 485 485 RXD2 TXD2 RXD1 TXD1 RAW K GND GND GND GND GND GN D Remove R1 Add solder lug to connect ground wire to chassis ...

Page 30: ...er inputs Figure 17 Buffered A D Converter Inputs The op amp is powered from the V supply The 1 MΩ and 200 kΩ resistors set the gain scale factor which is 0 2 in this case This results in a dynamic input range of 4 096 V 0 2 or 20 48 V The center point of this range is set by the 1 707 V reference voltage With the reference set to 1 707 V the center point is at 0 V and the input voltage can range ...

Page 31: ...erence voltage can be ratiometric rather than absolute This is done by removing the zener diode and installing the 453 Ω resistor With this arrangement the reference voltages follow changes in the power supply voltages Vcc and V which is a filtered ver sion of Vcc This type of measurement circuit is preferred by some customers whose sen sors are powered from the Vcc supply and hence the outputs tr...

Page 32: ...converters installed the user has the option of using an unbuffered A D con verter input to read the output of a D A converter or one of the two fixed voltages V or Vcc The standard BL2000 configuration is for A D converter channels 9 and 10 to moni tor D A converter channels 0 and 1 respectively Figure 19 shows the D A converter outputs with buffer amplifiers which may be used to increase the D A...

Page 33: ...rface mounted resistors NOTE Z World recommends that any customer applications should not be constrained by the sector size of the flash memory since it may be necessary to change the sector size in the future A Flash Memory Bank Select jumper configuration option exists at JP2 with 0 Ω surface mounted resistors This option used in conjunction with some configuration macros allows Dynamic C to com...

Page 34: ...21 R26 1 5 6 10 K1 C9 R14 C12 R21 C7 J12 DS1 DS4 DS3 DS2 Q6 C37 C42 DS5 DS6 DS7 DS8 GND IN3 IN2 IN4 IN5 IN6 IN7 IN8 IN9 IN10 OUT8 OUT9 GND GND OUT0 OUT1 OUT2 OUT3 OUT4 OUT5 OUT6 OUT7 NC GND RST IN1 IN0 485 485 RXD2 TXD2 RXD1 TXD1 AGND DAC1 DAC0 ADC8 ADC7 ADC6 ADC5 ADC4 ADC3 ADC2 ADC1 ADC0 RAW K NO COM GND GND GND GN D GND GND GND GND GND GND GND GN D GND GND GND GND GND GN D AGND AGND AGND AGND AG...

Page 35: ... with a simple change to the BIOS as described below 3 9 3 Spectrum Spreader BL2000 boards that carry the CE mark have a Rabbit 2000 microprocessor that features a spectrum spreader which helps to mitigate EMI problems By default the spectrum spreader is on automatically for BL2000 boards that carry the CE mark when used with Dynamic C 7 32 or later versions but the spectrum spreader may also be t...

Page 36: ...32 Wildcat BL2000 ...

Page 37: ...amming cable is disconnected Standalone applications can only run from flash memory The disadvantage of using flash memory for debug is that interrupts must be disabled for approximately 5 ms whenever a break point is set in the program This can crash fast inter rupt routines that are running while you stop at a break point or single step the program Flash memory or RAM is selected on the Options ...

Page 38: ...rectory containing the patch Do not simply copy over an entire file since you may overwrite a bug fix of course you may copy over any programs you have written Once you are sure the new patch works entirely to your satisfaction you may retire the existing installation but keep it available to handle legacy applications 4 1 1 2 Upgrades Dynamic C installations are designed for use with the board th...

Page 39: ...7 and the Processor Bad LED DS8 The LEDs are used in reverse logical order to minimize the cycling of the relay which is slaved to the same output as DS4 LEDS_4 C This program creates four devices lights and four buttons to toggle them Users can view the devices with their Web browser and change the status of the lights If the Demonstration Board is connected to the BL2000 the lights on the Dem on...

Page 40: ... display them in the STDIO window Use MASTER C to program the master BL2000 4 2 4 A D Converter Inputs The following sample programs are found in the ADC subdirectory in SAMPLES BL2000 AD_CALIB C Demonstrates how to recalibrate an A D converter channel using two known voltages to generate two coefficients gain and offset which are rewritten into the user block data area The voltage that is being m...

Page 41: ...rwrite the calibration constants set at the factory DAOUT1 C This program outputs a voltage that can be read with a voltmeter The out put voltage is computed using the calibration constants that are read from the EEPROM simulated in flash memory DAOUT2 C This program demonstrates the use of both the D A and the A D convert ers The user selects both the D A converter and A D channel to be used then...

Page 42: ...ns for the BL2000 BL2000 libraries associated with features specific to the BL2000 TCPIP libraries specific to using TCP IP functions on the BL2000 Other generic functions applicable to all devices based on the Rabbit 2000 microprocessor are described in the Dynamic C Function Reference Manual ...

Page 43: ...t OUT0 RELAY LED_DS4 High Current Driver Off PA1 Output OUT1 LED_DS5 High Current Driver Off PA2 Output OUT2 LED_DS6 High Current Driver Off PA3 Output OUT3 LED_DS7 High Current Driver Off PA4 Output OUT4 High Current Driver Off PA5 Output OUT5 High Current Driver Off PA6 Output OUT6 High Current Driver Off PA7 Output OUT7 High Current Driver Off PB0 Input IN6 N A PB1 Input CLKA N A PB2 Input IN7 ...

Page 44: ... On PD1 Output DAC ADC_SDI On PD2 Input RTL ADC_SDO N A PD3 Input RTL_SK N A PD4 Output RTL_SDI On PD5 Output DAC0_CS Inactive high PD6 Output DAC1_CS Inactive high PD7 Output ADC_CS Inactive high PE0 Output OUT8 High Current Driver Off PE1 Output OUT9 High Current Driver Off PE2 Input IN0 N A PE3 Input IN1 N A PE4 Input IN2 N A PE5 Input IN3 N A PE6 Input IN4 N A PE7 Input IN5 N A PD3 is an outpu...

Page 45: ...esired threshold voltage Anything below the threshold value is a logic 0 and any thing higher than or equal to the threshold value is a logic 1 PARAMETER channel is the input channel number 0 21 RETURN VALUE The state of the input 0 or 1 SEE ALSO brdInit digOut Sets the state of a digital output OUT0 OUT9 The default setting for the function is for current sinking outputs To change from sinking to...

Page 46: ... Dynamic C Function Reference Manual and Technical Note 213 Rabbit 2000 Serial Port Software The following function calls are specific to the BL2000 User interface to set up BL2000 serial communication lines Call this function after serXOpen If Mode 1 is selected CTS RTS flow control is exercised using the serCflowcontrolOn and serCflowcontrolOff functions from the RS232 LIB library PARAMETER mode...

Page 47: ...mon connected to relay normally closed contact 1 relay common connected to relay normally open contact SEE ALSO brdInit LED ON OFF control The relay is driven by PA0 which is the same Rabbit 2000 parallel port that drives OUT0 and LED0 OUT0 therefore works in parallel with the relay output Z World therefore recommends that you do not use OUT0 for a digital output when you are using the relay The r...

Page 48: ... channel value RETURN VALUE 0 if successful 1 if not able to make calibration constants SEE ALSO anaIn anaInVolts brdInit Reads the voltage of an analog input channel by serially clocking out an 8 bit command to the A D con verter device of the following formats TLC2543 commands D7 D4 Channel 0 10 Channel 11 Vref Vref 2 Channel 12 Vref Channel 13 Vref Channel 14 software powerdown D3 D2 Output dat...

Page 49: ... value corresponding to the voltage on the A D converter input channel which will be 0 4095 for 12 bit A D conversions 0 1023 for 10 bit A D conversions 0 255 for 8 bit A D conversions SEE ALSO anaIn anaInVolts brdInit samples bl2000 adc AD3 C Reads the state of an A D converter input channel PARAMETER channel is the A D converter input channel 0 10 to read RETURN VALUE A value corresponding to th...

Page 50: ...VALUE 0 if successful 1 if address or range is invalid SEE ALSO anaInEEWr brdInit Writes the calibration constants gain and offset to the simulated EEPROM in flash memory located in reserved user block memory area 0x1C00 0x1FFF PARAMETER channel is the A D converter input channel 0 10 RETURN VALUE 0 if successful 1 if address or range is invalid SEE ALSO anaInEERd brdInit The address range of the ...

Page 51: ...ed into global table _dacCalib PARAMETERS channel is the D A converter output channel 0 or 1 value1 is the first D A converter value volts1 is the voltage corresponding to the first D A converter value value2 is the second D A converter value volts2 is the voltage corresponding to the second D A converter value RETURN VALUE 0 if sucessful 1 if not able to make calibration constants SEE ALSO anaOut...

Page 52: ...e D11 D0 Data bits MSB LSB 0 4095 PARAMETERS channel is the D A converter output channel to write 0 or 1 modecount is a value corresponding to the voltage on the D A converter output and or setting the mode of operation RETURN VALUE None SEE ALSO anaOutVolts anaOutCalib brdInit void anaOut unsigned int channel unsigned int modecount Operation Mode Description modecount Value 0 Normal Mode 0 4095 1...

Page 53: ...ssful 1 if address or range is invalid SEE ALSO anaOutEEWr brdInit Writes the calibration constants gain and offset to the simulated EEPROM in flash memory located in reserved user block memory area 0x1C00 0x1FFF PARAMETER channel is the D A converter output channel 0 or 1 RETURN VALUE 0 if successful 1 if address or range is invalid SEE ALSO anaOutEERd brdInit The address range of the user block ...

Page 54: ...50 Wildcat BL2000 ...

Page 55: ...TCP IP tool kit More information is available at www zworld com 1 Connect the AC adapter and the programming cable as shown in Chapter 2 Getting Started 2 Ethernet Connections If you do not have access to an Ethernet network use a crossover Ethernet cable to con nect the BL2000 to a PC that at least has a 10Base T Ethernet card If you have Ethernet access use a straight through Ethernet cable to e...

Page 56: ...d NOTE A hardware RESET is accomplished by unplugging the AC adapter then plug ging it back in or by momentarily grounding the board reset input at pin 9 on screw ter minal header J2 When working with the BL2000 the green LNK light is on when a program is running and the board is properly connected either to an Ethernet hub or to an active Ethernet card The orange ACT light flashes each time a pac...

Page 57: ...P address of 10 1 1 2 for the BL2000 board and 10 1 1 1 for your PC you can edit the values in the section that directly follows the General Configuration comment in the TCP_CONFIG LIB library You will find this library in the LIB TCPIP directory 3 You can create a CUSTOM_CONFIG LIB library and use a TCPCONFIG value greater than 100 Instructions for doing this are at the beginning of the TCP_CONFI...

Page 58: ...sion of Windows you are using look for the TCP IP Protocol Network Dial Up Connections Network line or tab Double click on this line or select Properties or Local Area Connection Properties to bring up the TCP IP properties dialog box You can edit the IP address and the subnet mask directly Disable obtain an IP address automatically You may want to write down the existing values in case you have t...

Page 59: ...ection is made Note If the LNK light does not light you may not have a crossover cable or if you are using a hub perhaps the power is off on the hub The next step is to ping the board from your PC This can be done by bringing up the MS DOS window and running the pingme program ping 10 10 6 100 or by Start Run and typing the entry ping 10 10 6 100 Notice that the orange ACT light flashes on the BL2...

Page 60: ...IP connection should be closed and it uses high current output OUT0 to indicate that there is an open connection You may change the digital input and output to suit your application needs Run the Telnet program on your PC Start Run telnet 10 10 6 100 As long as you have not modified the TCPCONFIG 1 macro in the sample program the IP address is 10 10 6 100 as shown otherwise use the TCP IP settings...

Page 61: ...User s Manual 57 APPENDIX A SPECIFICATIONS Appendix A provides the specifications for the BL2000 and describes the conformal coating ...

Page 62: ... D8 D9 J9 J11 R43 R44 R45 C49 C48 C47 C46 BT1 D G S Q3 Q5 C32 D10 D11 D12 R46 R47 R48 R49 C51 C52 C50 C8 U2 R5 R11 R10 C75 C11 R17 C4 C13 U3 R8 R18 R2 R3 R23 R22 C14 R152 R7 C78 C77 C76 C79 C5 C15 1 4 3 2 Y1 C26 Q4 Q1 R25 R24 R29 C21 R26 1 5 6 10 K1 C9 R14 C12 R21 C7 J12 DS1 DS4 DS3 DS2 Q6 C37 C42 DS5 DS6 DS7 DS8 GND IN3 IN2 IN4 IN5 IN6 IN7 IN8 IN9 IN10 OUT8 OUT9 GND GND OUT0 OUT1 OUT2 OUT3 OUT4 O...

Page 63: ...Four 10 bit res 10 V DC 1 MΩ up to 4 000 samples s Four 12 bit res 10 V DC 1 MΩ up to 4 000 samples s Four 10 bit res 10 V DC 1 MΩ up to 4 000 samples s Analog Outputs Two 12 bit res 0 4 V DC update rate 12 kHz None Two 12 bit res 0 4 V DC update rate 12 kHz None Dual Purpose Analog or Digital Inputs Five at 12 kΩ 12 bit res 0 48 V DC Seven at 12 kΩ 10 bit res 0 48 V DC Five at 12 kΩ 12 bit res 0 ...

Page 64: ...40 V DC or 24 V AC 10 1 5 W max Operating Temperature 40 C to 70 C Humidity 5 95 noncondensing Board Size 3 43 4 15 0 82 87 mm 105 mm 21 mm When using the BL2000 in a CE certified application the voltages handled by the relay must not exceed SELV levels 42 4 V AC peak or 60 V DC Table A 1 BL2000 Specifications continued Feature BL2000 BL2010 BL2020 BL2030 ...

Page 65: ... connection to other boards or ribbon cables Figure A 2 shows the BL2000 footprint These values are relative to one of the mounting holes Figure A 2 User Board Footprint for BL2000 J1 J3 J12 J11 J10 J6 J7 1 589 40 4 2 839 72 1 0 361 9 2 0 760 19 3 3 189 81 0 1 239 31 5 3 380 85 9 0 487 12 4 2 641 67 1 2 113 53 7 2 280 57 9 2 598 66 0 J5 ...

Page 66: ...6 C20 D1 U4 Y3 Q2 C24 R30 R151 R4 C16 R20 R6 R12 C10 J5 R19 C80 R16 R130 U1 C2C3 C19 R153 C18 R154 R9 R13 R15 C1 Y2 R27 C22 C27 R28 90 15 65 40 U5 R55 R54 R37 R36 R38 R56 C40 C39 C38 R50 R51 R52 R58 R59 R60 C35 C34 C33 C31 C29 R33 R31 C36 U6 R32 R34 R35 C41 R53 R61 D5 D4 R41 R42 D3 R40 R57 R39 C45 C44 C43 J2 J1 J4 J3 D6 D7 D8 D9 J9 J11 R43 R44 R45 C49 C48 C47 C46 BT1 D G S Q3 Q5 C32 D10 D11 D12 R4...

Page 67: ...gurations Figure A 4 shows the header locations used to configure the various BL2000 options via jumpers Figure A 4 Location of BL2000 Configurable Positions JP3 JP6 JP5 JP4 JP2 GND GND JP1 Top Side Bottom Side R160 R161 TP17 TP15 R118 ...

Page 68: ...J9 Pin 12 is Vcc R160 installed Pin 12 is GND R161 installed JP1 RS 485 Bias and Termination Resistors 1 2 3 4 Bias and termination resistors connected None Bias and termination resistors not connected JP2 Flash Memory Bank Select 1 2 Normal Mode 2 3 Bank Mode JP3 D A Converter Power Supply 1 2 V 2 3 REF JP4 Flash Memory Size 1 2 128K 256K 2 3 512K JP5 SRAM Size 1 2 128K 2 3 512K JP6 Digital Input...

Page 69: ...DS5 Off PA2 Output OUT2 LED_DS6 Off PA3 Output OUT3 LED_DS7 Off PA4 Output OUT4 Off PA5 Output OUT5 Off PA6 Output OUT6 Off PA7 Output OUT7 Off PB0 Input IN6 N A PB1 Input CLKA N A PB2 Input IN7 N A RABBIT 2000 Port A OUT0 OUT7 Port B IN6 IN10 CTRL Port D ADC DAC Eth Port E IN0 IN5 OUT8 OUT9 PA0 PA7 PB0 PB5 PB6 PB7 PC0 PC5 PE2 PE7 A0 A18 IORD IOWR RESET Data Lines Address Lines Misc Input I O Cont...

Page 70: ...ort Serial Port A Inactive high PC7 Input RXA Programming Port N A PD0 Output DAC ADC_SK On PD1 Output DAC ADC_SDI On PD2 Input RTL ADC_SDO N A PD3 Input RTL_SK N A PD4 Output RTL_SDI On PD5 Output DAC0_CS Inactive high PD6 Output DAC1_CS Inactive high PD7 Output ADC_CS Inactive high PE0 Output OUT8 Off PE1 Output OUT9 Off PE2 Input IN0 N A PE3 Input IN1 N A PE4 Input IN2 N A PE5 Input IN3 N A PE6...

Page 71: ...re provides a secure way to protect your BL2000 The enclosure itself may be mounted on any flat sur face Appendix B describes how to mount the BL2000 inside the plas tic enclosure how to install the optional light pipes and pro vides details on mounting the assembly ...

Page 72: ...J7 T V S 1 J10 C28 R1 C23 C25 C17 J6 C20 D1 U4 Y3 Q2 C24 R30 R 1 5 1 R4 C16 R20 R6 R12 C10 J5 R19 C80 R16 R130 U1 C2C3 C19 R153 C18 R154 R9 R13 R15 C1 Y2 R 2 7 C 2 2 C 2 7 R 2 8 9 0 1 5 6 5 4 0 U5 R5 5 R5 4 R3 7 R3 6 R3 8 R5 6 C4 0 C3 9 C3 8 R5 0 R5 1 R5 2 R5 8 R5 9 R6 0 C3 5 C3 4 C3 3 C31 C29 R33 R31 C3 6 U6 R32 R34 R35 C4 1 R5 3 R6 1 D5 D4 R41 R42 D3 R40 R5 7 R3 9 C45 C44 C43 J2 J1 J4 J3 D6 D7 D...

Page 73: ...22 C 27 R 28 90 15 65 40 U5 R5 5 R5 4 R3 7 R3 6 R3 8 R5 6 C4 0 C3 9 C3 8 R5 0 R5 1 R5 2 R5 8 R5 9 R6 0 C3 5 C3 4 C3 3 C31 C29 R33 R31 C3 6 U6 R32 R34 R35 C4 1 R5 3 R6 1 D5 D4 R41 R42 D3 R40 R5 7 R3 9 C45 C44 C43 J2 J1 J4 J3 D6 D7 D8 D9 J9 J11 R43 R44 R45 C49 C48 C47 C46 BT1 D G S Q3 Q5 C32 D10 D11 D12 R46 R47 R48 R49 C51 C52 C50 C8 U2 R5 R 11 JP2 R 10 C75 C 11 R17 C4 C13 U3 R8 R18 R2 R3 R2 3 R22 C...

Page 74: ...re B 4 Plastic Enclosure Dimensions When fully assembled with the BL2000 installed the total height of the plastic enclosure will be 1 1 28 mm 5 60 142 2 85 72 2 1 3 5 4 1 375 35 0 25 6 4 4 8 7 5 1 2 4 1 3 7 5 3 5 4 35 110 3 6 2 9 2 5 00 127 4 2 5 1 0 8 0 70 18 0 375 9 5 mm is cut off each corner ...

Page 75: ...n this case D1 and C28 act as a half wave rectifier to produce approximately 40 V DC at the input of the switching regula tor U12 Although a significant drop will be measured at DCIN the voltage will never drop below 9 V DC As long as the minimum input level is maintained at the input to the regulator Vcc will be held at 5 V DC Pin 12 on header J9 can be configured to either supply Vcc 0 Ω surface...

Page 76: ...and External Battery Connections The SRAM and the real time clock have battery backup Power to the SRAM and the real time clock VRAM is provided by two different sources depending on whether the main part of the BL2000 is powered or not When the BL2000 is powered normally and Vcc is within operating limits the SRAM and the real time clock are powered from Vcc If power to the board is lost or falls...

Page 77: ...ended by the battery manufacturer Dispose of used batteries according to the battery manufacturer s instructions C 2 2 Battery Backup Circuit Figure C 2 shows the battery backup circuit Figure C 2 BL2000 Backup Battery Circuit The battery backup circuit serves three purposes It reduces the battery voltage to the SRAM and to the real time clock thereby limiting the current consumed by the real time...

Page 78: ... needed to provide a very small voltage drop between Vcc and VRAM 100 mV typically 10 mV so that the board components powered by Vcc will not have a significantly different voltage than VRAM When the BL2000 is not in reset the RESET line will be high This turns on Q8 causing its collector to go low This turns on Q9 allowing VRAM to nearly equal Vcc When the BL2000 is in reset the RESET line will g...

Page 79: ...ynamic C function chkWDTO is not able to detect whether a watchdog timeout has occurred on the BL2000 The GCSR status bits are read and stored by the BIOS and the reset status bit would normally change once a reset has occurred How ever since WDTOUT is tied to the reset generator a watchdog timeout forces a hard ware reset followed by the BIOS reading and storing the status bits corresponding to p...

Page 80: ... for the SRAM s chip select signal line In a powered up condition the CS control circuit must allow the processor s chip select signal CS1 to control the SRAM s CS signal CSRAM So with power applied CSRAM must be the same signal as CS1 and with power removed CSRAM must be held high but only needs to be battery voltage high Q3 and Q4 are MOSFET transistors with com plementary polarity They are both...

Page 81: ...rs to turn on creating a propagation delay This propa gation delay is typically very small about 10 ns to 15 ns The signal that turns the transistors on is a high on the processor s reset line RESET When the BL2000 is not in reset the reset line will be high turning on n channel Q4 directly and p channel FET Q3 by way of Q8 When the board is in reset both Q3 and Q4 are off isolating CSRAM and allo...

Page 82: ...78 Wildcat BL2000 ...

Page 83: ...00 Tool Kit to the BL2000 board Proceed as follows 1 Use the wires included in the BL2000 Tool Kit to connect header J1 on the Demonstra tion Board to header J8 and J9 on the BL2000 The connections are shown in Figure D 1 for sample programs DIGIN C DIGOUT C and SMTP C and in Figure D 2 for sample program ANADIGIN C 2 Make sure that your BL2000 is connected to your PC and that the power supply is ...

Page 84: ...2 R34 R35 C41 R53 R61 D5 D4 R41 R42 D3 R40 R57 R39 C45 C44 C43 J2 J1 J4 J3 D6 D7 D8 D9 J9 J11 R43 R44 R45 C49 C48 C47 C46 BT1 D G S Q3 Q5 C32 D10 D11 D12 R46 R47 R48 R49 C51 C52 C50 C8 U2 R5 R11 R10 C75 C11 R17 C4 C13 U3 R8 R18 R2 R3 R23 R22 C14 R152 R7 C78 C77 C76 C79 C5 C15 1 4 3 2 Y1 C26 Q4 Q1 R25 R24 R29 C21 R26 1 5 6 10 K1 C9 R14 C12 R21 C7 J12 DS1 DS4 DS3 DS2 Q6 C37 C42 DS5 DS6 DS7 DS8 GND I...

Page 85: ...3 R61 D5 D4 R41 R42 D3 R40 R57 R39 C45 C44 C43 J2 J1 J4 J3 D6 D7 D8 D9 J9 J11 R43 R44 R45 C49 C48 C47 C46 BT1 D G S Q3 Q5 C32 D10 D11 D12 R46 R47 R48 R49 C51 C52 C50 C8 U2 R5 R11 R10 C75 C11 R17 C4 C13 U3 R8 R18 R2 R3 R23 R22 C14 R152 R7 C78 C77 C76 C79 C5 C15 1 4 3 2 Y1 C26 Q4 Q1 R25 R24 R29 C21 R26 1 5 6 10 K1 C9 R14 C12 R21 C7 J12 DS1 DS4 DS3 DS2 Q6 C37 C42 DS5 DS6 DS7 DS8 GND IN3 IN2 IN4 IN5 I...

Page 86: ...82 Wildcat BL2000 ...

Page 87: ...e PROG connector is used only when the programming cable is attached to the programming connector header J5 while a new application is being devel oped Otherwise the DIAG connector on the programming cable allows the programming cable to be used as an RS 232 to CMOS level converter for serial communication which is appropriate for monitoring or debugging a BL2000 system while it is running ...

Page 88: ...t connected to this connector The programming port is then enabled as a diagnostic port by polling the port periodically to see if communication needs to begin or to enable the port and wait for interrupts The pull up resistors on RXA and CLKA prevent spurious data reception that might take place if the pins floated If the clocked serial mode is used the serial port can be driven by having two tog...

Page 89: ... for this alternate configuration Table E 1 BL2000 Programming Port Pinout Configurations Pin Pin Name Default Use Alternate Use Notes 1 RXA Serial Port A PC6 Input 2 GND 3 CLKA PB1 Bitwise or parallel programmable input 4 VCC 5 RESET Connected to reset generator U4 6 TXA Serial Port A PC7 Output 8 STATUS Output 9 SMODE0 Input Must be low when BL2000 boots up 10 SMODE1 Input Must be low when BL200...

Page 90: ...86 Wildcat BL2000 ...

Page 91: ...perfect Bugs are always present in a system of any size In order to prevent danger to life or property it is the responsibility of the system designer to incorporate redundant protective mechanisms appropriate to the risk involved All Z World products are 100 percent functionally tested Additional testing may include visual quality con trol inspections or mechanical defects analyzer inspections Sp...

Page 92: ...88 Wildcat BL2000 ...

Page 93: ...ging features 33 installation 9 starting 10 telephone based technical support 4 34 upgrades and patches 34 E EMI spectrum spreader feature 31 Ethernet cables 51 Ethernet connections 51 steps 51 Ethernet port 24 ground lug 25 handling EMI and noise 24 pinout 24 external interrupts 31 F features 1 flash memory lifetime write cycles 33 I installation plastic enclosure BL2000 68 light pipes 68 top 69 ...

Page 94: ...tion 21 programming port 23 RS 232 description 21 RS 485 description 21 RS 485 network 22 RS 485 termination and bias resistors 23 serial ports Ethernet port 24 setup 7 attach BL2000 to enclosure base 7 power supply connections 8 programming cable connec tions 8 software 4 A D converter inputs _anaIn 44 anaIn 45 anaInCalib 44 anaInEERd 46 anaInEEWr 46 anaInVolts 46 board initialization 39 brdInit ...

Page 95: ...0 0128 Programming Cable Schematic www zworld com documentation schemat 090 0128 pdf The schematics included with the printed manual were the latest revisions available at the time the manual was last revised The online versions of the manual contain links to the latest revised schematic on the Web site You may also use the URL information provided above to access the latest schematics directly ...

Page 96: ......

Reviews: