background image

41


CONFIDENTIAL 

DOC-USR-0093-03 


____________________________________________________________________________________


Z3 Technology, LLC 

 100 N. 8th St. STE 250 

 Lincoln, NE 68508-1369 USA 

 +1.402.323.0702 

11.2


 Method 2:  Running Your Code through TFTP/NFS 


Set up a TFTP server on your Linux PC and configure it to read from your “images” directory. 

(1)


This will vary depending on the Linux setup you have. As an example, here is a set of steps that 
would be run from Ubuntu 10.x (

these are in gray to denote they can vary from system to system

): 


(a)


 Get TFTP if it is not already installed: 


# sudo apt-get install xinetd tftpd tftp 


(b)


Create the file /etc/xinetd.d/tftp .  Set “server_args” to the home directory containing “z3-
netra-rdk” (/home/z3 in this example).  An example of a tftp file would be: 


service tftp 


disable       

= no 


socket_type 

= dgram 


protocol 


= udp 


wait   


= yes 


user   


= nobody 


server 


= /usr/sbin/in.tftpd 


server_args 

= -s /home 

(c)


Start TFTP 


# sudo /etc/init.d/xinetd start 


Enable NFS on the Linux PC.  The target DM8169 will mount the root file system using NFS.   

(2)


This, like TFTP, will also vary depending on the Linux setup you have. As an example, below is a set 
of steps that would be run from Ubuntu 10.x or later (these are in gray to denote they can vary from 
system to system): 


(a)


Get NFS if it is not already installed: 


# sudo apt-get install nfs-kernel-server 


(b)


Add an entry for the file system directory in /etc/exports.  For example, the line would be 
something like (here, 192.168.0.6 is the IP address of the PC): 

/home/z3/z3-netra-rdk/filesys/fs 
192.168.0.6/255.255.0.0(no_root_squash,insecure,nohide,rw,async) 


(c)


Create symbolic links in your top-level directory to allow access to your filesys and images 
directory. Actual directory name may be different depending on your specific release: 


# cd /home/z3/z3-netra-rdk 
# ln –s z3-netra-RDK-20160201/images images 
# ln –s z3-netra-RDK-20160201/filesys filesys 


Summary of Contents for Z3-SBE264-25

Page 1: ... Technology LLC All rights reserved This document contains proprietary and confidential information of Z3 Technology LLC Z3 This document may not be used reproduced disclosed or disseminated to anyone without the prior written approval of an authorized representative of Z3 Z3 Technology LLC incorporates HDMI technology The terms of HDMI and HDMI High Definition Multimedia Interface and the HDMI Lo...

Page 2: ...ology LLC 100 N 8th St STE 250 Lincoln NE 68508 1369 USA 1 402 323 0702 Revision History Version Date Change Note Author 2 35 1 05 12 2016 Original Document TA 2 35 1a 08 26 2016 Added RPS Notes TA 2 36 6 10 04 2016 Added RTP and RTMP streaming instructions Added Wowza configuration instructions Added decode instructions TA ...

Page 3: ...aring the Linux Environment 10 5 2 Making the Directories and Running the Make Script 10 CODE OVERVIEW RPS ONLY 12 6 0 6 1 The z3apps rdk Directory 12 6 2 Z3 Application Overview 13 6 3 RDK Documentation 14 RUNNING THE ENCODER 16 7 0 7 1 Set up the Video Source 16 7 2 Connect the Z3 SBE264 25 16 7 3 Set up the Terminal Window 17 7 4 Power on the Board 17 7 5 Ensure your PC has a Proper IP Address ...

Page 4: ...der 38 EXERCISING OTHER FEATURES 39 10 0 RUNNING THE CODE YOU BUILT ON THE BOARD RPS ONLY 40 11 0 11 1 Method 1 Updating the Image File 40 11 2 Method 2 Running Your Code through TFTP NFS 41 11 3 Other Available u boot Commands 45 USING THE PASSWORD FEATURE 46 12 0 SUMMARY OF OPTIONS 48 13 0 13 1 The System Setup Tab 48 13 2 The User Presets Tab 48 13 3 The Status Tab 49 13 4 The MPTS Tab 50 13 5 ...

Page 5: ... Changing the Bitrate Dynamically 27 Figure 17 Drop in Bitrate after Dynamic Bitrate Change 28 Figure 18 Tuning for Various Use Cases 29 Figure 19 Using the Aux TS File Enable Option 30 Figure 20 The User Presets Tab 31 Figure 21 Entering a User Preset Name 31 Figure 22 Setting z3_test as the preset configuration 31 Figure 23 Setting DHCP 32 Figure 24 New IP Address Assigned through DHCP 32 Figure...

Page 6: ... OS The kit comes with all of the low level resources such as the Linux kernel u boot tool chain and starter file system pre integrated and configured The software bundle also contains binary applications to support multimedia encoding to file or stream Z3 Technology can provide services to customize the software applications to a customer s specification For design services or additional support ...

Page 7: ...llowing figure shows a block diagram of the Z3 SBE264 25 single board encoder Note Z3 does not warrant modules that are operated outside the specified scope of operation per Texas Instruments datasheets or errata for the DM816x processors This includes but is not limited to the SATA2 interface Per specifications from Texas Instruments only SATA2 drives are supported Figure 2 Z3 SBE264 25 Block Dia...

Page 8: ...ing the single board encoder see Section 9 0 RUNNING THE DECODER on page 36 2 2 If You Already Have a System from Z3 and Need to Update the Firmware You can update the firmware via the HTTP base user interface by following the instructions in Section 11 0 RUNNING THE CODE YOU BUILT ON THE BOARD on page 40 2 3 If You are Ready to Start Development Details on how to untar and build the code can be f...

Page 9: ...EG 2 TS RTP and DVB ASI Supports unicast and multicast streaming Supports on the fly bitrate changes Inputs 3G SDI HDMI Outputs 3G SDI HDMI Additional Interfaces include 1Gb Ethernet 2x SATA2 USB 2 0 and RS 232 Serial HTTP based configuration software for user friendly configuration control and update RS 232 serial port for technical configuration and control 4 1 Supported Input Resolutions Encode...

Page 10: ...rmine whether your OS is 64 bit by using the uname p command A 64 bit OS will return x86_64 while a 32 bit OS will return i386 i586 or i686 For 64 bit Ubuntu you can get the necessary libraries by typing sudo apt get install ia32 libs For 64 bit Fedora you can type sudo yum install glibc i686 5 2 Making the Directories and Running the Make Script The software provided will allow you to re create t...

Page 11: ...250 Lincoln NE 68508 1369 USA 1 402 323 0702 The outcome of the build process should be newly created image files in the images directory You can confirm this by doing the following cd images ls alt The result will be similar to the following Actual filenames dates and times will differ Figure 3 Sample Content of Images Directory after Successful Build ...

Page 12: ...ncoder This binary is built from the dvr rdk directory The code for the binary resides in z3apps rdk rdk_demo The z3apps rdk directory is described in more detail in the next section 6 1 The z3apps rdk Directory There are three main subdirectories rdk_demo z3_mcfw_api and z3 6 1 1 rdk_demo This directory contains the code for the various modes that Z3 s boards are able to run in The encoder setup ...

Page 13: ... menu based demo uses an ini file This ini file is built in the script run sh and stored in tmp encode ini Once called with the ini file the menu based demo presents to the user a menu of demos Most ini files are geared towards a specific demo The easiest way to get a valid ini file is to run the script with the settings you want and then copy the generated ini out of tmp and save it The command l...

Page 14: ...tics pdf DM81xx_DVR_RDK_Display_Output_Configuration pdf DM81xx_DVR_RDK_Ethernet_Offload_Driver pdf DM81xx_DVR_RDK_External_Video_Device_Configuration pdf DM81xx_DVR_RDK_Flash_File_FS pdf DM81xx_DVR_RDK_Graphics_Using_FBDev pdf DM81xx_DVR_RDK_HDMI_Control_Notes pdf DM81xx_DVR_RDK_Memory_Map pdf DM81xx_DVR_RDK_Minimal_Root_File_System pdf DM81xx_DVR_RDK_Network_Stack_Optimization_Techniques_for_Mul...

Page 15: ...D1_Decode_Display pdf DM816x_DVR_RDK_UseCaseGuide_SD_HD_Encode_Card pdf DM81xx_DVR_RDK_Interlace_UseCaseGuide pdf UserGuides DM8168_DVR_RDK_GUI_Guide pdf DM816x_FAPLL xls DM81xx_DVR_RDK_Demo_Guide pdf DM81xx_DVR_RDK_FAQs pdf DM81xx_DVR_RDK_IPC_Bits_Out_Host pdf DM81xx_DVR_RDK_Migration_Guide pdf DM81xx_DVR_RDK_Overview pdf DM81xx_DVR_RDK_PSP_Arago pdf DM81xx_DVR_RDK_SCD_DMVAL_FAQs pdf DMVAL_API_an...

Page 16: ...d in this document 7 1 Set up the Video Source 1 Select an HD source with HDMI non HDCP output in Z3 s testing the Brite View BV 5005HD is used Power on the HD Source Connect HDMI to a monitor Set the HD Source to 1080p output Select content you would like to stream If you see playback on the monitor you ve confirmed the source works 7 2 Connect the Z3 SBE264 25 Connect the supplied 2 5 mm serial ...

Page 17: ...p within the terminal window After about one to two minutes you will see the Main Menu see Figure 5 on next page Note the local IP address and netmask typically 192 168 81 68 and 255 255 0 0 This is the IP address of the board You will need this later to access the HTTP based user interface 7 5 Ensure your PC has a Proper IP Address To be able to communicate with the board the PC that you are comm...

Page 18: ...OC USR 0093 03 ____________________________________________________________________________________ Z3 Technology LLC 100 N 8th St STE 250 Lincoln NE 68508 1369 USA 1 402 323 0702 Figure 5 Z3 SBE264 25 Serial Main Menu ...

Page 19: ...based graphical user interface GUI will appear at the System Setup tab Click on the CH1 tab 9 The CH1 tab only supports an HDMI video source The CH2 tab only supports an SDI video source In order to utilize an SDI video source click on the tab to create a tab for an additional channel SDI input is only supported by using the CH2 tab If SDI is your only input the CH1 tab can be stopped or deleted u...

Page 20: ...set to Follow Input or 1920x1080 Set Output Format to UDP and Dest Address to a multicast address in the pictured example 11 225 1 2 3 To stream to a static IP set this value to the IP address of the destination PC that will be running the VLC media player Make note of the Dest Port By default this value is 5004 12 Figure 7 Settings to Encode to UDP c Change format to UDP d Change Dest Address to ...

Page 21: ...er is running click Stop wait for status to say STOPPED and then click Start for the newly entered settings to take effect If the status is POLLING a valid HDMI input was not detected in HDMI In 7 8 Check the Encode Status Click on the Status tab Here you can see output bitrates frame rates and resolutions This is 14 shown on the next page Note When encoding first starts it may take around 1 minut...

Page 22: ...IDENTIAL DOC USR 0093 03 ____________________________________________________________________________________ Z3 Technology LLC 100 N 8th St STE 250 Lincoln NE 68508 1369 USA 1 402 323 0702 Figure 9 Status Tab ...

Page 23: ...m Run the VLC media player on your PC version used in testing at Z3 2 05 15 Select Media Open Network Stream In the box type udp 225 1 2 3 5004 where 16 225 1 2 3 is the multicast address you selected previously pictured and 5004 is the value of Dest Port noted in step 11 Press Enter 17 You will now see your source video streaming to VLC 18 Figure 10 VLC Open Network Screen Figure 11 Example of En...

Page 24: ...n 19 Change Output Format from UDP to RTP 20 Click on start to start the RTP encoding session At this point your settings should look like the 21 following Run VLC on your PC version used by Z3 2 1 5 22 In the Open Media box type rtsp IP Address z3 ch m mp4 where IP Address is the IP 23 address of the Z3 SBE264 25 ch is 1 for CH1 or 2 for CH2 and m is added if a multicast address is being streamed...

Page 25: ...______________ Z3 Technology LLC 100 N 8th St STE 250 Lincoln NE 68508 1369 USA 1 402 323 0702 Note VLC version 2 1 5 or later is needed for RTSP support You should then see RTP video streaming on VLC 24 Figure 13 VLC Open Network Stream Screen for RTP Figure 14 Example of Z3 Video Streaming to VLC RTP ...

Page 26: ...702 7 11 Changing the Bitrate Dynamically The Z3 SBE264 25 includes an update button which allows you to change the bitrate without stopping and restarting the encoder In VLC click on Tools and select Codec Information This brings up a window with four tabs 25 Select the Statistics tab In this tab you can see the current video audio bitrate Figure 15 Viewing Bitrate in VLC Video Audio bitrate ...

Page 27: ...____________________ Z3 Technology LLC 100 N 8th St STE 250 Lincoln NE 68508 1369 USA 1 402 323 0702 In the encoder GUI return to the CH1 tab and change the bitrate from 8000K to 2000K 26 Click the update button 27 Figure 16 Changing the Bitrate Dynamically 2 Click update 1 Change bitrate to 2000K ...

Page 28: ...____________________________ Z3 Technology LLC 100 N 8th St STE 250 Lincoln NE 68508 1369 USA 1 402 323 0702 You should see the quality of the picture in VLC change as well as the drop in the video bitrate 28 Figure 17 Drop in Bitrate after Dynamic Bitrate Change Lower video audio bitrate ...

Page 29: ...mends is 100 B frames improve the quality of the picture but they also increase the latency by 1 frame time To minimize latency B frames should be disabled done by setting Number of B frames to 0 Figure 18 shows the suggested values for Maximum Delay and Number of B frames for 3 common use cases Maximum Delay of B frames Case 1 Highest Quality Highest Latency 9999 2 Case 2 Good Quality Standard La...

Page 30: ...ting Aux TS File Enable to true When this is done they can then specify the file name in the Aux TS File Location box that appears If a user connects a USB drive for example a value of media sda1 encode_mve100r ts would save to encode_mve100r ts on that drive Sample values are shown below Note After clicking stop the user should wait at least 10 seconds before removing the USB drive from the unit ...

Page 31: ... up a custom configuration and save this so that the DHCP 29 setting is used the next time the system boots up To do this click on the User Presets tab and click on new This brings up a new text box to enter the preset name Type z3_test and click ok 30 Return to the System Setup tab Go to the bottom of the screen and select the z3_test preset 31 that you just created The system might take a few mo...

Page 32: ...d that z3_test 34 will be used when the system restarts go ahead and reboot the single board encoder Return to the serial interface you established in steps 5 and 6 When the Main Menu comes up 35 you can see the IP address that was dynamically assigned Finally type that address into a web browser to reach the HTTP based GUI 36 You can return to the use of a static IP address by unchecking Use DHCP...

Page 33: ...C does not support RTMP The test player within Wowza Streaming EngineTM is recommended 8 1 Connect the Encoder 1 Follow steps in Section 6 0 to connect the unit for encode and bring up the encoder GUI 8 2 Configure CH1 for RTMP Streaming 2 Click on the CH1 tab 3 Set Output Format to RTMP 4 For Dest Address type 192 168 0 4 1935 live 1080 where 192 168 0 4 is the IP address of the PC with the Wowza...

Page 34: ...tent on Wowza 9 Go to a PC that is on the same network as the Wowza server and open a web browser in this example FireFox is used Type in the URL of the Wowza server with the port 8088 in this example 192 168 0 4 8088 This will bring up the Wowza home page Log in with your user name and password 10 At the top you will see four options Home Server Applications and Help Click on Applications and sel...

Page 35: ...8 1369 USA 1 402 323 0702 11 You should see the Test Players popup screen Select the Adobe RTMP tab change the Stream name to 1080 should match the directory specified in the GUI and click Start You will then see the content streamed from the unit Figure 27 Viewing Content on Wowza 1 Select Adobe RTMP tab 2 Type stream name 3 Click Start 4 Audio and Video start to appear ...

Page 36: ...ts File using the Encoder 12 Follow the steps in Section 7 0 to access the GUI and to stream a TS stream 13 Follow the instructions in Section 7 13 to save the stream to a TS file The pictured example uses the file encode_mve 150 ts 9 2 Connect the Output 14 Connect an HDMI cable to HDMI out of the unit bottom HDMI port 15 Connect the other end of the HDMI cable to an HD Monitor 9 3 Set Decoder Mo...

Page 37: ...Technology LLC 100 N 8th St STE 250 Lincoln NE 68508 1369 USA 1 402 323 0702 17 Once you do this the GUI will reload in Decoder mode and settings for Display Mode Resolution and Layout will appear in the System Setup tab 18 Leave these settings as is Figure 29 System Setup in Decoder Mode New Settings for Display Appear ...

Page 38: ...SA 1 402 323 0702 9 4 Configure and Run Decoder 19 Click on the CH1 tab and change the settings to match the following configuration 20 About 5 10 seconds later decode will start and you will see video output on the monitor 2 Enter same path used when saving file 4 Click start Figure 30 Decoder Configuration Settings for Decode Example 1 Change to TSFILE 3 Set Audio Output to ON ...

Page 39: ...You can also store the configuration and store in the default or other files Section 13 0 SUMMARY OF OPTIONS lists available settings that can be changed in detail In addition to using the HTTP based GUI you can also use the serial menus for configuration More detailed system information can also be gained from the options in the serial interface A command line interface called MCSENC is also avai...

Page 40: ...P to link to your development PC 11 1 Method 1 Updating the Image File Run the Web Interface Steps 1 9 in Section 7 0 1 Select update device firmware from the main screen 2 This brings you to the Software Updater screen Click Browse and browse to the directory z3 3 netra rdk z3 netra RDK date images and select the image file z3 netra upd img Click Open 4 Click Upload and Update You should see a FL...

Page 41: ...wait yes user nobody server usr sbin in tftpd server_args s home c Start TFTP sudo etc init d xinetd start Enable NFS on the Linux PC The target DM8169 will mount the root file system using NFS 2 This like TFTP will also vary depending on the Linux setup you have As an example below is a set of steps that would be run from Ubuntu 10 x or later these are in gray to denote they can vary from system ...

Page 42: ...s Go to the u boot directory in the release directory and edit the file u boot env netra rdk txt here emacs is used any text editor can be used cd home z3 z3 netra rdk cd z3 netra RDK 20160201 cd u boot emacs u boot env netra rdk txt d In the editor you want to modify the values for nfsserver serverip gatewayip netmask ipaddr tftp_root and nfs_root as shown below The value for tftp_root when combi...

Page 43: ...indow From here set Newline tx delay ms option D to 100 and Character tx delay ms option F to 1 g Press return to save your terminal settings h The next step is to read in the u boot environment file you just modified If you are using minicom type ctl A and Z to bring up the Command Summary Then type Y for Paste file i This should bring up the Select file for upload window pointing to your home di...

Page 44: ... gatewayip and netmask to make sure it conforms to your network You can use setenv to change anything that needs to be modified m Set boot mode to NFS Z3 DM8168 MOD setenv bootcmd run boot nfs n Save your changes Z3 DM8168 MOD saveenv Make sure the DM8168 is connected to your network 4 From the u boot prompt type boot 5 Z3 DM8168 MOD boot You should see the single board encoder boot the kernel obt...

Page 45: ...Get kernel from NAND root file system from NFS setenv bootcmd run nand_boot_jffs2 Get kernel from NAND root file system from NAND JFFS2 setenv bootcmd run nand_boot_ramdisk Get kernel from NAND root file system from ramdisk setenv bootcmd run nand_boot_ubifs Get kernel from NAND root file system from NAND UBIFS The following scripts are also available to update the u boot environment run update ub...

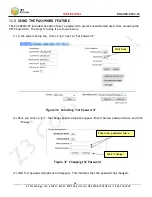
Page 46: ...assword to prevent unauthorized users from accessing the HTTP based GUI The steps for using it are shown below In the System Setup tab click on go next to Set Password 1 Once you click on go the change password options appear Enter the new password twice and click 2 change Wait for the password options to disappear This indicates that the password has changed 3 Figure 36 Selecting Set Password Fig...

Page 47: ...ology LLC 100 N 8th St STE 250 Lincoln NE 68508 1369 USA 1 402 323 0702 Retype the IP address in the web browser You should then see a prompt for a user name and 4 password Use admin for the user name and the value you had entered before for the password You can now access the HTTP based GUI 5 Figure 38 Password Entry Screen ...

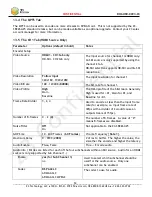
Page 48: ...der to dynamically receive an IP address at start up See Section 7 14 for DHCP configuration Set Device Name Can use to set your own name for identifying your encoder Set Password Can use to assign a password to restrict access to the HTTP based GUI See Section 12 0 update device firmware Allows for updating firmware See Section 11 0 download device logs Allows for extraction of a set of diagnosti...

Page 49: ... every 2 seconds Width Width of encoded picture Height Height of encoded picture If interlaced encoding is occurring the height of each field is output for example 1080i encode would have a value of 540 for height Audio Status Channel The channel number 1 or 2 Subchannel Always 1 in this release Codec The codec being used to encode audio for that channel Stream Status Channel The channel number UR...

Page 50: ...0 12000K 8000K The bit rate for channel 1 Video Profile High Main Baseline The H264 profile of the bitstream Generally High is used for D1 Main for D1 and Baseline for D1 Frame Rate Divider 1 2 4 Used to encode at less than the input frame rate for example an input frame rate of 30fps with a divider of 2 would cause an output stream of 15fps Number of B frames 0 2 0 The number of B frames A value ...

Page 51: ...rmat Jumbo PES None 1 AUs 2 AUs 3 AUs 4 AUs Optimizes audio transfer bit rate by allowing the user to set the number of audio Access Units AU per transport stream Packetized Elementary Stream PES packet Output Setup Output Format RTP UDP TSRTP TSFILE FILE MPTS RTMP Output format of encoded stream If UDP is selected check the value of TS Rate to make sure it is in line with expectation TSRTP allows...

Page 52: ...9 164 PID assigned to PMT in the TS stream TS Rate UDP Only 125K 20000K 8000K The rate of the transport stream Normally this value should be set to 1 25 video bit rate audio bit rate This can be set to higher values to allow leeway for times when many bits are needed to encode This can be especially useful for ensuring smooth playback at lower bitrates stop Stop current encode session start Start ...

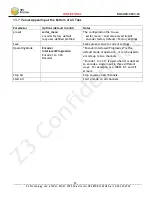
Page 53: ...rofiles The configuration file to use serial_menu Last value saved in GUI encoder factory default Factory settings Save Saves preset value to current settings Operating Mode Encoder Interlaced Progressive Encode 1 to 3 Ch Decoder Encoder Interlaced Progressive is the default mode of operation it can be used to encode up to two channels Encode 1 to 3 Ch is used when it is desired to encode a single...

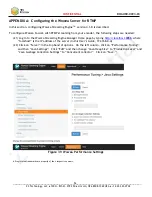
Page 54: ... from your encoder the following steps are needed 21 Log in to the Wowza Streaming Engine Manager Home page by typing http localhost 8088 where localhost is the IP address of the server in this User s Guide 192 168 0 4 22 Click on Server in the top band of options On the left column click on Performance Tuning and then Java Settings Click Edit and then change Java Heap Size to Production Level and...

Page 55: ...ishing and RTSP Publishing are both set to Open and Client Restrictions is set to No client restrictions Then click Save The Wowza server is now configured to work with your Z3 product Note You can also specify Require password authentication for RTMP Publishing In this case Authentication on the channel tab needs to be enabled and a valid Wowza user name and password needs to be entered to succes...

Page 56: ... 1080p decode on VLC Is VLC version 1 1x or later Problem Receive an error message while building Were all modules for Linux installed See Preparing the Linux Environment on page 10 Problem TFTP does not work Please see the items in Web interface does not come up Does the file uImage exist in z3 netra rdk images Is the link to images properly set up see step 2c If you take serverargs in etc xinetd...

Reviews: