background image

Page 7

MAINTENANCE

IF YOUR OXYGEN BAR IS IN NEED OF SERVICE, SEND THE UNIT TO ZADRO 

PRODUCTS FOR EXAMINATION OR REPAIR.

CLEANING THE HEADSET AND TUBES

1. 

Water condensation may form in the air flow tube and essential oil reservoir if using 

the oxygen bar in high humidity locations. Clean both pieces before storing the unit for 

long periods of time.

2. 

Rinse the airflow tube and essential oil reservoir with warm water and allow to air dry 

before storage or re-attaching the parts to the unit.

CLEANING THE UNIT

1. 

Unplug the unit from electrical outlet. Wipe the unit with a soft clean cloth that’s 

slightly damp with water, then wipe dry with a dry cloth. Do not use paper towels 

(fibers can get caught in the unit’s vents).

2. 

Do not use washing detergents, benzene, thinner or alcohol. 

CLEANING THE WATER RESERVOIR

1. 

Open the water tank panel and slide out the water cup from the unit.

2. 

Rinse the cup with warm water and dry with a cloth before attaching back to the unit. 

Do not use washing detergents, benzene, thinner or alcohol.

CLEANING THE ESSENTIAL OIL RESERVOIR

1. 

Twist to unlock the essential oil reservoir. 

2. 

Rinse each piece of the reservoir with warm water. Do not use washing detergents, 

benzene, thinner or alcohol.

REPLACING FUSES

NOTE:  FUSES DEGRADE WITH TIME AND WILL FAIL AFTER REPEATED USE. A BLOWN 

FUSE DOES NOT MEAN THAT THERE IS SOMETHING WRONG WITH THE UNIT. IF A FUSE IS 

REPEATEDLY FAILING, SEND THE UNIT TO ZADRO PRODUCTS FOR INSPECTION OR SERVICE. 

FIGURE 2

FIGURE 1

FIGURE 3

1. 

Before opening the fuse door, turn off the power and unplug the unit. 

2. 

Locate the fuse door on the back of the unit between the ON/OFF switch and the 

electrical plug port. With the power off and the unit unplugged, use a small blunt item 

such as tweezers or a small screw driver to remove the fuse door assembly (see Figure 

1).  The fuse door assembly can be removed by pulling the small notch on the right side 

of the door outward (see Figure 2).  The fuse door assembly will come completely out 

of the unit (see Figure 3).  Note: To avoid damage, pull slowly so that the fuse door does 

not fly out of the fuse slot.

3. 

With the fuse door assembly removed, simply unclip the fuse.

4. 

Insert a new 5A - 250V "Little Fuse" into the fuse door assembly clip.

5. 

Re-insert the fuse door assembly into the unit until you feel a click and the door is flush 

with the unit surface.

TROUBLESHOOTING

1. 

THE UNIT DOESN’T TURN ON. 

•  Check that the power cord is securely plugged into a nearby electrical outlet. 

•  Check that the power cord is undamaged. 

•  Check that your wall outlet is live and undamaged. 

•  Check if the fuse in the back of the unit is black or the wire is broken. If so, replace the 


fuse with a standard 5 amp fuse from a local hardware supply store. 

Summary of Contents for OXY03

Page 1: ...Aromatherapy PERSONAL OXYGEN BAR Model OXY03 USER MANUAL...

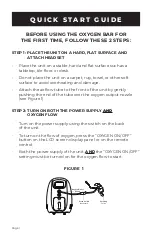
Page 2: ...age Attach the airflow tube to the front of the unit by gently pushing the end of the tube over the oxygen output nozzle see Figure 1 STEP 2 TURN ON BOTH THE POWER SUPPLY AND OXYGEN FLOW Turn on the p...

Page 3: ...USE ONLY SAVE THESE INSTRUCTIONS WHAT S IN THE BOX Oxygen Bar 1 Remote Control 1 Headset 1 Nasal Tube Attachment 1 Essential Oil 1 SPECIFICATIONS SAFETY INFORMATION Adjustable Oxygen Output Rate at S...

Page 4: ...when there are any hazardous vapors or pesticide spray in the room The use of oxygen in therapy requires that special care be taken to reduce the risk of fire Any materials which will burn in air and...

Page 5: ...ies Simply wear the included headset or nose tube attachment for a gentle stream of oxygen FEATURES 1 Experience luxurious spa like aromatherapy during your session using essential oil of your choice...

Page 6: ...using the Nasal Tube Attachment position the nasal tube with the nasal prongs facing upward and curved toward the face Then insert the two nasal prongs into your nostrils and position until it s comf...

Page 7: ...ential oil 2 4 drops are recommended then screw the reservoir back together to lock into place FIGURE 1 Essential Oil Reservoir Oxygen Outlet Nozzle Ear Hang Joint HUMIDITY 1 If you re in a dry climat...

Page 8: ...ITH TIME AND WILL FAIL AFTER REPEATED USE A BLOWN FUSE DOES NOT MEAN THAT THERE IS SOMETHING WRONG WITH THE UNIT IF A FUSE IS REPEATEDLY FAILING SEND THE UNIT TO ZADRO PRODUCTS FOR INSPECTION OR SERVI...

Page 9: ...le shipping charges to Zadro Inc Please contact our Customer Service at 800 468 4348 714 892 9200 or email customersupport zadroinc com on how to obtain an RMA return authorization number Please have...

Page 10: ...delantera de la unidad empujando suavemente el extremo del tubo sobre la boquilla de salida de ox geno ver Figura 1 PASO 2 ENCIENDA TANTO LA FUENTE DE ALIMENTACI N Y FLUJO DE OX GENO Encienda la fuen...

Page 11: ...STAS INSTRUCCIONES QU HAY EN LA CAJA Barra de ox geno 1 Mando a distancia 1 Auriculares 1 Fijaci n del tubo nasal 1 Aceite Esencial 1 ESPECIFICACIONES INFORMACI N DE SEGURIDAD Velocidad de salida de o...

Page 12: ...s peligrosos o aerosoles de pesticidas en la habitaci n El uso de ox geno en la terapia requiere que se tenga especial cuidado para reducir el riesgo de incendio Cualquier material que se queme en el...

Page 13: ...ave de ox geno FUNCIONES 1 Experimente la lujosa aromaterapia tipo spa durante su sesi n utilizando el aceite esencial de su elecci n o con el aceite esencial de lavanda incluido 2 5 ajustes de concen...

Page 14: ...usa una barra de ox geno le recomendamos comenzar con la concentraci n m s baja configuraci n de 5L y luego aumentar la concentraci n con el tiempo L Liter of air per minute CONFIGURACIONES DE TEMPORI...

Page 15: ...uede formar condensaci n de agua en el tubo de flujo de aire y en el dep sito de aceite esencial si se usa la barra de ox geno en lugares con alta humedad Limpie ambas piezas antes de guardar la unida...

Page 16: ...sible 5A 250V en el clip de montaje de la puerta del fusible 5 Vuelva a introducir el conjunto de la puerta del fusible en la unidad hasta que sienta un clic y la puerta quede a ras de la superficie d...

Page 17: ...CLIENTES FUERA DE LOS ESTADOS UNIDOS DE AM RICA COMUN QUESE DIRECTAMENTE CON EL DISTRIBUIDOR DE COMPRA PARA RESOLVER CUALQUIER PROBLEMA RELACIONADO CON LA GARANT A DEL PRODUCTO Cualquier producto devu...

Page 18: ...circulation d air l avant de l unit en poussant doucement l extr mit du tube sur la buse de sortie d oxyg ne voir la figure 1 TAPE 2 ALLUMER LA FOIS L ALIMENTATION LECTRIQUE ET LE FLUX D OXYG NE Allu...

Page 19: ...STAS INSTRUCCIONES QU HAY EN LA CAJA Barra de ox geno 1 Mando a distancia 1 Auriculares 1 Fijaci n del tubo nasal 1 Aceite Esencial 1 ESPECIFICACIONES INFORMACI N DE SEGURIDAD Velocidad de salida de o...

Page 20: ...pareil lorsqu il y a des vapeurs dangereuses ou des pesticides en a rosol dans la pi ce L utilisation de l oxyg ne en th rapie exige que l on prenne des pr cautions particuli res pour r duire le risqu...

Page 21: ...une aromath rapie luxueuse de type spa pendant votre s ance en utilisant l huile essentielle de votre choix ou avec l huile essentielle de lavande incluse 2 5 r glages de concentration d oxyg ne r gla...

Page 22: ...GS 1 Lorsque l OXYGEN ON OFF est allum appuyez sur les boutons TIMER haut et bas sur le panneau d affichage de l cran LCD l avant de l appareil ou sur la t l commande 2 Choisissez entre les 8 r glages...

Page 23: ...sur l appareil N utilisez pas de d tergents de benz ne de diluant ou d alcool NETTOYAGE DU R SERVOIR D HUILE ESSENTIELLE 1 Tournez pour d verrouiller le r servoir d huile essentielle 2 Rincez chaque p...

Page 24: ...la p riode de garantie Zadro Inc r parera ou remplacera notre seule discr tion votre produit sans frais Cependant vous tes responsable d emballer correctement votre produit et tous les frais d exp di...

Reviews: