background image

www.zalman.co.kr    www.zalmanusa.com

7

VGA Heatpipe Cooler

How to Install

1. Spread the Thermal Grease on the GPU(VPU)

1) Clean off the surfaces of the GPU(VPU) and the Front Side Heatsink Base thoroughly.

2) Spread  the  thermal  grease  thoroughly  on  the  GPU(VPU).  Using  a  thick  piece  of  paper  is 

recommended for spreading. Many GPUs(VPUs) are concave (center is lower than around

the edges), so you should apply more thermal grease at the center of the chip.

2. Choosing the Front Side Heatsink Base Assembly 

This package includes two Front Side Heatsink Base Assemblies. If your graphics card is based on

Geforce4 Ti or your graphics card has heatsink mounting holes that are spaced far apart, then it is 

necessary for you to use the Front Side Heatsink Base Assembly B. Otherwise, use Front Side

Heatsink Base Assembly A. The only difference between the Front/Back Side Heatsink Base 

Assembly A and B is the width(A is shorter than B).

GPU(VPU)

Front side heatsink base assembly A

Front side heatsink base assembly B

Thermal Grease

Protective Frame for Core

Graphics Core

< ATI Radeon 9700 PRO>

Summary of Contents for ZM80C

Page 1: ...com VGA Heatpipe Cooler This Manual Contains the Following Languages for Product Installation English Language For a better understanding of the installation process watch the installation video clip...

Page 2: ...er Tube Dissip Material Aluminum Dissip Area 1200Cm2 3 Usable Graphics Card Types Cards with heatsink mounting holes Note 1 When using this product with Matrox Parhelia series graphics cards or GeForc...

Page 3: ...it in a reverse direction the product will not function properly either so you should place your computer case in a normal position 2 As shown in figure if the northbridge cooler is 25mm tall or bigge...

Page 4: ...f without a fan it is designed to accommodate an 80mm fan directly on the heatsink Therefore a quiet cooling fan ZM80C Option Package can be installed to increase performance The ZM80C Option Package...

Page 5: ...lt B Four 4 Plate Link Nipples Two 2 Plate Link A B A B Two 2 Nut A Two 2 Rubber Rings Two 2 Nipples One 1 Thermal Grease Two 2 Bolt B Two 2 Bolt C Two 2 Bolt D Two 2 Nut B Two 2 Rubber Rings One 1 Th...

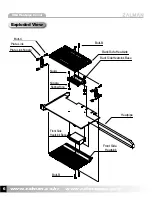
Page 6: ...zalmanusa com 6 VGA Heatpipe Cooler Exploded View Bolt B Front Side Heatsink Base Back Side Heatsink Back Side Heatsink Base Plate Link Nipple Plate Link Nut A Rubber Ring Nipple Heatpipe Front Side H...

Page 7: ...he chip 2 Choosing the Front Side Heatsink Base Assembly This package includes two Front Side Heatsink Base Assemblies If your graphics card is based on Geforce4 Ti or your graphics card has heatsink...

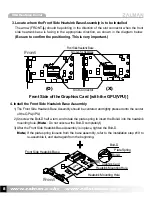
Page 8: ...pring loosens from the base assembly refer to the installation step 19 to re assemble it and start again from the beginning Front Plate Spring Front Side Heatsink Base Heatsink Mounting Hole graphics...

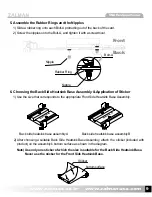
Page 9: ...sink Base Assembly Application of Sticker 1 Use the size that corresponds to the appropriate Front Side Heatsink Base Assembly 2 After choosing a suitable Back Side Heatsink Base Assembly attach the s...

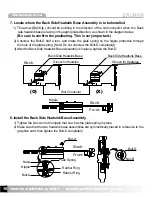
Page 10: ...rudes through the hole of the plate spring Note Do not unscrew the Bolt D completely 3 After the Back Side Heatsink Base Assembly is in place tighten the Bolt D 8 Install the Back Side Heatsink Base A...

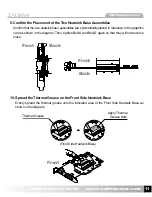
Page 11: ...eference to the graphics card as shown in the diagram Then tighten Bolt A and Bolt D again so that they will not become loose 10 Spread the Thermal Grease on the Front Side Heatsink Base Evenly spread...

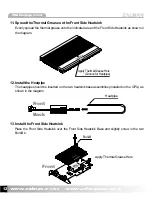
Page 12: ...shown in the diagram 12 Install the Heatpipe The heatpipe should be inserted on the two heatsink base assemblies installed on the GPU as shown in the diagram 13 Install the Front Side Heatsink Place t...

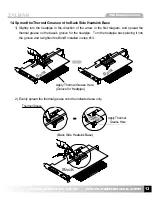
Page 13: ...in the first diagram and spread the thermal grease on the base s groove for the heatpipe Turn the heatpipe back placing it into the groove and re tighten the Bolt B installed in step 13 2 Evenly spre...

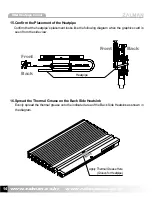
Page 14: ...acement looks like the following diagram when the graphics card is seen from the side view 16 Spread the Thermal Grease on the Back Side Heatsink Evenly spread the thermal grease onto the indicated ar...

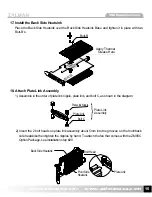
Page 15: ...r of plate link nipple plate link and bolt C as shown in the diagram 2 Insert the 2 bolt heads on plate link assembly about 5mm into the grooves on the front back side heatsinks then tighten the nippl...

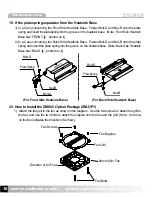
Page 16: ...plate spring and insert the plate spring into the groove on the heatsink base Note Back Side Heatsink Base has BACK printed on it 20 How to Install the ZM80C Option Package ZM OP1 1 Attach the fan gri...

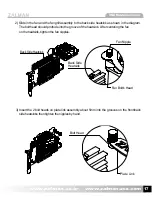
Page 17: ...The bolt head should protrude into the groove of the heatsink After centering the fan on the heatsink tighten the fan nipples 3 Insert the 2 bolt heads on plate link assembly about 5mm into the groove...

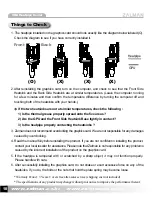
Page 18: ...e not at similar temperatures check the following 1 Is the thermal grease properly spread onto the five areas 2 Are the GPU and the Front Side Heatsink Base tightly in contact 3 Is the heatpipe proper...

Reviews: