OPERATION, MOUNTING RNK-02
By pressing the button, the transmitter sends a signal with 868,32 MHz frequency
which controls EXTA FREE receivers.
Device programming procedure (adding a
transmitter to a receiver’s memory) is described in particular EXTA FREE man-
ual instructions. The device range (up to 250 m depending on a receiver) can be
increased by means of a retransmitter or few RTN-01 retransmitters.
The device can be mounted in any place by means of double-sided adhesive tape or
wall plugs 5 x (3 x 30) mm.
Mounting by means of wall plugs:
Remove the button - to do it press the button on one side, and on the other side put
a screwdriver into a slot and lift up the button (Fig. 1)
OPERATION, MOUNTING RDP-01
Disconnect power supply by the phase fuse, the circuit-breaker or the switch-discon-
nector combined to the proper circuit.
Check if there is no voltage on connection cables by means of a special measure
equipment.
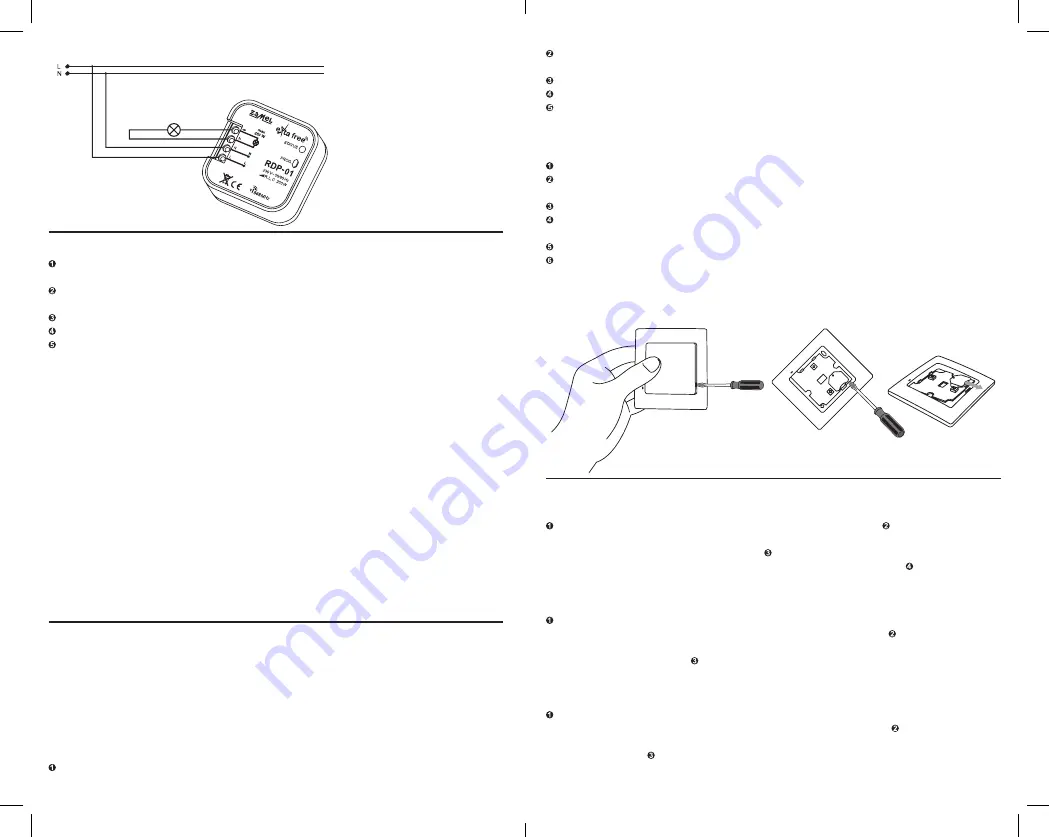
Connect the cables with the terminals in accordance with the installing diagram.
Install RDP-01 device in installation cable box.
Switch on the power supply from the mains.t
CONNECTION
RDP-01 can operate in five modes:
COMFORT
(Available only in cooperation with 4 push-button transmitter). In this mode
the following two functions are realised:
ONE PUSH-BUTTON
Pressing the programmed push-button shortly (<0.8 sec.) caus-
es the dimmer to operate in the range of switch on/switch off (to the last adjustment of
lighting luminous density level), however pressing the programmed push-button longer
(>0.8 sec.) causes alternate lighting brightening - dimming.
TWO PUSH-BUTTONS
SWITCH ON pushbutton:
pressing the programmed push-
button shortly (<0.8 sec.) causes the lighting switches on according to the last adjust-
ment of lighting luminous density level, however pressing the programmed push-button
longer (>0.8 sec.) causes lighting brightening to the maximum level.
SWITCH OFF
pushbutton:
pressing the programmed push-button shortly (<0.8 sec.) causes the
lighting switches off, however pressing the programmed push-button longer (>0.8 sec.)
causes lighting dimming to the minimum level.
TIME
The device after pressing the pushbutton switches on according to the adjusted
time (tp), then it switches off automatically. Another pressing of the push-button dur-
ing time countdown causes the lighting is switched off before adjusted time finishes.
Default settings - 15 seconds.
CAUTION! Adjusted time cannot be deleted.
COMFORT
mode:
Press RNK-04 transmitter’s push-button for a longer time. Press PROG push-
button of RDP-01 device for a longer time until LED red diode switches on (constant
signal). Next release PROG push-button Release transmitter’s pushbutton. LED red
diode switches on (first signal pulsates, next the signal is constant). Press the same
transmitter’s pushbutton and release it. LED red diode switches on (the signal pulsates)
and next it switches off - THE TRANSMITTER IS ADDED.
ONE PUSH-BUTTON
mode:
Press PROG push-button of RDP-01 device for a longer time until LED red diode
switches on (constant signal). Next release PROG push-button. Press the transmit-
ter’s push-button for a longer time. LED red diode switches on (first signal pulsates,
next the signal is constant). Release transmitter’s push-button. LED red diode switch-
es on (the signal pulsates), next the LED red diode switches off - it means the TRANS-
MITTER IS ADDED.
SWITCH ON/SWITCH OFF
mode (two push-buttons):
Press PROG push-button of RDP-01 device for a longer time until LED red diode
switches on (constant signal). Next release PROG push-button. Press and release
transmitter’s first push-button. LED red diode switches on (first signal pulsates, next the
signal is constant). Press and release the second transmitter’s push-button. LED red
diode switches on (the signal pulsates) and next it switches off - THE TRANSMITTER
IS ADDED.
REMOTE CONTROLS PROGRAMMING
Find a place on the wall to mount the transmitter, make two holes corresponding
mounting holes from the transmitter’s base.
Set wall plugs in the holes.
Fix the base by means of screwing screws into wall plugs.
Place the button again.
BATTERY CHANGE
Battery discharge status is signalled by several LED red diode flashes during
transmission time.
Remove the button (Fig. 1).
By means of a screwdriver lever up the printedcircuit board releasing the bottom
latch (Fig. 2), and remove it from the base.
Remove the battery from the latch (Fig. 3).
Mount a new battery. Watch battery polarisation marked on the latch. Wrong battery
mounting may cause device damage.
Put the removed printed-circuit board back in the base.
Put the button back.
CAUTION: While changing the battery, it is suggested to press any of the but-
tons for about 5 seconds before putting it into a latch. Next press transmission
button several times to check its operation. If the transmitter does not work
properly repeat the battery change procedure.
Fig. 1
Fig. 2
Fig. 3


