

plik: inst_gb_GPRN | modyfikacja: 31.03.2016
plik: inst_gb_GPRN | modyfikacja: 31.03.2016
INSTALLATION
1. Before purchase, measure the surface the heating cable will be applied to.
2. Choose a cable of an appropriate length. If the width / diameter of the gutter / drain pipe does not exceed 80 mm, a single arrangement of the heating
cable may be used. In case this width / diameter is bigger than the recommended one, it is advisable to arrange the cables in a pair while maintaining
the minimum 45 mm distance between the cable runs. The heating cable in the downpipe should be selected that it is 1 meter below ground level. This
will allow the water outflow safely eg for drainage wells.
3. Unpack particular elements and inspect visually of what you have received.
4. Make a draft of the heating cable arrangement in a drain pipe / gutters. Specify and mark the installation place of the temperature controller and electric
supply as well as of sensors used with the controller. A draft or pictures are an integral part of the as-built documentation.
5. Check the heating cable resistance with the supply cable based on the value given on the label. Write it down in the Warranty Card.
6. Prepare the connection place of the heating cable and a temperature controller to the electrical installation.
7. Prepare the protection corrugated pipes for the separate insertion of: a supply cable of the heating cable and a sensor’s signalling cable.
8. Before the heating cable arrangement make sure the surface is free of dust and sharp elements.
9. In order to prevent the heating cables from contact in a gutter, mount clips (type: KRU-01) inside gutters every 25 cm.
10. Then insert the heating cable into the clips. During installation the cable outer insulation must not be damaged.
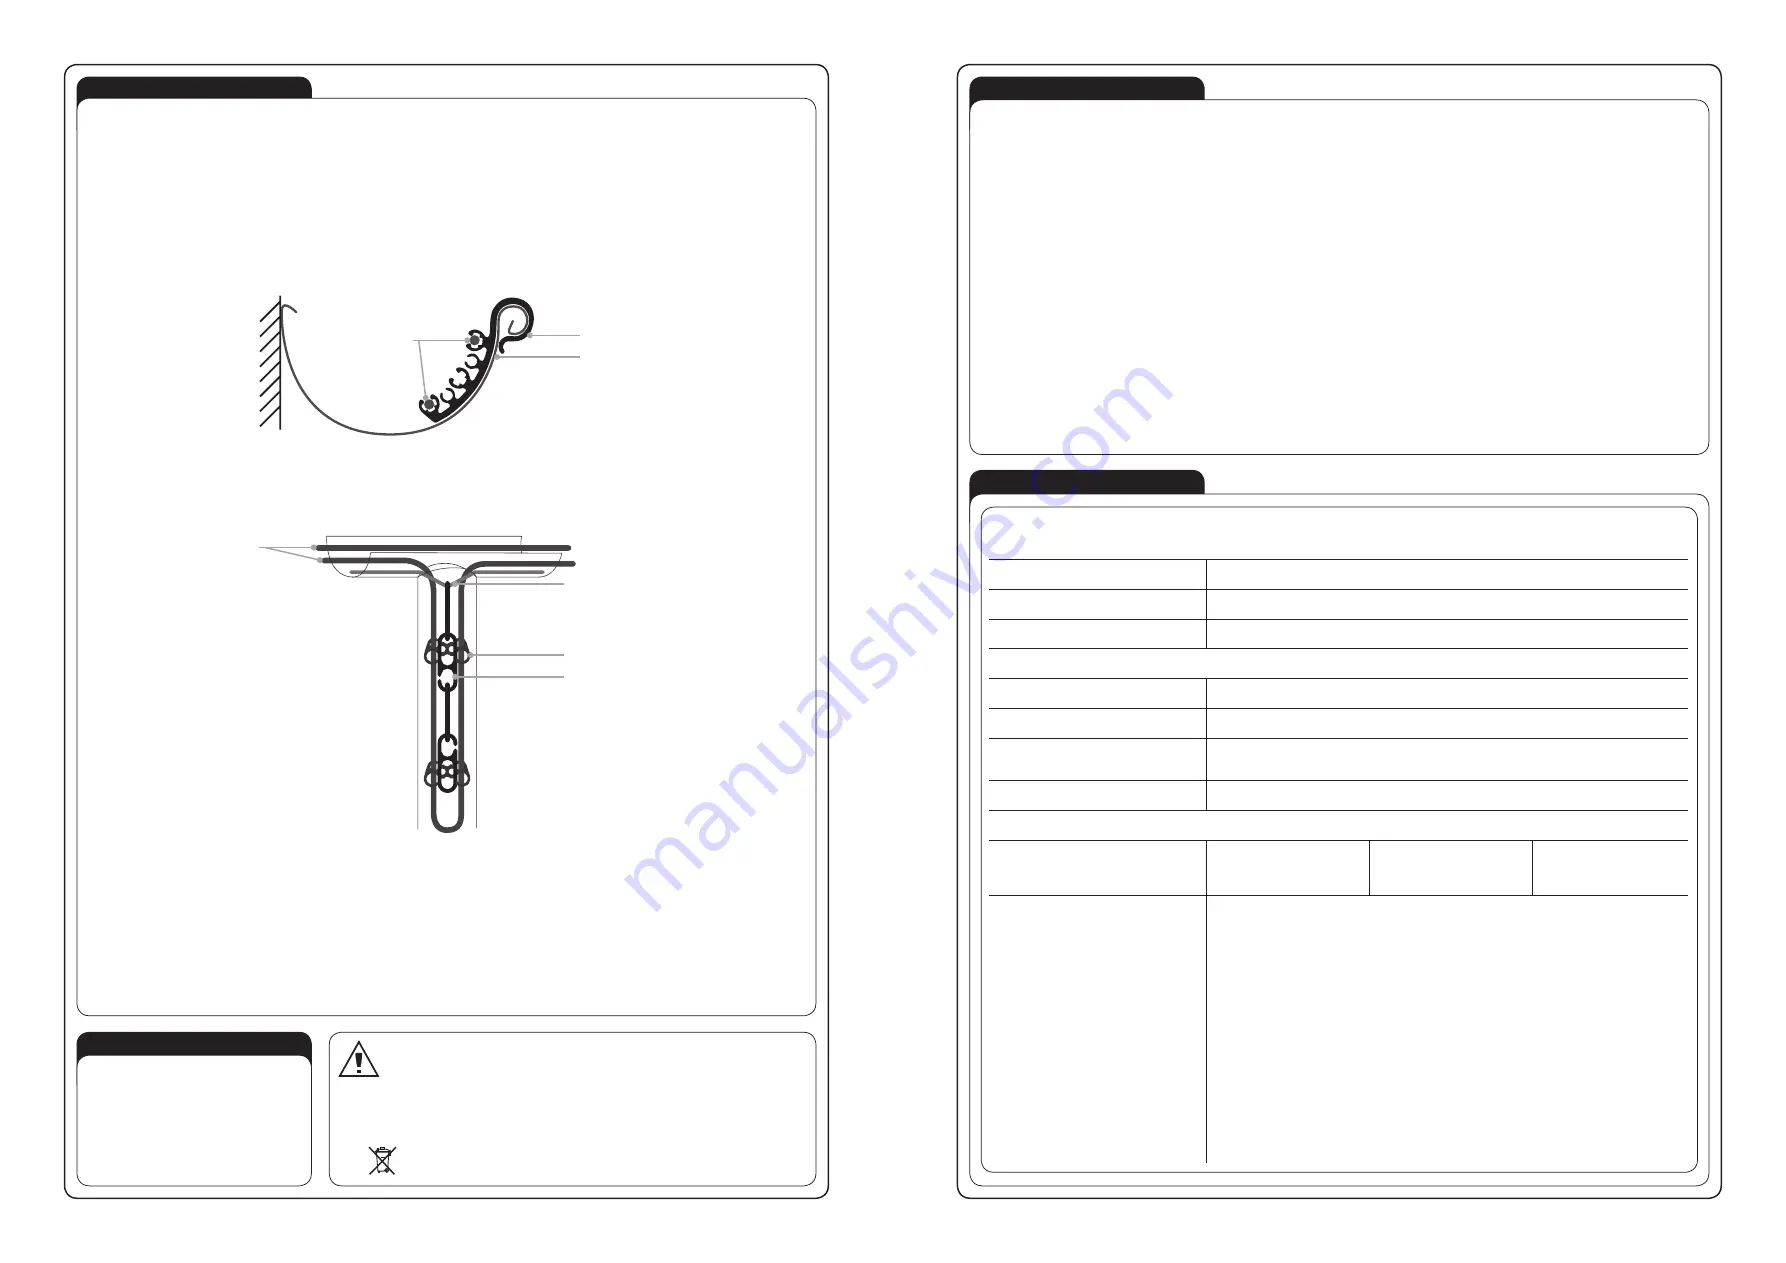
Fig. A diagram of arranging a clips KRU-01 in a gutter with a hating cable
11. In case of mounting the heating cable in a drain pipe before insertion of the heating cable the following should be done:
a) Put a suspension ZW-01 on a drain. The suspension can be shortened depending on to the dimensions of the drainage system.
b) Attach a chain LS-01 to the suspension, which together with a cable should run along the drain pipe till its end (bottom).
c) Attach a KRS-01 clip used for drain pipes to the LS-01 chain.
d) Attach the heating cable to the KRS-01 clips. It is important that the cable is laid at the whole length of the gutter – to the bottom.
Fig. A diagram of a heating cable arrangement and equipment in a drain pipe
12. The heating cable must not be shortened. Its excess length should be lain down as an additional cable run. (keeping the minimum 45 cm distance).
13. The supply cable and cables from the sensors should be pulled through in a separate protection corrugated pipe and install the temperature controller in a
previously arranged place. To pull cables through a protection corrugated pipe use the so called „pilote”. In order to avoid damaging the cables’ connection
with the heating cable do not pull or stretch them, etc.
14. Carry out the second resistance measurement just after the heating cable has been mounted but before connecting it to the temperature controller and
write the results in the Warranty Card.
Connection of the heating cable to the electrical installation should be carried out by a qualified electrician staff with suitable authorisations.
The installation should be in accordance with standards valid in a particular country.
The electrical installation, the GPRN heating cable is connected to with a supply cable,
should be made in accordance with applicable national regulations.
WARRANTY
WARRANTY CARD
Zamel Sp. z o.o. declares and assures that the electric heating systems MATEC (heating cables) manufactured and supplied by Zamel Sp. z o.o. are com-
pliant with current standards in the Company and binding norms in Poland. The warranty includes all MATEC products under the condition of proper storage,
transport, installation and operation according to binding norms. There is 2 year warranty for MATEC products and the warranty refers to defects made by
the manufacturer itself.
GENERAL WARRANTY CONDITIONS AND CLAIM CONSIDERATION BY Zamel Sp. z o.o.
1. Zamel Sp. z o.o. assures warranty for MATEC products. There is 2 year warranty for the heating cables. Warranty time starts at the moment of product sell
by Zamel Sp. z o.o. to the Purchaser. Be able to provide as a proof of purchase of the product an invoice by Zamel Sp. z o. o.
2. Zamel Sp. z o.o. shall process the claim at its own discretion.
3. The purchaser must inform about the claim which will be considered within 14 workdays only after proper claim notification. The PURCHASER shall lay
any claims in writing to the Authorised Point or Zamel Sp. z o.o. only on presentation of an invoice (or its number and date of issue)
4. The properly filled Warranty Card should include (the scheme or photos):
• installed heating cable with supply cable (including distances between the places of the heating cable) and arrangement of joints (a part connecting the
heating cable with the supply cable),
• installation place of the temperature controller, connection of the supply cable „cold” to the thermocontroller,
• location of control sensors and thermocontroller control and their connection to the electrical installation.
5. In case it appears that Zamel Sp. z o.o. is not the manufacturer of the claimed product or in case the claim is deemed void by Zamel Sp. z o.o., the Pur-
chaser will bear all the costs connected with claim consideration.
6. When your Warranty is invoked, your damaged product will be replaced free of charge to yourself by Zamel Sp. z o.o.
7. The manufacturer warranty is not valid in below cases:
• damage caused by unauthorised modifications made by the PURCHASER or any third parties to the product
• mechanical damage of the device
• wrong power supply
• electric installation which is not compliant with current IEE wiring regulations and installations
• damage caused by incorrect product mounting - not according with MATEC Installation Manual.
8. In case of product claim by an indirect Purchaser of Zamel products, the Purchaser is obliged to present the claim to the Supplier (where the product was
purchased).
ZAMEL sp. z o.o.
Installation place
Post code, city/town
Street, Home/Flat No
Telephone
Filled by the electrician
Electrician Name/Surname
Telephone
No of a Certified Electrician /
Expire date of a Certified Electrician
Installation date
Resistance measurement results of the Heating Cable:
After the package was opened
(before installation) [Ω]:
After laying the heating cable
(before connection t the tempe-
rature controller) [Ω]:
Signature / stamp
Place for the Heating Mat label
OPERATION
• Before starting the seasonal heating sys-
tem, visual inspection of the heating and
power cable shouLd be done in order to eli-
minate the risk of faulty wiring operation.
• The heating system operation is limited to
switching on the temperature controller and
to adjust the required parameters.
The device is designed for single-phase installation and must be installed in accordance
with standards valid in a particular country. The device should be connected according to
the details included in this operating manual. Installation, connection and control should be
carried out by a qualified electrician staff, who act in accordance with the service manual
and the device functions. Before installation make sure the connection cables are not under voltage.
Improper transport, storage, and use of the device influence its wrong functioning. It is not advisable
to install the device in the following cases: if any device part is missing or the device is damaged or
deformed. In case of improper functioning of the device contact the producer.
The symbol means selective collecting of electrical and electronic equipment.
It is forbidden to put the used equipment together with other waste.
UWAGA
KRU-01
Gutter
Heating cable
Heating cable
KRS-01
ZW-01
LS-01


