background image

The appliance must be earthed. The power supply ca-
ble plug is provided with a contact for this purpose. If
the domestic power supply socket is not earthed, con-
nect the appliance to a separate earth in compliance
with current regulations, consulting a qualified electri-
cian.
The manufacturer declines all responsibility if the above
safety precautions are not observed.

This appliance complies with the E.E.C. Directives.

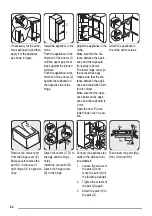
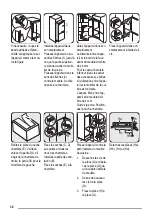
Door reversibility

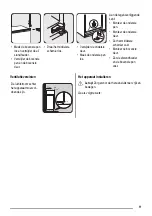
The door of the appliance opens to the right. If you
want to open the door to the left, do these steps before
you install the appliance:

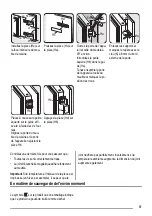
• Loosen the upper pin

and remove the spacer.

• Remove the upper pin

and the upper door.

• Loosen the middle

hinge.

• Remove the lower

door.

• Loosen the lower pin.

On the opposite side:
• Install the lower pin.
• Install the lower door.
• Tighten the middle

hinge.

• Install the upper door.
• Tighten the spacer and

tighten the upper pin.

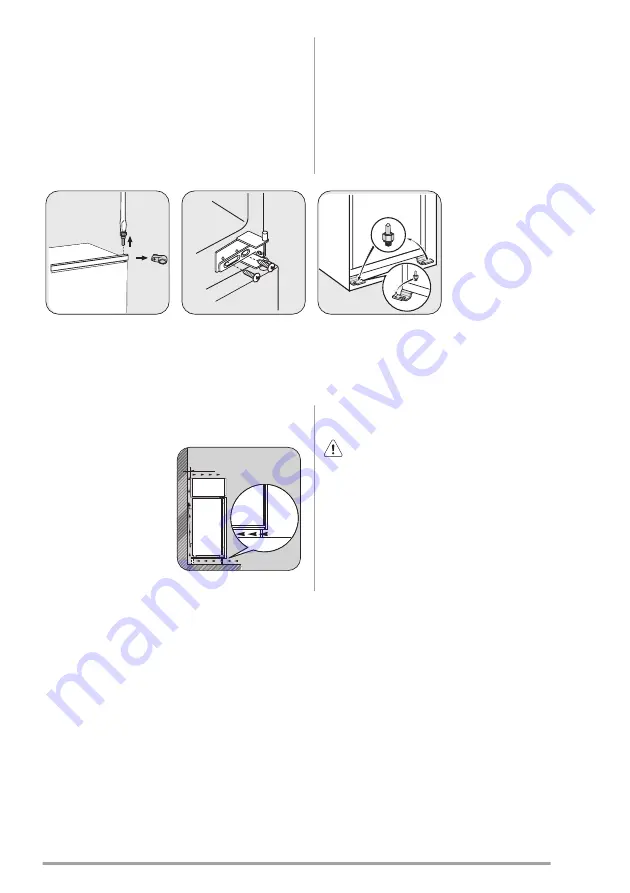
Ventilation requirements

The airflow behind the
appliance must be suffi-
cient.

50 mm

min.
200 cm

2

min.
200 cm

2

Installing the appliance

Caution!

 Make sure that the mains cable can

move freely.

Do the following steps:


23

Summary of Contents for KBB25001SK

Page 1: ...Gebruiks aanwijzing Koel vriescom binatie User manual Fridge Freezer Notice d utilisation R frig rateur cong lateur Benutzer information K hl Gefrier schrank KBB25001SK...

Page 2: ...icht gebeurt van een voor hun veiligheid verantwoordelijke per soon of tenzij zij van een dergelijke persoon instruc tie hebben ontvangen over het gebruik van het appa raat Houd kinderen uit de buurt...

Page 3: ...d is Bewaar voorverpakte diepvriesproducten volgens de aanwijzingen van de fabrikant U dient zich strikt te houden aan de aanbevelingen van de fabrikant van het apparaat met betrekking tot het bewaren...

Page 4: ...ediening Inschakelen Steek de stekker in het stopcontact Draai de thermostaatknop op een gemiddelde stand Uitschakelen Draai de thermostaatknop op de stand O om het ap paraat uit te schakelen Temperat...

Page 5: ...tuur laten ontdooien afhankelijk van de hoeveelheid tijd die hiervoor nodig is Kleine stukken kunnen zelfs rechtstreeks vanuit de vrie zer gekookt worden als ze nog bevroren zijn in dat ge val zal de...

Page 6: ...en ingevroren en zo kunt u later alleen die hoeveelheid laten ontdooien die u nodig heeft wikkel het voedsel in aluminiumfolie of plastic en zorg ervoor dat de pakjes luchtdicht zijn leg vers nog niet...

Page 7: ...dampt Het is belangrijk om het afvoergaatje van het dooiwater in het midden van het koelvak regelmatig schoon te maken om te voorkomen dat het water overloopt en op het voedsel in de koelkast gaat dru...

Page 8: ...ekken Het opsporen van storingen die niet in deze handleiding vermeld zijn dient te worden verricht door een gekwalificeerd technicus of competent persoon Belangrijk Er zijn tijdens de normale werking...

Page 9: ...oduct is te hoog Laat het product afkoelen tot kamer temperatuur voordat u het opbergt Er zijn veel producten tegelijk opge borgen Berg minder producten tegelijk op Er is geen koude luchtcirculatie in...

Page 10: ...tot 32 C N 16 C tot 32 C ST 16 C tot 38 C T 16 C tot 43 C Elektrische aansluiting Zorg er v r het aansluiten voor dat het voltage en de frequentie op het typeplaatje overeenkomen met de stroomtoevoer...

Page 11: ...de tegenoverliggende kant Monteer de onderste pen Monteer de onderste deur Zet het middelste scharnier vast Monteer de bovenste deur Zet de afstandhouder en de bovenste pen vast Ventilatievereisten D...

Page 12: ...e kast aan de an dere kant van het schar nier 44mm 4mm Stel het apparaat in de nis af Zorg ervoor dat de afstand tussen het apparaat en de voorste rand van de kast 44 mm is De afdekking voor het on de...

Page 13: ...t keukenmeubel 2 Draai de schroeven van het onderdeel G weer vast 3 Bevestig het onder deel H aan het on derdeel G Ha Hb Hc Hd Maak de onderdelen Ha Hb Hc en Hd los ca 50 mm ca 50 mm 21 mm 90 21 mm 90...

Page 14: ...ng van de pakking neemt toe als de omgevingstemperatuur toeneemt Het milieu Het symbool op het product of op de verpakking wijst erop dat dit product niet als huishoudafval mag worden behandeld maar m...

Page 15: ...ll packaging well away from children There is risk of suffocation If you are discarding the appliance pull the plug out of the socket cut the connection cable as close to the appliance as you can and...

Page 16: ...g in damage to the appliance Ice lollies can cause frost burns if consumed straight from the appliance Care and cleaning Before maintenance switch off the appliance and disconnect the mains plug from...

Page 17: ...antity of food stored the location of the appliance Important If the ambient temperature is high or the appliance is fully loaded and the appliance is set to the lowest temperatures it may run continu...

Page 18: ...helves To permit storage of food packages of various sizes the door shelves can be placed at different heights To make these adjust ments proceed as fol lows gradually pull the shelf in the direction...

Page 19: ...ime Hints for storage of frozen food To obtain the best performance from this appliance you should make sure that the commercially frozen foodstuffs were adequately stored by the retailer be sure that...

Page 20: ...the appro priate seating at the bottom cen tre placing a ba sin underneath to collect the de frost water In order to speed up the defrosting process place a pot of warm water in the freezer compartme...

Page 21: ...Decrease the room temperature Water flows on the rear plate of the refrigerator During the automatic defrosting proc ess frost defrosts on the rear plate This is correct Water flows into the refrigera...

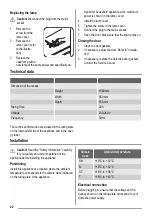
Page 22: ...Service Center Technical data Dimension of the recess Height 1580 mm Width 560 mm Depth 550 mm Rising Time 20 h Voltage 230 240 V Frequency 50 Hz The technical information are situated in the rating p...

Page 23: ...the appliance opens to the right If you want to open the door to the left do these steps before you install the appliance Loosen the upper pin and remove the spacer Remove the upper pin and the upper...

Page 24: ...en the appli ance and the kitchen furni ture is correct Make sure that the clear ance between the appli ance and the cupboard is 4 mm Open the door Put the lower hinge cover in posi tion I I Attach th...

Page 25: ...re tightened The magnetic sealing strip is attached tightly to the cabinet Important If the ambient temperature is low for example in the Winter the size of the gasket decreases The size of the gasket...

Page 26: ...l absence d instruction d une personne res ponsable qui puisse leur assurer une utilisation de l appareil sans danger Emp chez les enfants de jouer avec l appareil Ne laissez pas les diff rents emball...

Page 27: ...s emball s conform ment aux instructions de leur fabricant Respectez scrupuleusement les conseils de conser vation donn s par le fabricant de l appareil Consul tez les instructions respectives Ne mett...

Page 28: ...l tournez le bouton du thermostat sur la position O R glage de la temp rature La temp rature est r gl e automatiquement Pour faire fonctionner l appareil proc dez comme suit tournez le bouton du therm...

Page 29: ...rtiment r frig rateur ou temp ra ture ambiante avant d tre utilis s en fonction du temps disponible pour cette op ration Les petites pi ces peuvent m me tre cuites sans d cong lation pr alable dans ce...

Page 30: ...out e pendant cette p riode congelez seulement les denr es alimentaires fra ches de qualit sup rieure une fois nettoy es pr parez la nourriture en petits paquets pour une cong lation rapide et uniform...

Page 31: ...ipient sp cial situ l arri re de l appareil au dessus du compresseur d o elle s vapore Il est important de nettoyer r guli rement l orifice d coulement de la goutti re d vacuation de l eau de d givrag...

Page 32: ...faites v rifier r guli rement son bon fonctionnement pour viter la d t rioration des ali ments en cas de panne de courant En cas d anomalie de fonctionnement Avertissement Avant de r soudre les probl...

Page 33: ...t rieur de l appareil est trop lev e La temp rature n est pas correcte ment r gl e S lectionnez une temp rature plus basse La porte n est pas correctement fer m e Consultez le paragraphe Fermeture de...

Page 34: ...C ST 16 38 C T 16 43 C Branchement lectrique Contr lez avant de brancher l appareil si la tension et la fr quence indiqu es sur la plaque signal tique cor respondent celles de votre r seau L appareil...

Page 35: ...lle in f rieure Installez la porte inf rieure Serrez la charni re in term diaire Installez la porte sup rieure Serrez l entretoise et la goupille sup rieure Conditions requises en mati re de circulati...

Page 36: ...l appa reil et le mobilier de la cui sine est correcte L espace libre entre l ap pareil et le meuble doit tre de 4 mm Ouvrez la porte Position nez le cache charni re I I Fixez l appareil dans son empl...

Page 37: ...le guide et fi xez la l aide des vis four nies Alignez la porte du meu ble de cuisine et la porte de l appareil en ajustant la pi ce Hb Hb Hd Appuyez la pi ce Hd sur la pi ce Hb Contr lez une derni re...

Page 38: ...e au rebut de l appareil dans les r gles de l art nous pr servons l environnement et notre s curit s assurant ainsi que les d chets seront trait s dans des conditions optimum Pour obtenir plus de d ta...

Page 39: ...durch eine verantwortungsbewusste Person benutzt werden die sicherstellt dass sie sich der Gefahren des Gebrauchs bewusst sind Kinder m ssen beaufsichtigt werden damit sie nicht am Ger t herumspielen...

Page 40: ...ellerangaben aufbewahren Die Lagerempfehlungen des Ger teherstellers soll ten strikt eingehalten werden Halten Sie sich an die betreffenden Anweisungen Keine kohlens urehaltigen Getr nke oder Sprudel...

Page 41: ...Sie den Temperaturregler im Uhrzeigersinn auf eine mittlere Einstellung Ausschalten des Ger ts Drehen Sie den Temperaturregler zum Ausschalten des Ger ts in die Position O Temperaturregelung Die Temp...

Page 42: ...angegebene Wert siehe Ausfalldauer zu einem ungewollten Abtauen dann m ssen die aufgetauten Lebensmittel sehr rasch verbraucht oder sofort gekocht und nach dem Abk hlen erneut eingefroren werden Auft...

Page 43: ...und Knoblauch sollten nicht im K hlschrank aufbewahrt werden au er diese sind daf r speziell verpackt Hinweise zum Einfrieren Im Folgenden finden Sie einige wertvolle Tipps f r ei nen optimalen Gefri...

Page 44: ...ht zu besch digen Viele Haushaltsreiniger f r K chen enthalten Chemika lien die den im Ger t verwendeten Kunststoff angreifen k nnen Aus diesem Grund ist es empfehlenswert das Ger t au en nur mit warm...

Page 45: ...rgehen trennen Sie das Ger t von der Netzversorgung entnehmen Sie alle Lebensmittel tauen Sie das Ger t ab15 Reinigen Sie das Ger t und alle Zubeh rteile lassen Sie die T ren offen angelehnt um das En...

Page 46: ...Lebensmittel ver hindern dass das Wasser zum Was serablauf flie t Stellen Sie sicher dass die Lebens mittel nicht die R ckwand ber hren Wasser flie t auf den Boden Der Tauwasserablauf l uft nicht in...

Page 47: ...Abmessung der Aussparung H he 1580 mm Breite 560 mm Tiefe 550 mm Ausfalldauer 20 h Spannung 230 240 V Frequenz 50 Hz Die technischen Informationen befinden sich auf dem Typenschild innen links im Ger...

Page 48: ...vor dem Einbau des Ger ts bitte nach den folgenden Anweisungen vor L sen Sie den oberen Scharnierstift und ent fernen Sie das Distanz st ck L sen Sie den oberen Bolzen und die obere T r L sen Sie das...

Page 49: ...glich gegen die Seitenwand des K chen m bels 44mm 4mm Richten Sie das Ger t in der Einbaunische aus Vergewissern Sie sich dass der Abstand zwi schen dem Ger t und der Schrankvorderkante 44 mm betr gt...

Page 50: ...schieben Sie Teil G zur K chenm bel Seiten wand 2 Ziehen Sie die Schrauben vom Teil G erneut fest 3 Befestigen Sie Teil H am Teil G Ha Hb Hc Hd Trennen Sie die Teile Ha Hb Hc und Hd ab ca 50 mm ca 50...

Page 51: ...Dichtung Bei h herer Umgebungstemperatur dehnt sich die Dichtung aus Hinweise zum Umweltschutz Das Symbol auf dem Produkt oder seiner Verpackung weist darauf hin dass dieses Produkt nicht als normale...

Page 52: ...www electrolux com shop 222315244 A 212011...

Reviews: