background image

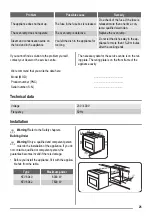
Problem

Possible cause

Remedy

The appliance does not heat up.

The fuse in the fuse box is released.

Do a check of the fuse. If the fuse is
released more than one time, con-
tact a qualified electrician.

The oven lamp does not operate.

The oven lamp is defective.

Replace the oven lamp.

Steam and condensation settle on
the food and in the appliance.

You left the dish in the appliance for
too long.

Do not let the dishes stay in the ap-
pliance for more than 15-20 minutes
after the cooking ends.

If you cannot find a solution to the problem yourself,
contact your dealer or the service centre.

The necessary data for the service centre is on the rat-
ing plate. The rating plate is on the front frame of the
appliance cavity.

We recommend that you write the data here:
Model (MOD.)

.........................................

Product number (PNC)

.........................................

Serial number (S.N.)

.........................................

Technical data

Voltage

230 / 400 V

Frequency

50 Hz

Installation

Warning!

 Refer to the Safety chapters.

Building Under

Warning!

 Only a qualified and competent person

must do the installation of the appliance. If you do

not contact a qualified or competent person, the
guarantee becomes invalid if there is damage.

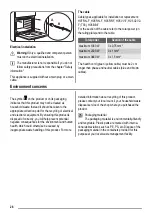
• Before you install the appliance, fit it with the applica-

ble hob from the table.

Type

Maximum power

KEV 6040

6000 W

KEV 6042

7600 W

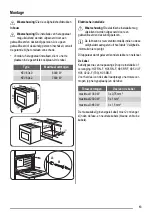
560

570

540

20

590

594

7

550 min

600

560-570

80÷100


25

Summary of Contents for KOU10301

Page 1: ...Gebruiks aanwijzing Oven User manual Oven Notice d utilisation Four Benutzer information Backofen KOU10301 ...

Page 2: ...paraat De fabrikant is niet verantwoordelijk voor letsel en schade veroorzaakt door een foutieve installatie Bewaar de instructies van het apparaat voor toe komstig gebruik Veiligheid van kinderen en kwetsbare mensen Waarschuwing Gevaar voor verstikking letsel of permanente invaliditeit Dit apparaat kan worden gebruikt door kinderen van 8 jaar en ouder en door mensen met beperkte lichamelijke zint...

Page 3: ...ppara ten of units staan van dezelfde hoogte Aansluiting op het elektriciteitsnet Waarschuwing Gevaar voor brand en elektrische schokken Alle elektrische aansluitingen moeten door een gedi plomeerd elektromonteur worden gemaakt Dit apparaat moet worden aangesloten op een ge aard stopcontact Controleer of de elektrische informatie op het type plaatje overeenkomt met de stroomvoorziening Zo niet nee...

Page 4: ...t het apparaat als u klaar bent met koken Wees voorzichtig bij het verwijderen of bevestigen van accessoires Verkleuring van het email heeft geen ongewenst ef fect op de werking van het apparaat Dit is geen de fect dat geldt voor het recht op garantie Gebruik een diepe braadpan voor vochtige taarten Fruitsappen kunnen permanente vlekken maken Onderhoud en reiniging Waarschuwing Gevaar voor letsel ...

Page 5: ...op voor de kookzone rechtsvoor 10 Ventilatie openingen 11 Ovenlampje 12 Typeplaatje Ovenaccessoires Bakrooster Voor kookgerei bak en braadvormen Vlakke bakplaat Voor gebak en koekjes Voor het eerste gebruik Waarschuwing Zie de veiligheidshoofdstukken Eerste reiniging Verwijder alle onderdelen van het apparaat Reinig het apparaat voor het eerste gebruik Belangrijk Zie het hoofdstuk Onderhoud en rei...

Page 6: ...one ongeveer 5 10 minu ten voordat het koken is voltooid uit Gebruik van de dubbele zone indien van toepassing Waarschuwing Draai de bedieningsknop met de dubbele zone naar rechts om de dubbele zone aan te zetten draai de knop niet door naar de stoppositie 1 Draai de bedieningsknop naar rechts stand 9 2 Draai de bedieningsknop langzaam naar symbool totdat u een klik hoort Nu zijn de twee kookzones...

Page 7: ...rechten zacht van binnen en knapperig van bui ten Bovendien worden de bereidingstijd en het ener gieverbruik tot een minimum beperkt Vocht kan in het apparaat of op de glazen deuren condenseren Dit is normaal Ga altijd iets terug staan van het apparaat als u de deur van het appa raat tijdens de werking opent Om de condens te ver minderen dient u het apparaat 10 minuten te laten voorverwarmen Veeg ...

Page 8: ...in Notities Niveau Temp C Schuimtaart 2 170 45 60 In cakevorm Zandtaartdeeg 2 170 24 34 In cakevorm Kwarktaart met karne melk 1 170 60 80 In cakevorm van 26 cm Appelgebak appel taart 1 170 100 120 2 cakevormen van 20 cm op het bak rooster Strudel 2 175 60 80 Op bakplaat Geleitaart 2 170 30 40 In cakevorm van 26 cm Fruitcake 2 170 60 70 In cakevorm van 26 cm Biscuittaart botervrije biscuittaart 2 1...

Page 9: ...5 40 In ovenschaal Cannelloni 2 200 25 40 In ovenschaal Yorkshire pudding 2 220 20 30 6 puddingvormen 1 1 Warm de oven 10 minuten voor VLEES SOORT GERECHT Boven en onderwarmte Bereidingstijd min Notities Niveau Temp C Rundvlees 2 200 50 70 Op bakrooster en in de braadpan Varkensvlees 2 180 90 120 Op bakrooster en in de braadpan Kalfsvlees 2 190 90 120 Op bakrooster en in de braadpan Engelse rosbie...

Page 10: ...ingsmid del voorwerpen met scherpe randen of afwasauto maat Hierdoor kan de antiaanbaklaag onherstelbaar worden beschadigd Apparaten van roestvrij staal of aluminium Reinig de ovendeur alleen met een natte spons Droog hem af met een zachte doek Gebruik geen staalwol zuren of bijtende materialen omdat deze het ovenoppervlak kunnen beschadigen Reinig het bedieningspaneel van de oven net zo voor zich...

Page 11: ...ijde ren om ze schoon te maken De ovendeur kan dichtslaan als u de binnenste glasplaat probeert te verwijderen voordat u de ovendeur hebt verwijderd 1 Open de deur volledig en houd de twee deur scharnieren vast 2 Til de hendels op de twee scharnieren omh oog en draai ze 3 Sluit de ovendeur in de eerste openingsstand halfopen Trek hem daarna naar voren en haal hem uit zijn zitting 4 Leg de deur op ...

Page 12: ...laat raadpleegt u een bevoegde elektri cien Het ovenlampje brandt niet Het ovenlampje is kapot Vervang het ovenlampje Stoom en condens slaan neer op de gerechten en in de ovenruimte Het gerecht heeft te lang in de oven gestaan Laat gerechten na het einde van de baktijd niet langer dan 15 20 minu ten in de oven staan Als u niet zelf het probleem kunt verhelpen neem dan contact op met uw verkoper of...

Page 13: ...e elektrische installatie mag uitsluitend worden uitgevoerd door een gekwalificeerd en deskundig persoon De fabrikant is niet verantwoordelijk indien u deze veiligheidsmaatregelen uit hoofdstuk Veiligheids informatie niet opvolgt Dit apparaat wordt geleverd zonder stekker en netsnoer De kabel Kabeltypes die van toepassing zijn op de installatie of vervanging H07 RN F H05 RN F H05 RRF H05 VV F H05 ...

Page 14: ... gevolgen voor mens en milieu die zich zouden kunnen voordoen in geval van verkeerde afvalverwerking Voor gedetailleerdere informatie over het recyclen van dit product kunt u contact opnemen met de gemeente de gemeentereiniging of de winkel waar u het product hebt gekocht Verpakkingsmateriaal Het verpakkingsmateriaal is milieuvriendelijk en geschikt voor hergebruik Kunststofonderdelen worden aange...

Page 15: ... not responsible if an incorrect installation and use causes injuries and damages Always keep the instructions with the appli ance for future reference Children and vulnerable people safety Warning Risk of suffocation injury or permanent disability This appliance can be used by children aged from 8 years and above and persons with reduced physical sensory or mental capabilities or lack of expe rie...

Page 16: ...ays use a correctly installed shockproof socket Do not use multi plug adapters and extension cables Make sure not to cause damage to the mains plug and to the mains cable Contact the Service or an electrician to change a damaged mains cable Do not let mains cables to come in touch with the ap pliance door specially when the door is hot The shock protection of live and insulated parts must be faste...

Page 17: ...hat can be permanent Care and Cleaning Warning Risk of injury fire or damage to the appliance Before maintenance deactivate the appliance and disconnect the mains plug from the mains socket Make sure the appliance is cold There is the risk that the glass panels can break Replace immediately the door glass panels when they are damaged Contact the Service Be careful when you remove the door from the...

Page 18: ...ean the appliance before first use Important Refer to chapter Care and Cleaning Preheating This is to burn off any residue from the cavity surface Accessories can become more hot than in normal use During this period an odour and smoke can be emitted This is normal Make sure the airflow is sufficient Set the function for 1 hour Daily use Warning Refer to the Safety chapters Activating and deactiva...

Page 19: ...ntrol knob to the right to position 9 2 Turn the control knob slowly to symbol until you can hear a click At this time the two cooking zones are on 3 To set necessary heat setting refer to Heat set tings Oven functions Oven function Application OFF position The appliance is off Conventional cooking Heats both from the top and bottom element To bake and roast on one oven level Top heating element H...

Page 20: ...t cover the components with aluminium foil when you cook This can change the baking results and damage the enamel coating Baking cakes The best temperature for baking cakes is between 150 C and 200 C Preheat the oven for approximately 10 minutes be fore baking Do not open the oven door before 3 4 of the set cooking time is up If you use two baking trays at the same time keep one level empty betwee...

Page 21: ... Small cakes 3 170 20 30 On flat baking tray Biscuits 3 150 20 30 On flat baking tray1 Meringues 3 100 90 120 On flat baking tray Buns 3 190 15 20 On flat baking tray1 Choux 3 190 25 35 On flat baking tray1 Plate tarts 3 180 45 70 In cake mould 20 cm Victoria sandwich 1 or 2 180 40 55 Left right in cake mould 20 cm 1 Preheat for 10 minutes BREAD AND PIZZA TYPE OF DISH Conventional cooking Cooking ...

Page 22: ... rare 2 210 44 50 On wire shelf and deep roasting pan English roast beef me dium 2 210 51 55 On wire shelf and deep roasting pan English roast beef well done 2 210 55 60 On wire shelf and deep roasting pan Shoulder of pork 2 180 120 150 On deep roasting pan Shin of pork 2 180 100 120 2 pieces on deep roasting pan Lamb 2 190 110 130 Leg Chicken 2 200 70 85 Whole on deep roasting pan Turkey 1 180 21...

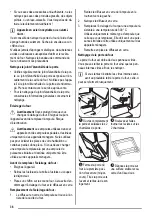
Page 23: ...an the door gasket refer to the general informa tion about the cleaning Oven lamp Warning Be careful when you change the oven lamp Always switch off the appliance before you start to replace the lamp There is a risk of electric shock Warning Bulb lamps used in this appliance are special lamps for use only in household appliances Do not use them to illuminate household rooms or parts of rooms If yo...

Page 24: ... soap Dry the glass panel carefully Installing the door and the glass panel When you install the panel with a decorative frame make sure that the screen printing zone looks to the in ner side of the door Make sure that after the installation the surface of the glass panel frame on the screen print ing zones is not rough when you touch it Make sure that you install the internal panel of glass in th...

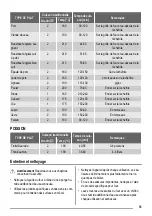
Page 25: ...ct your dealer or the service centre The necessary data for the service centre is on the rat ing plate The rating plate is on the front frame of the appliance cavity We recommend that you write the data here Model MOD Product number PNC Serial number S N Technical data Voltage 230 400 V Frequency 50 Hz Installation Warning Refer to the Safety chapters Building Under Warning Only a qualified and co...

Page 26: ...ent concerns The symbol on the product or on its packaging indicates that this product may not be treated as household waste Instead it should be taken to the appropriate collection point for the recycling of electrical and electronic equipment By ensuring this product is disposed of correctly you will help prevent potential negative consequences for the environment and human health which could ot...

Page 27: ...ujours cet te notice avec votre appareil pour vous y référer ultérieurement Sécurité des enfants et des personnes vulnérables Avertissement Risque d asphyxie de blessure ou d invalidité permanente Cet appareil peut être utilisé par des enfants de plus de 8 ans ainsi que des personnes dont les capacités physiques sensorielles et mentales sont rédui tes ou dont les connaissances et l expérience sont...

Page 28: ...semble des branchements électriques doit être effectué par un technicien qualifié L appareil doit être relié à la terre Vérifiez que les données électriques figurant sur la plaque signalétique correspondent à celles de votre réseau Si ce n est pas le cas contactez un électri cien Utilisez toujours une prise antichoc correctement in stallée L appareil ne doit pas être raccordé à l aide d un pro lon...

Page 29: ...ent dans l appareil lorsqu il est chaud ne laissez jamais d aliments ni de plats humides à l intérieur de l appareil une fois la cuisson terminée faites attention lorsque vous retirez ou remettez en place les accessoires La décoloration de l émail est sans effet sur les per formances de l appareil Il ne s agit pas d un défaut dans le cadre de la garantie Utilisez un plat à rôtir pour obtenir des g...

Page 30: ...ifices d aération 11 Éclairage du four 12 Plaque signalétique Accessoires du four Grille métallique Elle permet de poser les plats rôtis gratins les moules à pâtisserie et de faire des grillades Plateau multi usages Pour gâteaux et biscuits Avant la première utilisation Avertissement Reportez vous aux chapitres concernant la sécurité Premier nettoyage Retirez tous les accessoires de l appareil Net...

Page 31: ...r le niveau de cuisson souhaité 2 Pour terminer le processus de cuisson tournez la manette sur la position 0 Utilisez la chaleur résiduelle pour réduire la con sommation d énergie Désactivez la zone de cuis son environ 5 à 10 minutes avant la fin de la cuisson Utilisez la zone de cuisson à double circuit si votre appareil en est équipé Avertissement Pour sélectionner la zone de cuisson à double ci...

Page 32: ...ès élevée et peut brûler tous les plats Vous devez appeler immédiatement le service après vente pour remplacer le thermostat du four Conseils utiles Le four dispose de quatre niveaux de gradins Comp tez les niveaux de gradins à partir du bas de l appa reil L appareil est doté d un système spécial qui permet à l air de circuler et qui recycle perpétuellement la va peur Dans cet environnement ce sys...

Page 33: ...s temps de cuisson varient en fonction de la composi tion des ingrédients et de la quantité de liquide que contient chaque plat Surveillez toujours l appareil pendant son fonctionne ment Annotez les meilleurs réglages niveau de cuis son temps de cuisson etc en fonction des ustensiles et des recettes lors de vos expériences de cuisson Tableau de référence pour rôtir et cuire GÂTEAUX TYPE DE PLAT Cu...

Page 34: ... à pain Petits pains 2 190 25 40 6 8 petits pains sur plateau multi usa ges 1 Sole Pulsée 1 190 20 30 Dans le plat profond1 Scones 3 200 10 20 Sur plateau multi usages 1 1 Pré chauffez pendant 10 minutes FLANS gratins TYPE DE PLAT Cuisson traditionnelle Temps de cuis son min Remarques Gradin Temp C Gratin de pâtes 2 180 40 50 Dans un moule Gratin de légumes 2 200 45 60 Dans un moule Quiche 1 190 4...

Page 35: ...Entier sur la lèchefrite Oie 1 175 150 200 Entier sur la lèchefrite Lapin 2 190 60 80 En morceaux lièvre 2 190 150 200 En morceaux Faisan 2 190 90 120 Entier sur la lèchefrite POISSON TYPE DE PLAT Cuisson traditionnelle Temps de cuis son min Remarques Gradin Temp C Truite Daurade 2 190 40 55 3 4 poissons Thon saumon 2 190 35 60 4 6 filets Entretien et nettoyage Avertissement Reportez vous aux chap...

Page 36: ...èce Si vous devez changer une ampoule remplacez la par une ampoule de puissance similaire et destinée uniquement à être utilisée sur des appareils ménagers Avant de remplacer l éclairage du four Éteignez l appareil Retirez les fusibles de la boîte à fusibles ou coupez le disjoncteur Placez un chiffon sur la sole du four Cela évite d en dommager l éclairage du four et le diffuseur en verre Remplace...

Page 37: ...ré dans son logement respectif voir l illustration En cas d anomalie de fonctionnement Avertissement Reportez vous aux chapitres concernant la sécurité Problème Cause possible Solution Les zones de cuisson ne fonction nent pas Consultez la notice d utilisation de la table de cuisson L appareil ne chauffe pas L appareil est éteint Mettez l appareil en marche Repor tez vous au chapitre Utilisation q...

Page 38: ...effectuée par un professionnel qualifié Si vous ne contactez pas un professionnel qualifié les éventuels dommages causés ne seront pas couverts par la garantie Avant d installer l appareil adaptez y la table de cuis son correspondante indiquée dans le tableau Type Puissance maximale KEV 6040 6000 W KEV 6042 7600 W 560 570 540 20 590 594 7 550 min 600 560 570 80 100 A B Installation électrique Aver...

Page 39: ...oduit ne peut être traité comme déchet ménager Il doit être remis au point de collecte dédié à cet effet collecte et recyclage du matériel électrique et électronique En procédant à la mise au rebut de l appareil dans les règles de l art nous préservons l environnement et notre sécurité s assurant ainsi que les déchets seront traités dans des conditions optimum Pour obtenir plus de détails sur le r...

Page 40: ...zungen oder Schäden die durch eine fehlerhafte Montage entstehen Bewahren Sie die Anleitung zum Nachschlagen auf Sicherheit von Kindern und schutzbedürftigen Personen Warnung Es besteht Erstickungsgefahr das Risiko von Verletzungen oder permanenten Behinderungen Dieses Gerät kann dann von Kindern ab 8 Jahren von Personen mit einge schränkten körperlichen sensorischen oder geistigen Fähigkeiten sow...

Page 41: ...renden Tei len zu vermeiden Die Seiten des Geräts dürfen nur an Geräte oder Ein heiten in gleicher Höhe angrenzen Elektrischer Anschluss Warnung Brand und Stromschlaggefahr Alle elektrischen Anschlüsse sind von einem geprüf ten Elektriker vorzunehmen Das Gerät muss geerdet werden Stellen Sie sicher dass die elektrischen Daten auf dem Typenschild den Daten Ihrer Stromversorgung entsprechen Wenden S...

Page 42: ...rfärbungen der Email beschichtung zu vermeiden Stellen Sie feuerfestes Geschirr oder andere Ge genstände nicht direkt auf den Boden des Gerätes Legen Sie keine Alufolie direkt auf den Boden des Geräts Stellen Sie kein Wasser in das heiße Gerät Lassen Sie nach dem Abschalten des Geräts kein feuchtes Geschirr oder feuchte Speisen im Backofe ninnenraum stehen Gehen Sie beim Herausnehmen oder Einsetze...

Page 43: ...pf der hinteren linken Kochzone 4 Temperaturkontrolllampe 5 Temperaturwahlknopf 6 Backofen Einstellknopf 7 Betriebs Kontrolllampe 8 Knopf der hinteren rechten Kochzone 9 Knopf der vorderen rechten Kochzone 10 Lüftungsöffnungen 11 Backofenlampe 12 Typenschild Backofenzubehör Kombirost Für Geschirr Kuchenformen Braten Backblech Für Kuchen und Plätzchen Vor der ersten Inbetriebnahme Warnung Siehe Sic...

Page 44: ...nschte Koch stufe 2 Um den Garvorgang zu beenden drehen Sie den Einstellknopf auf die Position 0 Nutzen Sie die Restwärme um den Energiever brauch zu senken Schalten Sie die Kochzone ca 5 10 Minuten vor Ende des Garvorgangs aus Verwendung der Zweikreis Kochzone falls vorhanden Warnung Drehen Sie den Zweikreis Kochzonenschalter nach rechts aber nicht über die Endposition hinaus um die Zweikreis Koc...

Page 45: ... vier Einschubebenen Die Einschube benen werden vom Boden des Backofens aus ge zählt Das Gerät hat ein exklusives Umluft und Dampfsys tem das die Luft umwälzt und den Dampf wieder auf bereitet Das Garen mit Dampf macht Ihre Speisen innen weich und außen knusprig Gardauer und Energieverbrauch werden dabei auf ein Minimum re duziert Es kann sich Feuchtigkeit im Gerät oder an den Glastüren niederschl...

Page 46: ...e die Leistung zu Beginn des Garens Fin den Sie die besten Einstellungen Heizstufe Garzeit usw für Ihre Brat und Backformen und Ihre persönli chen Rezepte und Mengen heraus wenn Sie das Gerät benutzen Back und Brattabelle KUCHEN GERICHT Ober Unterhitze Garzeit Min Anmerkungen Ebene Tempera tur C Rührteig 2 170 45 60 Kuchenform Mürbeteig 2 170 24 34 Kuchenform Buttermilch Käseku chen 1 170 60 80 Ku...

Page 47: ... Pizza 1 190 20 30 Fettpfanne1 Mürbeteigplätzchen 3 200 10 20 Backblech1 1 10 Minuten vorheizen AUFLÄUFE GERICHT Ober Unterhitze Garzeit Min Anmerkungen Ebene Tempera tur C Nudelauflauf 2 180 40 50 Form Gemüseauflauf 2 200 45 60 Form Quiche 1 190 40 50 Form Lasagne 2 200 25 40 Form Cannelloni 2 200 25 40 Form Yorkshire Pudding 2 220 20 30 6 Puddingformen 1 1 10 Minuten vorheizen FLEISCH GERICHT Ob...

Page 48: ...2 190 40 55 3 4 Fische Thunfisch Lachs 2 190 35 60 4 6 Filets Reinigung und Pflege Warnung Siehe Sicherheitshinweise Feuchten Sie ein weiches Tuch mit warmem Wasser und etwas Reinigungsmittel an und reinigen Sie da mit die Vorderseite des Geräts Reinigen Sie die Metalloberflächen mit einem han delsüblichen Reinigungsmittel Reinigen Sie den Innenraum des Backofens nach je dem Gebrauch Auf diese Wei...

Page 49: ...as Gerät aus Entfernen Sie die Sicherungen aus dem Sicherungs kasten oder schalten Sie den Schutzschalter aus Breiten Sie ein Tuch auf dem Backofenboden aus Auf diese Weise werden Beschädigungen der Back ofenlampe und der Glasabdeckung vermieden Austauschen der Backofenlampe 1 Die Glasabdeckung der Backofenlampe befindet sich an der Rückwand des Backofeninnenraums Drehen Sie die Glasabdeckung der ...

Page 50: ...ch tige Aufnahme einsetzen siehe nachfolgende Abbil dung Was tun wenn Warnung Siehe Sicherheitshinweise Problem Mögliche Ursache Abhilfe Die Kochzonen funktionieren nicht Informationen hierzu finden Sie in der Gebrauchsanleitung des Kochfelds Das Gerät heizt nicht Das Gerät ist ausgeschaltet Schalten Sie das Gerät ein Siehe hierzu Täglicher Gebrauch Das Gerät heizt nicht Die Sicherung im Sicherung...

Page 51: ...zierten Fachkraft vorgenommen werden Wenn Sie die Montage nicht durch eine qualifizierte Fachkraft durchführen lassen und es zu Schäden kommt entfällt der Garantieanspruch Bevor Sie das Gerät einbauen montieren Sie das entsprechende Kochfeld aus der Tabelle Art Maximale Leistung KEV 6040 6000 W KEV 6042 7600 W 560 570 540 20 590 594 7 550 min 600 560 570 80 100 A B Elektrischer Anschluss Warnung D...

Page 52: ...maler Haushaltsabfall zu behandeln ist sondern an einem Sammelpunkt für das Recycling von elektrischen und elektronischen Geräten abgegeben werden muss Durch Ihren Beitrag zum korrekten Entsorgen dieses Produkts schützen Sie die Umwelt und die Gesundheit Ihrer Mitmenschen Umwelt und Gesundheit werden durch falsches Entsorgen gefährdet Weitere Informationen über das Recycling dieses Produkts erhalt...

Page 53: ...53 ...

Page 54: ...54 ...

Page 55: ...55 ...

Page 56: ...www electrolux com shop 892944769 B 102013 ...

Reviews: