background image

• To clean metal surfaces, use a usual cleaning

agent.

• Clean the appliance interior after each use. Fat

accumulation or other food remains may result in a

fire.

• Clean stubborn dirt with a special oven cleaner.

• Clean all accessories after each use and let them

dry. Use a soft cloth with warm water and a cleaning

agent.

• If you have nonstick accessories, do not clean them

using aggressive agents, sharp-edged objects or a

dishwasher. It can cause damage to the nonstick

coating.

Stainless steel or aluminium appliances

Clean the oven door with a wet sponge

only. Dry it with a soft cloth.

Do not use steel wool, acids or abrasive

materials as they can damage the oven

surface. Clean the oven control panel

with the same precautions.

Cleaning the door gasket

• Regularly do a check of the door gasket. The door

gasket is around the frame of the oven cavity. Do

not use the appliance if the door gasket is damaged.

Contact an Authorised Service Centre.

• To clean the door gasket, refer to the general

information about cleaning.

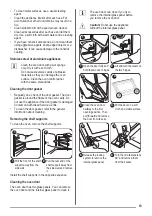
Removing the shelf supports

To clean the oven, remove the shelf supports.

1

Pull the front of the shelf
support away from the
side wall.

1

2

1

2

Pull the rear end of the
shelf support away from
the side wall and remove
it.

2

Install the shelf supports in the opposite sequence.

Cleaning the oven door

The oven door has two glass panels. You can remove

the oven door and the internal glass panel to clean it.

The oven door can close if you try to

remove the internal glass panel before

you remove the oven door.

Caution! Do not use the appliance

without the internal glass panel.

1

Open the door fully and
hold the two door hinges.

1

2

Lift and turn the levers on
the two hinges.

2

3

Close the oven door
halfway to the first
opening position. Then
pull forward and remove
the door from its seat.

3

4

Put the door on a soft
cloth on a stable surface.

4

5

Release the locking
system to remove the
internal glass panel.

5

90°

6

Turn the two fasteners by
90° and remove them
from their seats.

6

13

Summary of Contents for KOU20612

Page 1: ...KOU20612 User Manual Oven Benutzerin formation Backofen ...

Page 2: ...r lack of experience and knowledge if they have been given supervision or instruction concerning use of the appliance in a safe way and understand the hazards involved Do not let children play with the appliance Keep all packaging away from children Keep children and pets away from the appliance when it operates or when it cools down Accessible parts are hot If the appliance has a child safety dev...

Page 3: ...to prevent touching the dangerous parts The sides of the appliance must stay adjacent to appliances or to units with the same height Electrical connection Warning Risk of fire and electrical shock All electrical connections should be made by a qualified electrician The appliance must be earthed Make sure that the electrical information on the rating plate agrees with the power supply If not contac...

Page 4: ...t cakes Fruit juices cause stains that can be permanent This appliance is for cooking purposes only It must not be used for other purposes for example room heating Always cook with the oven door closed Care and cleaning Warning Risk of injury fire or damage to the appliance Before maintenance deactivate the appliance and disconnect the mains plug from the mains socket Make sure the appliance is co...

Page 5: ...ovable shelf supports from the appliance Refer to Care and cleaning chapter Clean the appliance before first use Put the accessories and the removable shelf supports back to their initial position Preheating Preheat the empty appliance to burn off the remaining grease 1 Set the function and the maximum temperature 2 Let the appliance operate for 1 hour 3 Set the function and the maximum temperatur...

Page 6: ...t or roast and bake food with the same cooking temperature on more than 1 shelf position without flavour transference Top Bottom Heat To bake and roast food on 1 shelf position Bottom Heat To bake cakes with crispy bottom and to preserve food Turbo Grilling To roast larger meat joints or poultry with bones on 1 shelf position Also to make gratins and to brown Grilling To grill flat food and to toa...

Page 7: ...e steam With this system you can cook in a steamy environment and keep the food soft inside and crusty outside It decreases the cooking time and energy consumption to a minimum Moisture can condense in the appliance or on the door glass panels This is normal Always stand back from the appliance when you open the appliance door while cooking To decrease the condensation operate the appliance for 10...

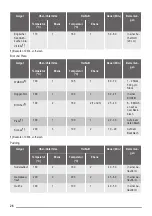
Page 8: ...n a wire shelf Strudel 175 2 150 2 60 80 In a baking tray Jam tart 170 2 160 2 1 and 3 30 40 In a 26 cm cake mould Fruit cake 170 2 155 2 50 60 In a 26 cm cake mould Sponge cake Fat less sponge cake 170 2 160 2 90 120 In a 26 cm cake mould Christmas cake Rich fruit cake 170 2 160 2 50 60 In a 20 cm cake mould Plum cake1 170 2 165 2 20 30 In a bread tin Small cakes 170 3 166 3 1 and 3 25 35 In a ba...

Page 9: ... minutes Bread and pizza Food Top Bottom Heat Fan Cooking Time min Comments Tempera ture C Shelf posi tion Tempera ture C Shelf posi tion White bread1 190 1 195 1 60 70 1 2 pieces 500 gr per piece Rye bread 190 1 190 1 30 45 In a bread tin Bread rolls1 190 2 180 2 1 and 3 25 40 6 8 rolls in a baking tray Pizza1 190 1 190 1 20 30 On a deep pan Scones1 200 3 190 2 10 20 In a baking tray 1 Preheat th...

Page 10: ... Cooking Time min Comments Tempera ture C Shelf posi tion Tempera ture C Shelf posi tion Beef 200 2 190 2 50 70 On a wire shelf and a deep pan Pork 180 2 180 2 90 120 On a wire shelf and a deep pan Veal 190 2 175 2 90 120 On a wire shelf and a deep pan English roast beef rare 210 2 200 2 44 50 On a wire shelf and a deep pan English roast beef medium 210 2 200 2 51 55 On a wire shelf and a deep pan...

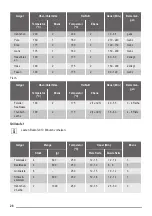
Page 11: ...ces Pheasant 190 2 175 2 90 120 Whole Fish Food Top Bottom Heat Fan Cooking Time min Comments Tempera ture C Shelf posi tion Tempera ture C Shelf posi tion Trout Sea bream 190 2 175 2 1 and 3 40 55 3 4 fishes Tuna fish Salmon 190 2 175 2 1 and 3 35 60 4 6 fillets Grilling Preheat the empty oven for 10 minutes before cooking Food Quantity Tempera ture C Time min Shelf posi tion Pieces g 1st side 2n...

Page 12: ...h a maximum temperature of 200 C Food Quantity Tempera ture C Time min Shelf posi tion Pieces g 1st side 2nd side Rolled joints turkey 1 1000 200 30 40 20 30 3 Chicken cut in two 2 1000 200 25 30 20 30 3 Chicken drumsticks 6 200 15 20 15 18 3 Quail 4 500 200 25 30 20 25 3 Vegetable gratin 200 20 25 3 Scallops 200 15 20 3 Mackerel 2 4 200 15 20 10 15 3 Fish slices 4 6 800 200 12 15 8 10 3 Care and ...

Page 13: ...aged Contact an Authorised Service Centre To clean the door gasket refer to the general information about cleaning Removing the shelf supports To clean the oven remove the shelf supports 1 Pull the front of the shelf support away from the side wall 1 2 1 2 Pull the rear end of the shelf support away from the side wall and remove it 2 Install the shelf supports in the opposite sequence Cleaning the...

Page 14: ... cavity Warning Danger of electrocution Disconnect the fuse before you replace the lamp The lamp and the lamp glass cover can be hot 1 Deactivate the appliance 2 Remove the fuses from the fuse box or deactivate the circuit breaker The back lamp 1 Turn the lamp glass cover counterclockwise to remove it 2 Clean the glass cover 3 Replace the lamp with a suitable 300 C heat resistant lamp 4 Install th...

Page 15: ...ou write the data here Model MOD Product number PNC Serial number S N Installation Warning Refer to Safety chapters Building Under Caution Only a qualified and competent person must do the installation of the appliance If you do not contact a qualified or competent person the guarantee becomes invalid if there is damage Before you install the appliance fit it with the applicable hob from the table...

Page 16: ...r to the total power on the rating plate Connecting the terminal board The appliance has a six pole terminal board The jumpers bridges are set for operation on a 400 V three phase with a neutral wire 1 45 mm 2 45 mm 3 60 mm 4 60 mm 70 mm 1 2 3 4 5 L 1 2 3 phase cables N 4 neutral cable earth cable If the mains voltage is different rearrange the jumpers on the terminal board refer to the connection...

Page 17: ...the cooking Use metal dishes to improve the energy saving When possible put the food inside the oven without heating it up When the cooking duration is longer than 30 minutes reduce the oven temperature to minimum 3 10 minutes before the end of the cooking time depending on the duration of the cooking The residual heat inside the oven will continue to cook Use the residual heat to warm up other fo...

Page 18: ...eistigen Fähigkeiten oder mit mangelnder Erfahrung und oder mangelndem Wissen nur dann verwendet werden wenn sie durch eine für ihre Sicherheit zuständige Person beaufsichtigt werden oder in die sichere Verwendung des Geräts eingewiesen wurden und die mit dem Gerät verbundenen Gefahren verstanden haben Kinder dürfen nicht mit dem Gerät spielen Alle Verpackungsmaterialien von Kindern fernhalten Hal...

Page 19: ...en Anschluss des Geräts vornehmen Entfernen Sie das gesamte Verpackungsmaterial Stellen Sie ein beschädigtes Gerät nicht auf und benutzen Sie es nicht Halten Sie sich an die mitgelieferte Montageanleitung Seien Sie beim Umsetzen des Geräts vorsichtig denn es ist schwer Tragen Sie stets Sicherheitshandschuhe Ziehen Sie das Gerät nicht am Türgriff Das Küchenmöbel und die Einbaunische müssen die pass...

Page 20: ... Sie keinen Druck auf die geöffnete Gerätetür aus Benutzen Sie das Gerät nicht als Arbeits oder Abstellfläche Öffnen Sie die Gerätetür vorsichtig Bei der Verwendung von Zutaten die Alkohol enthalten kann ein Alkohol Luftgemisch entstehen Achten Sie beim Öffnen der Tür darauf dass keine Funken oder offenen Flammen in das Geräts gelangen Platzieren Sie keine entflammbaren Produkte oder Gegenstände d...

Page 21: ...ustauschen Verwenden Sie dazu eine Lampe mit der gleichen Leistung Entsorgung WARNUNG Verletzungs und Erstickungsgefahr Trennen Sie das Gerät von der Stromversorgung Schneiden Sie das Netzkabel ab und entsorgen Sie es Entfernen Sie das Türschloss um zu verhindern dass sich Kinder oder Haustiere in dem Gerät einschliessen Service Wenden Sie sich zur Reparatur des Geräts an einen autorisierten Kunde...

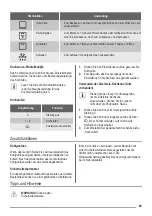
Page 22: ...se Versenkbare Knöpfe Drücken Sie zum Benutzen des Geräts auf den versenkbaren Knopf Der Knopf kommt dann heraus Ein und Ausschalten des Geräts Je nach Modell besitzt Ihr Gerät Knopfsymbole Kontrolllampen oder Anzeigen Die Anzeige leuchtet während der Aufheizphase des Backofens auf Die Lampe leuchtet während das Gerät in Betrieb ist Das Symbol zeigt an ob der Knopf eine der Kochzonen die Ofenfunkt...

Page 23: ...gedreht werden Verwenden der Zweikreis Kochzone falls vorhanden Drehen Sie den Knopf im Uhrzeigersinn um die Zweikreis Kochzone einzuschalten Drehen Sie ihn jedoch nicht über die Endposition hinaus 1 Drehen Sie den Knopf im Uhrzeigersinn auf die Stellung 9 2 Drehen Sie den Knopf langsam auf das Symbol bis er hörbar einrastet Jetzt sind beide Kochzonen eingeschaltet 3 Zum Einstellen der gewünschten...

Page 24: ...kofentür nicht öffnen bevor 3 4 der Backzeit abgelaufen ist Wenn Sie zwei Backbleche gleichzeitig nutzen lassen Sie eine Ebene dazwischen frei Garen von Fleisch und Fisch Setzen Sie beim Garen von Speisen mit hohem Fettgehalt ein tiefes Blech ein damit keine hartnäckigen Flecken im Backofen verbleiben Das Fleisch vor dem Anschneiden mindestens 15 Minuten ruhen lassen damit der Fleischsaft nicht au...

Page 25: ...70 2 160 2 50 60 In einer Ku chenform 20 cm Rosinenku chen1 170 2 165 2 20 30 In einer Brotform Kleine Ku chen 170 3 166 3 1 und 3 25 35 Auf dem Backblech Plätzchen1 150 3 140 3 1 und 3 30 35 Auf dem Backblech Baiser 100 3 115 3 35 40 Auf dem Backblech Rosinen brötchen1 190 3 180 3 80 100 Auf dem Backblech Brandteig1 190 3 180 3 1 und 3 15 20 Auf dem Backblech Törtchen 180 3 170 2 25 35 In einer K...

Page 26: ...95 1 60 70 1 2 Stück 500 g pro Stück Roggenbrot 190 1 190 1 30 45 In einer Brotform Brötchen1 190 2 180 2 1 und 3 25 40 6 8 Brötch en auf ei nem Back blech Pizza1 190 1 190 1 20 30 Auf einem tiefen Blech Scones1 200 3 190 2 10 20 Auf dem Backblech 1 Backofen 10 Min vorheizen Pudding Gargut Ober Unterhitze Heißluft Dauer Min Bemerkun gen Temperatur C Ebene Temperatur C Ebene Nudelauflauf 180 2 180 ...

Page 27: ...ur C Ebene Temperatur C Ebene Rindfleisch 200 2 190 2 50 70 Kombirost und tiefes Blech Schweine fleisch 180 2 180 2 90 120 Kombirost und tiefes Blech Kalb 190 2 175 2 90 120 Kombirost und tiefes Blech Roastbeef englisch 210 2 200 2 44 50 Kombirost und tiefes Blech Roastbeef medium 210 2 200 2 51 55 Kombirost und tiefes Blech Roastbeef durch 210 2 200 2 55 60 Kombirost und tiefes Blech Schwei nesch...

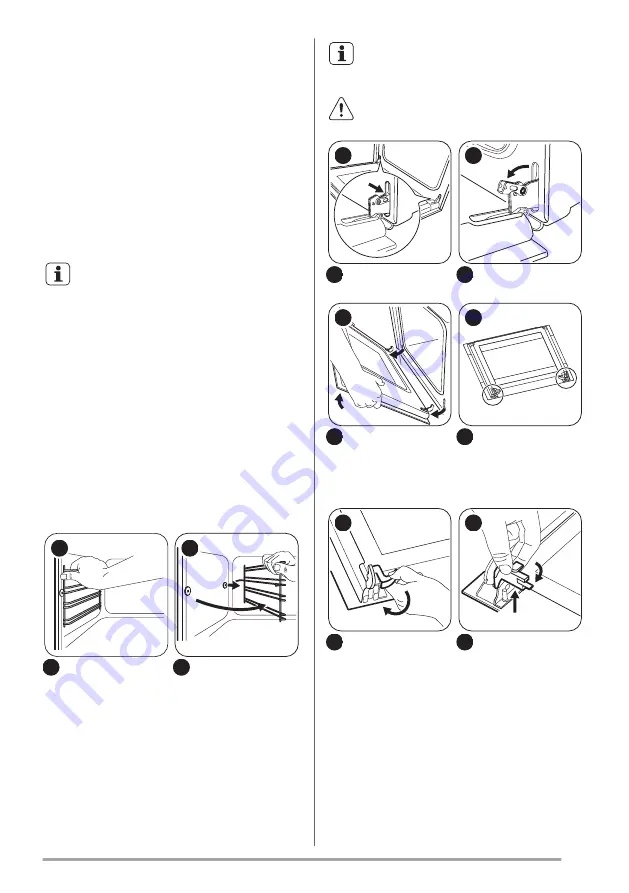
Page 28: ...Fisch Gargut Ober Unterhitze Heißluft Dauer Min Bemerkun gen Temperatur C Ebene Temperatur C Ebene Forelle Seebrasse 190 2 175 2 1 und 3 40 55 3 4 Fische Thunfisch Lachs 190 2 175 2 1 und 3 35 60 4 6 Filets Grillstufe 1 Leeren Backofen 10 Minuten vorheizen Gargut Menge Temperatur C Dauer Min Ebene Stück g Erste Seite Zweite Seite Filetsteaks 4 800 250 12 15 12 14 3 Beefsteaks 4 600 250 10 12 6 8 3...

Page 29: ...ie bei Verwendung dieser Funktion eine Höchsttemperatur von 200 C Gargut Menge Temperatur C Dauer Min Ebene Stück g Erste Seite Zweite Seite Rollbraten Pute 1 1000 200 30 40 20 30 3 Hähnchen in zwei Hälften 2 1000 200 25 30 20 30 3 Hähnchen schenkel 6 200 15 20 15 18 3 Wachteln 4 500 200 25 30 20 25 3 Gemüsegra tin 200 20 25 3 Jakobsmu scheln 200 15 20 3 Makrele 2 4 200 15 20 10 15 3 Fischschei be...

Page 30: ...gen Sie das Bedienfeld auf gleiche Weise Reinigen der Türdichtung Die Türdichtung muss regelmäßig überprüft werden Die Türdichtung ist im Rahmen des Garraums angebracht Nehmen Sie das Gerät nicht in Betrieb wenn die Türdichtung beschädigt ist Wenden Sie sich an den Kundendienst Lesen Sie in den allgemeinen Informationen zur Reinigung nach was bei der Reinigung der Türdichtung beachtet werden muss ...

Page 31: ...r Tür zeigen Vergewissern Sie sich nach der Montage dass sich der Glasscheibenrahmen an den bedruckten Bereichen nicht rau anfühlt Achten Sie darauf die innere Glasscheibe richtig in die Aufnahmen einzusetzen Austauschen der Lampe Legen Sie ein Tuch unten in den Garraum des Geräts Auf diese Weise schützen Sie die Glasabdeckung der Backofenlampe und den Innenraum des Backofens WARNUNG Stromschlagge...

Page 32: ...n wenden Sie sich an den Händler oder einen autorisierten Kundendienst Die vom Kundendienst benötigten Daten finden Sie auf dem Typenschild Das Typenschild befindet sich am Frontrahmen des Garraums Entfernen Sie das Typenschild nicht vom Garraum Wir empfehlen hier folgende Daten zu notieren Modell MOD Produktnummer PNC Seriennummer S N Montage WARNUNG Siehe Kapitel Sicherheitshinweise Einbau ACHTU...

Page 33: ...der Austausch H07 RN F H05 RN F H05 RRF H05 VV F H05 V2V2 F T90 H05 BB F Näheres zum Kabelquerschnitt siehe Gesamtleistung auf dem Typenschild Anschluss der Klemmleiste Das Gerät ist mit einer 6 poligen Klemmleiste ausgestattet Die Jumper Brücken sind für einen Dreiphasen Betrieb mit 400 V und Nullleiter eingerichtet 1 45 mm 2 45 mm 3 60 mm 4 60 mm 70 mm 1 2 3 4 5 L 1 2 3 Phasenleiter N 4 Nullleit...

Page 34: ...icht öfter als erforderlich Verwenden Sie Kochgeschirr aus Metall um Energie zu sparen Wenn immer möglich geben Sie die Speisen in den kalten Backofen Beträgt die Garzeit länger als 30 Minuten reduzieren Sie die Ofentemperatur je nach Gardauer 3 10 Minuten vor Ablauf des Garvorgangs auf die Mindesttemperatur Durch die Restwärme des Backofens werden die Speisen weiter gegart Nutzen Sie die Restwärm...

Page 35: ...35 ...

Page 36: ...www electrolux com shop 867323244 A 262015 ...

Reviews: