background image

• Do not pull the mains cable to disconnect the

appliance. Always pull the mains plug.

• Use only correct isolation devices: line protecting

cut-outs, fuses (screw type fuses removed from the

holder), earth leakage trips and contactors.

• The electrical installation must have an isolation

device which lets you disconnect the appliance from

the mains at all poles. The isolation device must

have a contact opening width of minimum 3 mm.

• This appliance complies with the E.E.C. Directives.

Use

Warning! Risk of injury, burns and

electric shock or explosion.

• This appliance is for household use only.

• Do not change the specification of this appliance.

• Make sure that the ventilation openings are not

blocked.

• Do not let the appliance stay unattended during

operation.

• Deactivate the appliance after each use.

• Be careful when you open the appliance door while

the appliance is in operation. Hot air can release.

• Do not operate the appliance with wet hands or

when it has contact with water.

• Do not apply pressure on the open door.

• Do not use the appliance as a work surface or as a

storage surface.

• Open the appliance door carefully. The use of

ingredients with alcohol can cause a mixture of

alcohol and air.

• Do not let sparks or open flames to come in contact

with the appliance when you open the door.

• Do not put flammable products or items that are wet

with flammable products in, near or on the

appliance.

Warning! Risk of damage to the

appliance.

• To prevent damage or discoloration to the enamel:

– do not put ovenware or other objects in the

appliance directly on the bottom.

– do not put aluminium foil directly on the bottom

of cavity of the appliance.

– do not put water directly into the hot appliance.

– do not keep moist dishes and food in the

appliance after you finish the cooking.

– be careful when you remove or install the

accessories.

• Discoloration of the enamel or stainless steel has no

effect on the performance of the appliance.

• Use a deep pan for moist cakes. Fruit juices cause

stains that can be permanent.

• This appliance is for cooking purposes only. It must

not be used for other purposes, for example room

heating.

• Always cook with the oven door closed.

Care and cleaning

Warning! Risk of injury, fire, or damage

to the appliance.

• Before maintenance, deactivate the appliance and

disconnect the mains plug from the mains socket.

• Make sure the appliance is cold. There is the risk

that the glass panels can break.

• Replace immediately the door glass panels when

they are damaged. Contact the Authorised Service

Centre.

• Be careful when you remove the door from the

appliance. The door is heavy!

• Clean regularly the appliance to prevent the

deterioration of the surface material.

• Clean the appliance with a moist soft cloth. Only use

neutral detergents. Do not use any abrasive

products, abrasive cleaning pads, solvents or metal

objects.

• If you use an oven spray, follow the safety

instruction on it's packaging.

• Do not clean the catalytic enamel (if applicable) with

any kind of detergent.

Internal lighting

Warning! Risk of electric shock.

• The type of light bulb or halogen lamp used for this

appliance is for household appliances only. Do not

use it for house lighting.

• Before replacing the lamp, disconnect the appliance

from the power supply.

• Only use lamps with the same specifications.

Service

• To repair the appliance contact an Authorised

Service Centre.

• Use original spare parts only.

Disposal

Warning! Risk of injury or suffocation.

• Disconnect the appliance from the mains supply.

• Cut off the mains electrical cable close to the

appliance and dispose of it.

• Remove the door catch to prevent children or pets

from becoming trapped in the appliance.

4

Summary of Contents for KOU20711XB

Page 1: ...KOU20711XB User Manual Oven Benutzerin formation Backofen ...

Page 2: ...and knowledge if they have been given supervision or instruction concerning the use of the appliance in a safe way and understand the hazards involved Children between 3 and 8 years of age and persons with very extensive and complex disabilities shall be kept away unless continuously supervised Children of less than 3 years of age should be kept away unless continuously supervised Do not let child...

Page 3: ...ance by the handle The kitchen cabinet and the recess must have suitable dimensions Keep the minimum distance from other appliances and units Install the appliance in a safe and suitable place that meets installation requirements Parts of the appliance carry current Close the appliance with furniture to prevent touching the dangerous parts The appliance is equipped with an electric cooling system ...

Page 4: ...d food in the appliance after you finish the cooking be careful when you remove or install the accessories Discoloration of the enamel or stainless steel has no effect on the performance of the appliance Use a deep pan for moist cakes Fruit juices cause stains that can be permanent This appliance is for cooking purposes only It must not be used for other purposes for example room heating Always co...

Page 5: ...chapters Initial Cleaning Remove all accessories from the oven Refer to Care and cleaning chapter Clean the oven and the accessories before first use Put the accessories back to their initial position Preheating Preheat the empty oven before first use 1 Set the function Set the maximum temperature 2 Let the oven operate for 1 hour 3 Set the function Set the maximum temperature 4 Let the oven opera...

Page 6: ... is not interrupted and to en sure that the oven operates with the highest energy efficiency possible When you use this function the temperature in the cavity may differ from the set temperature The heat ing power may be reduced For general energy saving recommen dations refer to Energy Efficiency chapter Energy Saving This func tion was used to comply with the energy efficiency class according to...

Page 7: ...ng To prevent this the oven has a safety thermostat which interrupts the power supply The oven turns on again automatically when the temperature drops Hints and tips Warning Refer to Safety chapters The temperature and baking times in the tables are guidelines only They depend on the recipes and the quality and quantity of the ingredients used Cooking recommendations The oven has four shelf positi...

Page 8: ...asting table Cakes Food Top Bottom Heat Fan Cooking Time min Comments Tempera ture C Shelf posi tion Tempera ture C Shelf posi tion Whisked recipes 170 2 165 2 1 and 3 45 60 In a cake mould Shortbread dough 170 2 160 2 1 and 3 20 30 In a cake mould Butter milk cheese cake 170 1 165 2 70 80 In a 26 cm cake mould Apple cake Apple pie 170 1 160 2 1 and 3 80 100 In two 20 cm cake moulds on a wire shel...

Page 9: ...35 In a 20 cm cake mould Victoria sandwich 180 1 or 2 170 2 45 70 Left right in a 20 cm cake mould Rich fruit cake 160 1 150 2 110 120 In a 24 cm cake mould Victoria sandwich1 170 1 160 1 50 60 In a 20 cm cake mould 1 Preheat the oven for 10 minutes Bread and pizza Food Top Bottom Heat Fan Cooking Time min Comments Tempera ture C Shelf posi tion Tempera ture C Shelf posi tion White bread1 190 1 19...

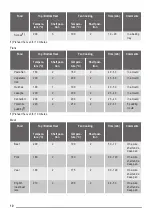
Page 10: ... 45 60 In a mould Quiches 190 1 190 1 40 50 In a mould Lasagne 200 2 200 2 25 40 In a mould Cannelloni 200 2 200 2 25 40 In a mould Yorkshire pudding1 220 2 210 2 20 30 6 pudding mould 1 Preheat the oven for 10 minutes Meat Food Top Bottom Heat Fan Cooking Time min Comments Tempera ture C Shelf posi tion Tempera ture C Shelf posi tion Beef 200 2 190 2 50 70 On a wire shelf and a deep pan Pork 180 ...

Page 11: ... 2 190 2 110 130 Leg Chicken 200 2 200 2 70 85 Whole Turkey 180 1 160 1 210 240 Whole Duck 175 2 160 2 120 150 Whole Goose 175 1 160 1 150 200 Whole Rabbit 190 2 175 2 60 80 Cut in pieces Hare 190 2 175 2 150 200 Cut in pieces Pheasant 190 2 175 2 90 120 Whole Fish Food Top Bottom Heat Fan Cooking Time min Comments Tempera ture C Shelf posi tion Tempera ture C Shelf posi tion Trout Sea bream 190 2...

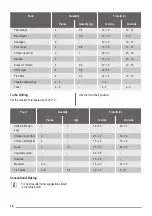
Page 12: ... 4 12 14 10 12 Toasted sandwiches 4 6 5 7 Toast 4 6 2 4 2 3 Turbo Grilling Set the maximum temperature of 200 C Use the third shelf position Food Quantity Time min Pieces kg 1st side 2nd side Rolled joints tur key 1 1 30 40 20 30 Chicken cut in two 2 1 25 30 20 30 Chicken drumsticks 6 15 20 15 18 Quail 4 0 5 25 30 20 25 Vegetable gratin 20 25 Scallops 15 20 Mackerel 2 4 15 20 10 15 Fish slices 4 6...

Page 13: ... 45 Fish fillet 0 3 kg pizza pan on wire shelf 180 3 35 45 Poached meat 0 25 kg baking tray or dripping pan 200 3 40 50 Shashlik 0 5 kg baking tray or dripping pan 200 3 25 35 Cookies 16 pieces baking tray or dripping pan 180 2 20 30 Macaroons 20 pieces baking tray or dripping pan 180 2 40 45 Muffins 12 pieces baking tray or dripping pan 170 2 30 40 Savory pastry 16 pieces baking tray or dripping ...

Page 14: ...cloth with warm water and a mild cleaning agent To clean metal surfaces use a dedicated cleaning agent Clean the oven interior after each use Fat accumulation or other food remains may result in a fire Clean all accessories after each use and let them dry Use a soft cloth with warm water and a cleaning agent Do not clean the accessories in the dishwasher Clean stubborn dirt with a special oven cle...

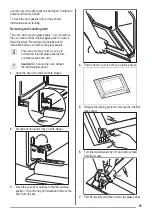
Page 15: ... close if you try to remove the internal glass panel before you remove the oven door Caution Do not use the oven without the internal glass panel 1 Open the door fully and hold both hinges 2 Lift and turn the levers fully on both hinges 3 Close the oven door halfway to the first opening position Then lift and pull forward and remove the door from its seat 4 Put the door on a soft cloth on a stable...

Page 16: ...o do if Problem Possible cause Remedy The cooking zones do not operate Refer to the operating instructions for the built in cooking surface The oven does not heat up The oven is deactivated Activate the oven The oven does not heat up The fuse is blown Make sure that the fuse is the cause of the malfunction If the fuse is blown again and again contact a qualified electrician The lamp does not opera...

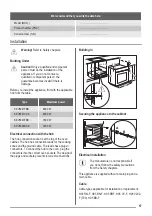
Page 17: ...b The hob connection socket is at the top of the oven cabinet The hob has connection leads for the cooking zones and the ground cable The leads have plug in connectors To connect the hob to the oven plug the connectors into the correct oven sockets The design of the plugs and sockets prevents incorrect connections Building In 589 598 594 114 19 21 540 570 558 min 550 20 600 min 560 3 9 Securing th...

Page 18: ...n clamp 1 2 3 4 5 1 2 3 4 5 1 2 3 4 5 1 2 3 4 5 230V 3 230V 1 400V 2N 400V 3N L1 L1 N L2 L1 N N L2 L3 L1 L2 L3 PE PE PE PE Energy efficiency Product Fiche and information according to EU 65 66 2014 Supplier s name Zanker Model identification KOU20711XB Energy Efficiency Index 94 8 Energy efficiency class A Energy consumption with a standard load conventional mode 0 83 kWh cycle Energy consumption ...

Page 19: ... residual heat to warm up other dishes Keep breaks between baking as short as possible when you prepare few dishes at one time Cooking with fan When possible use the cooking functions with fan to save energy Keep food warm Choose the lowest possible temperature setting to use residual heat and keep a meal warm Conventional Baking Function designed to save energy during cooking Environmental concer...

Page 20: ...geistigen Fähigkeiten oder mit mangelnder Erfahrung und oder mangelndem Wissen nur dann verwendet werden wenn sie durch eine für ihre Sicherheit zuständige Person beaufsichtigt werden oder in die sichere Verwendung des Geräts eingewiesen wurden und die mit dem Gerät verbundenen Gefahren verstanden haben Kinder zwischen 3 und 8 Jahren und Personen mit schweren Behinderungen oder Mehrfachbehinderung...

Page 21: ...eller seinem autorisierten Kundenservice oder einer gleichermaßen qualifizierten Person ausgetauscht werden um Gefahren durch elektrischen Strom zu vermeiden Gemäß den Verdrahtungsregeln muss bei Festverdrahtung eine Vorrichtung zur Trennung des Gerätes von der Spannungsversorgung vorhanden sein Sicherheitsanweisungen Montage WARNUNG Die Montage des Geräts darf nur von einer qualifizierten Fachkra...

Page 22: ...nen Die Trenneinrichtung muss mit einer Kontaktöffnungsbreite von mindestens 3 mm ausgeführt sein Das Gerät entspricht den EC Richtlinien Verwendung WARNUNG Verletzungs Verbrennungs Stromschlag oder Explosionsgefahr Dieses Gerät ist ausschließlich zur Verwendung im Haushalt bestimmt Nehmen Sie keine technischen Änderungen am Gerät vor Die Lüftungsöffnungen dürfen nicht abgedeckt werden Lassen Sie ...

Page 23: ...wenden befolgen Sie die Anweisungen auf der Verpackung Reinigen Sie die katalytische Emailbeschichtung falls vorhanden nicht mit Reinigungsmitteln Innenbeleuchtung WARNUNG Stromschlaggefahr Die Leuchtmittel oder die Halogenlampe in diesem Gerät sind nur für Haushaltsgeräte geeignet Benutzen Sie diese nicht für die Raumbeleuchtung Trennen Sie das Gerät von der Stromversorgung bevor Sie die Lampe au...

Page 24: ... lassen Sie ihn abkühlen Das Zubehör kann heißer werden als bei normalem Gebrauch Der Backofen kann Geruch und Rauch verströmen Sorgen Sie für eine ausreichende Raumbelüftung Täglicher Gebrauch WARNUNG Siehe Kapitel Sicherheitshinweise Ofenfunktionen Ofenfunktion Anwendung Stellung Aus Der Backofen ist ausgeschaltet Umluft Zum Braten oder zum Braten und Backen von Speisen mit derselben Gartemperat...

Page 25: ...ist 3 Um den Backofen auszuschalten drehen Sie den Backofen Einstellknopf in die Position Aus Kochzonen Einstellknöpfe Das Kochfeld kann mit den Kochzonen Einstellknöpfen bedient werden Lesen Sie bitte die Sicherheitshinweise in der Gebrauchsanleitung für das Kochfeld sorgfältig durch Kochstufen Knopfstellung Funktion 0 Stellung Aus 1 9 Kochstufen Zweikreiszonenschalter 1 Drehen Sie den Einstellkn...

Page 26: ...peratureinstellungen die Gardauer und die Einschubebene Finden Sie für ein bestimmtes Rezept keine konkreten Angaben orientieren Sie sich an einem ähnlichem Rezept Der Backofen ist mit einem speziellen System ausgestattet das die Luft zirkulieren lässt und den Dampf ständig wiederverwendet Mit diesem System macht das Garen mit Dampf Ihre Speisen innen weich und außen knusprig So verringert sich di...

Page 27: ...n 20 cm auf dem Kombirost Strudel Stol len 175 2 150 2 60 80 Auf dem Backblech Marmela denkuchen 170 2 160 2 1 und 3 30 40 In einer Ku chenform 26 cm Früchteku chen 170 2 155 2 50 60 In einer Ku chenform 26 cm Biskuit Bis kuit ohne Butter 170 2 160 2 90 120 In einer Ku chenform 26 cm Stollen Üppiger Früchteku chen 170 2 160 2 50 60 In einer Ku chenform 20 cm Rosinenku chen1 170 2 165 2 20 30 In ei...

Page 28: ...s Ku chenform 20 cm Üppiger Früchteku chen 160 1 150 2 110 120 In einer Ku chenform 24 cm Englischer Sandwich kuchen à la Victoria1 170 1 160 1 50 60 In einer Ku chenform 20 cm 1 Backofen 10 Min vorheizen Brot und Pizza Speise Ober Unterhitze Umluft Dauer Min Bemerkun gen Temperatur C Einschub ebene Temperatur C Einschub ebene Weißbrot1 190 1 195 1 60 70 1 2 Stück 500 g pro Stück Roggenbrot 190 1 ...

Page 29: ...lauf 200 2 200 2 45 60 In einer Auf laufform Quiche 190 1 190 1 40 50 In einer Auf laufform Lasagne 200 2 200 2 25 40 In einer Auf laufform Cannelloni 200 2 200 2 25 40 In einer Auf laufform Yorkshire Pudding1 220 2 210 2 20 30 6 Pudding formen 1 Backofen 10 Min vorheizen Fleisch Speise Ober Unterhitze Umluft Dauer Min Bemerkun gen Temperatur C Einschub ebene Temperatur C Einschub ebene Rindfleisc...

Page 30: ...m tiefen Blech Lamm 190 2 190 2 110 130 Keule Hähnchen 200 2 200 2 70 85 ganz Pute 180 1 160 1 210 240 Ganz Ente 175 2 160 2 120 150 Ganz Gans 175 1 160 1 150 200 Ganz Hasenbra ten 190 2 175 2 60 80 Zerlegt Hase 190 2 175 2 150 200 Zerlegt Fasan 190 2 175 2 90 120 Ganz Fisch Speise Ober Unterhitze Umluft Dauer Min Bemerkun gen Temperatur C Einschub ebene Temperatur C Einschub ebene Forelle Seebras...

Page 31: ...ote 4 6 5 7 Toast 4 6 2 4 2 3 Heißluftgrillen Stellen Sie die Höchsttemperatur von 200 C ein Nutzen Sie die dritte Einschubebene Speise Menge Dauer Min Stück kg 1 Seite 2 Seite Rollbraten Pute 1 1 30 40 20 30 Hähnchen in zwei Hälften 2 1 25 30 20 30 Hähnchenunter schenkel 6 15 20 15 18 Wachteln 4 0 5 25 30 20 25 Gemüsegratin 20 25 Jakobsmuscheln 15 20 Makrele 2 4 15 20 10 15 Fischscheiben 4 6 0 8 ...

Page 32: ...kblech oder tiefes Blech 180 3 35 45 Fischfilet 0 3 kg Pizzapfanne auf Kombirost 180 3 35 45 Fleisch pochiert 0 25 kg Backblech oder tiefes Blech 200 3 40 50 Schaschlik 0 5 kg Backblech oder tiefes Blech 200 3 25 35 Plätzchen 16 Stück Backblech oder tiefes Blech 180 2 20 30 Makronen 20 Stück Backblech oder tiefes Blech 180 2 40 45 Muffins 12 Stück Backblech oder tiefes Blech 170 2 30 40 Gebäck pik...

Page 33: ...ackofens einschieben Nach der Hälfte der Gar dauer die Speise wenden Backofen 3 Min vor heizen Reinigung und Pflege WARNUNG Siehe Kapitel Sicherheitshinweise Hinweise zur Reinigung Feuchten Sie ein weiches Tuch mit warmem Wasser und einem milden Reinigungsmittel an und reinigen Sie damit die Vorderseite des Ofens Reinigen Sie die Metalloberflächen mit einem speziellen Reinigungsmittel Reinigen Sie...

Page 34: ...torisierten Kundendienst Lesen Sie in den allgemeinen Informationen zur Reinigung nach was bei der Reinigung der Türdichtung beachtet werden muss Aus und Einbauen der Tür Die Backofentür ist mit zwei Glasscheiben ausgestattet Die Backofentür und die innere Glasscheibe können zur Reinigung ausgebaut werden Lesen Sie die gesamte Anleitung Aus und Einbauen der Tür bevor Sie die Glasscheiben entfernen...

Page 35: ... und anschließend die Backofentür ein Bei korrektem Einbau macht die Türabdeckung ein Klickgeräusch Achten Sie darauf die innere Glasscheibe richtig in die Aufnahmen einzusetzen A Austauschen der Lampe WARNUNG Stromschlaggefahr Die Lampe kann heiß sein 1 Schalten Sie den Backofen aus Warten Sie bis der Backofen abgekühlt ist 2 Trennen Sie den Ofen von der Netzversorgung 3 Breiten Sie ein Tuch auf ...

Page 36: ...fen Lassen Sie die Speisen nach Been digung des Gar oder Backvorgangs nicht länger als 15 20 Minuten im Backofen stehen Servicedaten Wenn Sie das Problem nicht selbst lösen können wenden Sie sich an Ihren Händler oder einen autorisierten Kundendienst Die vom Kundendienst benötigten Daten finden Sie auf dem Typenschild Das Typenschild befindet sich am Frontrahmen des Garraums Entfernen Sie das Type...

Page 37: ...für Schäden die aufgrund der Nichtbeachtung der in den Sicherheitshinweisen beschriebenen Sicherheitsvorkehrungen entstehen Das Gerät wird ohne Netzstecker und Netzkabel geliefert Kabel Einsetzbare Kabeltypen für Montage oder Austausch H07 RN F H05 RN F H05 RRF H05 VV F H05 V2V2 F T90 H05 BB F Näheres zum Kabelquerschnitt siehe Gesamtleistung auf dem Typenschild Anschluss der Klemmleiste Das Gerät...

Page 38: ...llgeräte Verfahren zur Messung der Gebrauchseigenschaften Energie sparen Der Backofen verfügt über Funktionen mit deren Hilfe Sie beim täglichen Kochen Energie sparen können Allgemeine Tipps Achten Sie darauf dass die Backofentür während des Ofenbetriebs richtig geschlossen ist Die Gerätetür darf während des Garvorgangs nicht zu oft geöffnet werden Halten Sie die Türdichtung sauber und stellen Sie...

Page 39: ...wenn Sie die Restwärme zum Warmhalten von Speisen nutzen möchten Backen mit Ober Unterhitze Diese Funktion ist entwickelt worden um während des Garvorgangs Energie zu sparen Umwelttipps Recyceln Sie Materialien mit dem Symbol Entsorgen Sie die Verpackung in den entsprechenden Recyclingbehältern Recyceln Sie zum Umwelt und Gesundheitsschutz elektrische und elektronische Geräte Entsorgen Sie Geräte ...

Page 40: ...www electrolux com shop 867348579 A 392018 ...

Reviews: