background image

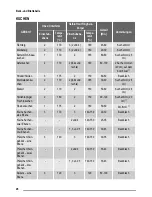
GERICHT

Ober- und Unter-

hitze

Heißluft mit Ring-

heizkörper

Garzeit

[Min.]

Anmerkungen

Ein-

schub-

ebene

Tempe-

ratur

[°C]

Ein-

schub-

ebene

Tempe-

ratur

[°C]

Nudelauflauf

2

200

2

180

40-50

Auflaufform

Gemüseauflauf

2

200

2

175

45-60

Auflaufform

Quiche

1

180

1

180

50-60

Auflaufform

1)

Lasagne

2

180-190

2

180-190

25-40

Auflaufform

1)

Cannelloni

2

180-190

2

180-190

25-40

Auflaufform

1)

1) 10 Minuten vorheizen.

FLEISCH

GERICHT

Ober- und Unter-

hitze

Heißluft mit Ring-

heizkörper

Garzeit

[Min.]

Anmerkungen

Ein-

schub-

ebene

Tempe-

ratur

[°C]

Ein-

schub-

ebene

Tempe-

ratur

[°C]

Rindfleisch

2

200

2

190

50-70

Kombirost

Schweinefleisch

2

180

2

180

90-120

Kombirost

Kalbfleisch

2

190

2

175

90-120

Kombirost

Roastbeef, eng-
lisch, rosa

2

210

2

200

50-60

Kombirost

Roastbeef, eng-
lisch, medium

2

210

2

200

60-70

Kombirost

Roastbeef, eng-
lisch, durchgebra-
ten

2

210

2

200

70-75

Kombirost

Schweineschulter

2

180

2

170

120-150

mit Schwarte

Schweinshaxe

2

180

2

160

100-120

2 Stk.

Lammfleisch

2

190

2

175

110-130

Keule

Hähnchen

2

220

2

200

70-85

ganz

Pute

2

180

2

160

210-240

ganz

Ente

2

175

2

220

120-150

ganz

Gans

2

175

1

160

150-200

ganz

Kaninchen

2

190

2

175

60-80

zerlegt

Hase

2

190

2

175

150-200

zerlegt

28


Summary of Contents for KOU55602

Page 1: ...User manual Oven Benutzer information Backofen KOU55602 ...

Page 2: ...tion and use causes injuries and damages Always keep the instructions with the appli ance for future reference Children and vulnerable people safety Warning Risk of suffocation injury or permanent disability This appliance can be used by children aged from 8 years and above and persons with reduced physical sensory or mental capabilities or lack of ex perience and knowledge if they are supervised ...

Page 3: ...t the electrical information on the rat ing plate agrees with the power supply If not con tact an electrician Always use a correctly installed shockproof socket Do not use multi plug adapters and extension ca bles Make sure not to cause damage to the mains plug and to the mains cable Contact the Service or an electrician to change a damaged mains cable Do not let mains cables to come in touch with...

Page 4: ...arranty law Use a deep pan for moist cakes Fruit juices cause stains that can be permanent Care and Cleaning Warning Risk of injury fire or damage to the appliance Before maintenance deactivate the appliance and disconnect the mains plug from the mains socket Make sure the appliance is cold There is the risk that the glass panels can break Replace immediately the door glass panels when they are da...

Page 5: ...pplicable Clean the appliance before first use Important Refer to the chapter Care and cleaning Setting the time You must set the time before you operate the oven When you connect the appliance to the electrical supply or after a power cut the indicator for the Time of Day function flashes Press the or button to set the correct time After approximately five seconds the flashing stops and the displ...

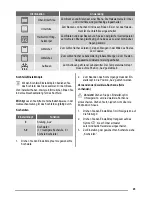
Page 6: ...pplication Off position The appliance is off Conventional Cook ing To bake and roast on one oven level The top and bottom heating ele ments operate at the same time Bottom Heat To bake cakes with crispy or crusty bottom Only the bottom heating element operates True Fan Cooking To roast or roast and bake food with the same cooking temperature on more than one shelf without flavour transference Gril...

Page 7: ... 4 Selection button 5 Button Clock function Application Time of day To set change or check the time of day Minute Minder To set a countdown time This function has no effect on the operation of the oven Duration To set how long the appliance must operate End To set when the appliance must be deactivated You can use Duration and End at the same time to set the time when the appliance must be activat...

Page 8: ...oor The appliance has a special system which circulates the air and constantly recycles the steam With this system you can cook in a steamy environment and keep the food soft inside and crusty outside It de creases the cooking time and energy consumption to a minimum Moisture can condense in the appliance or on the door glass panels This is normal Always stand back from the appliance when you open...

Page 9: ...n a baking tray Jam tart 2 170 2 left and right 165 30 40 In a 26 cm cake mould Sponge cake 2 170 2 160 50 60 In a 26 cm cake mould Christmas cake Rich fruit cake 2 160 2 150 90 120 In a 20 cm cake mould1 Plum cake 1 175 2 160 50 60 In a bread tin1 Small cakes one level 3 170 3 140 150 20 30 In a baking tray Small cakes two levels 2 and 4 140 150 25 35 In a baking tray Small cakes three levels 1 3...

Page 10: ...t for 10 minutes BREAD AND PIZZA TYPE OF DISH Conventional Cooking True Fan Cooking Cooking time min Notes Shelf posi tion Temp C Shelf posi tion Temp C White bread 1 190 1 190 60 70 1 2 pieces 500 gr per piece1 Rye bread 1 190 1 180 30 45 In a bread tin Bread rolls 2 190 2 2 and 4 180 25 40 6 8 rolls in a bak ing tray1 Pizza 1 230 250 1 230 250 10 20 In a baking tray or a deep pan1 Scones 3 200 3...

Page 11: ...2 180 90 120 On a wire shelf Veal 2 190 2 175 90 120 On a wire shelf English roast beef rare 2 210 2 200 50 60 On a wire shelf English roast beef medium 2 210 2 200 60 70 On a wire shelf English roast beef well done 2 210 2 200 70 75 On a wire shelf Shoulder of pork 2 180 2 170 120 150 With rind Shin of pork 2 180 2 160 100 120 2 pieces Lamb 2 190 2 175 110 130 Leg Chicken 2 220 2 200 70 85 Whole ...

Page 12: ...ges 8 4 max 12 15 10 12 Pork chops 4 600 4 max 12 16 12 14 Chicken cut in 2 2 1000 4 max 30 35 25 30 Kebabs 4 4 max 10 15 10 12 Breast of chicken 4 400 4 max 12 15 12 14 Hamburger 6 600 4 max 20 30 Fish fillet 4 400 4 max 12 14 10 12 Toasted sandwiches 4 6 4 max 5 7 Toast 4 6 4 max 2 4 2 3 Defrosting TYPE OF DISH g Defrosting time min Further defrosting time min Notes Chicken 1000 100 140 20 30 Pl...

Page 13: ...ylamides Important According to the newest scientific knowledge if you brown food specially the one which contains starch acrylamides can pose a health risk Thus we recommend that you cook at the lowest temperatures and do not brown food too much Care and cleaning Warning Refer to the Safety chapters Clean the front of the appliance with a soft cloth with warm water and a cleaning agent To clean m...

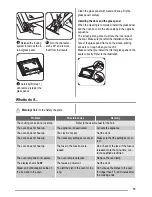
Page 14: ...e careful when you change the oven lamp There is a risk of electrical shock Before you change the oven lamp Deactivate the oven Remove the fuses in the fuse box or deactivate the circuit breaker Put a cloth on the bottom of the oven to prevent damage to the oven light and glass cover Always hold the halogen lamp with a cloth to prevent grease residue from burning on the lamp 1 Turn the glass cover...

Page 15: ...o the illustration What to do if Warning Refer to the Safety chapters Problem Possible cause Remedy The cooking zones do not operate Refer to the user manual for the hob The oven does not heat up The appliance is deactivated Activate the appliance The oven does not heat up The clock is not set Set the clock The oven does not heat up The necessary settings are not set Make sure that the settings ar...

Page 16: ...llation of the appliance If you do not contact a qualified or competent person the guarantee becomes invalid if there is damage Before you install the appliance fit it with the appli cable hob from the table Type Maximum power KEV6046XXK 7600 W Electrical connection with the hob The hob connection socket is at the top of the oven cabinet The hob has connection leads for the cooking zones and the g...

Page 17: ...le to the terminal board at tach it with a junction clamp 1 2 3 4 5 1 2 3 4 5 1 2 3 4 5 1 2 3 4 5 230V 3 230V 1 400V 2N 400V 3N L1 L1 N L2 L1 N N L2 L3 L1 L2 L3 PE PE PE PE Environment concerns The symbol on the product or on its packaging indicates that this product may not be treated as household waste Instead it should be taken to the appropriate collection point for the recycling of electrical...

Page 18: ... Der Hersteller haftet nicht für Verletzungen oder Schäden die durch eine fehlerhafte Montage entstehen Bewahren Sie die Anleitung zum Nachschlagen auf Sicherheit von Kindern und schutzbedürftigen Personen Warnung Es besteht Erstickungsgefahr das Risiko von Verletzungen oder permanenten Behinderungen Dieses Gerät kann dann von Kindern ab 8 Jahren von Personen mit einge schränkten körperlichen sens...

Page 19: ...e müssen die passenden Abmessungen aufweisen Die Mindestabstände zu anderen Geräten und Kü chenmöbeln sind einzuhalten Stellen Sie sicher dass das Gerät unterhalb von bzw zwischen sicheren Konstruktionen montiert wird Einige Teile des Geräts sind stromführend Das Kü chenmöbel muss auf allen Seiten mit dem Gerät ab schließen um einen Kontakt mit stromführenden Teilen zu vermeiden Die Seiten des Ger...

Page 20: ...euchten oder nas sen Händen oder wenn es mit Wasser in Kontakt ge kommen ist Üben Sie keinen Druck auf die geöffnete Gerätetür aus Benutzen Sie das Gerät nicht als Arbeits oder Ab stellfläche Halten Sie die Tür immer geschlossen wenn das Gerät in Betrieb ist Öffnen Sie die Gerätetür vorsichtig Wenn Sie Zuta ten mit Alkohol verwenden kann ein Alkohol Luftge misch entstehen Achten Sie beim Öffnen de...

Page 21: ...us haltsgeräte geeignet Benutzen Sie sie nicht für die Raumbeleuchtung Warnung Stromschlaggefahr Trennen Sie das Gerät von der Stromversorgung bevor Sie die Lampe austauschen Verwenden Sie dazu eine Lampe mit der gleichen Leistung Entsorgung Warnung Verletzungs und Erstickungsgefahr Trennen Sie das Gerät von der Stromversorgung Schneiden Sie das Netzkabel ab und entsorgen Sie es Entfernen Sie das ...

Page 22: ... eine Stunde lang einge schaltet 3 Stellen Sie die Funktion und die Höchsttempe ratur ein 4 Lassen Sie das Gerät zehn Minuten lang einge schaltet 5 Stellen Sie die Funktion und die Höchsttempe ratur ein 6 Lassen Sie das Gerät zehn Minuten lang einge schaltet Das Zubehör kann heißer werden als bei normalem Ge brauch Das Gerät kann Geruch und Rauch verströ men Das ist normal Sorgen Sie für eine ausr...

Page 23: ...Kochfeld Einstellknöpfen bedienen Sie das Kochfeld das Sie zusammen mit dem Back ofen installiert haben Weitere Informationen finden Sie in der Gebrauchsanleitung für das Kochfeld Wichtig Lesen Sie bitte die Sicherheitshinweise in der Gebrauchsanleitung für das Kochfeld sorgfältig durch Kochstufen Einstellknopf Funktion 0 Stellung Aus 1 9 Kochstufen 1 niedrigste Kochstufe 9 höchste Kochstufe 1 Dre...

Page 24: ... ein und wieder ausgeschaltet werden soll Stellen Sie zunächst die Dauer und anschließend das Ende ein Einstellen der Uhrfunktionen 1 Stellen Sie eine Backofenfunktion und die Tempe ratur für Dauer und Ende ein Für den Kurzzeit Wecker ist diese Einstellung nicht erforderlich 2 Drücken Sie mehrmals die Auswahltaste bis die Anzeige für die erforderliche Uhrfunktion im Dis play blinkt 3 Drücken Sie o...

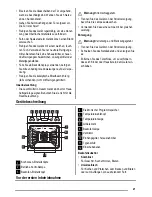
Page 25: ...ei auf ein Minimum reduziert Es kann sich Feuchtigkeit im Gerät oder an den Glastüren niederschlagen Das ist normal Stehen Sie beim Öffnen der Tür während des Betriebs stets in sicherer Entfernung zum Gerät Um die Konden sation zu reduzieren heizen Sie vor dem Garen den Backofen immer 10 Minuten vor Wischen Sie das Gerät nach jedem Gebrauch mit ei nem Tuch trocken Stellen Sie keine Gegenstände dir...

Page 26: ...Marmeladenku chen 2 170 2 links und rechts 165 30 40 Kuchenform 26 cm Biskuit 2 170 2 160 50 60 Kuchenform 26 cm Stollen üppiger Früchtekuchen 2 160 2 150 90 120 Kuchenform 20 cm 1 Rosinenkuchen 1 175 2 160 50 60 Brotform 1 Kleine Kuchen eine Ebene 3 170 3 140 150 20 30 Backblech Kleine Kuchen zwei Ebenen 2 und 4 140 150 25 35 Backblech Kleine Kuchen drei Ebenen 1 3 und 5 140 150 30 45 Backblech P...

Page 27: ...2 150 110 120 Kuchenform 24 cm Englischer Sand wichkuchen à la Victoria 1 170 2 160 50 60 Kuchenform 20 cm 1 Backofen 10 Minuten vorheizen BROT UND PIZZA GERICHT Ober und Unter hitze Heißluft mit Ring heizkörper Garzeit Min Anmerkungen Ein schub ebene Tempe ratur C Ein schub ebene Tempe ratur C Weißbrot 1 190 1 190 60 70 1 2 Stück 500 g pro Stück1 Roggenbrot 1 190 1 180 30 45 Brotform Brötchen 2 1...

Page 28: ... Ein schub ebene Tempe ratur C Ein schub ebene Tempe ratur C Rindfleisch 2 200 2 190 50 70 Kombirost Schweinefleisch 2 180 2 180 90 120 Kombirost Kalbfleisch 2 190 2 175 90 120 Kombirost Roastbeef eng lisch rosa 2 210 2 200 50 60 Kombirost Roastbeef eng lisch medium 2 210 2 200 60 70 Kombirost Roastbeef eng lisch durchgebra ten 2 210 2 200 70 75 Kombirost Schweineschulter 2 180 2 170 120 150 mit S...

Page 29: ...nfisch Lachs 2 190 2 175 35 60 4 6 Filets Grillstufe 1 Den leeren Backofen 10 Minuten vorheizen Menge Grillstufe 1 Garzeit Min GERICHT Stücke g Einschub ebene Tempera tur C 1 Seite 2 Seite Filetsteaks 4 800 4 max 12 15 12 14 Beefsteaks 4 600 4 max 10 12 6 8 Bratwürste 8 4 max 12 15 10 12 Schweinskotelett 4 600 4 max 12 16 12 14 Hähnchen in zwei Hälften 2 1000 4 max 30 35 25 30 Spieße 4 4 max 10 15...

Page 30: ...n 300 30 40 10 20 Butter 250 30 40 10 15 Sahne 2 x 200 80 100 10 15 Sahne lässt sich auch mit noch leicht gefrorenen Stellen gut aufschlagen Kuchen 1400 60 60 Dörren Heißluft mit Ringheizkörper Backbleche mit Backpapier abdecken GEMÜSE GERICHT Einschubebene Temperatur C Dauer Std 1 Ebene 2 Ebenen Bohnen 3 1 4 60 70 6 8 Paprika 3 1 4 60 70 5 6 Suppengemüse 3 1 4 60 70 5 6 Pilze 3 1 4 50 60 6 8 Kräu...

Page 31: ...genständen oder im Geschirrspüler gereinigt wer den Die Antihaftbeschichtung kann dadurch zerstört werden Geräte mit Edelstahl oder Aluminiumfront Reinigen Sie die Backofentür nur mit einem nas sen Schwamm und trocknen Sie sie mit einem weichen Tuch ab Verwenden Sie keine Stahlwolle Säuren oder Scheuer mittel da diese die Oberflächen beschädigen können Reinigen Sie das Bedienfeld auf gleiche Weise...

Page 32: ...sscheiben ab zunehmen solange die Tür noch am Gerät montiert ist Vorsicht Verwenden Sie das Gerät nicht ohne die Glasscheiben 1 Klappen Sie die Backofentür ganz auf und greifen Sie an die beiden Türscharniere 2 Heben Sie die Hebel an den beiden Scharnie ren an und klappen Sie sie nach vorn 3 Schließen Sie die Backofentür bis zur ers ten Raststellung halb Anschließend ziehen Sie sie nach vorn aus d...

Page 33: ...tig sind Der Backofen heizt nicht auf Die Sicherung im Sicherungskasten hat ausgelöst Prüfen Sie die Sicherung Falls die Sicherung öfter als einmal auslöst wenden Sie sich an eine Elektro fachkraft Die Backofenlampe leuchtet nicht Die Backofenlampe ist defekt Ersetzen Sie die Backofenlampe Im Display wird 12 00 angezeigt Es gab einen Stromausfall Stellen Sie die Uhrzeit ein Dampf und Kondenswasser...

Page 34: ...ichtigen Buchsen am Backofen Die Stecker und Buchsen sind so ausgelegt dass keine falschen Anschlüsse vorgenommen werden können 573 594 5 589 558 548 20 min 550 min 560 600 20 Elektroinstallation Warnung Der elektrische Anschluss muss von einer qualifizierten Fachkraft vorgenommen werden Der Hersteller haftet nicht für Schäden die auf grund der Nichtbeachtung der Sicherheitsvorkeh rungen des Kapit...

Page 35: ...ormaler Haushaltsabfall zu behandeln ist sondern an einem Sammelpunkt für das Recycling von elektrischen und elektronischen Geräten abgegeben werden muss Durch Ihren Beitrag zum korrekten Entsorgen dieses Produkts schützen Sie die Umwelt und die Gesundheit Ihrer Mitmenschen Umwelt und Gesundheit werden durch falsches Entsorgen gefährdet Weitere Informationen über das Recycling dieses Produkts erha...

Page 36: ...www electrolux com shop 397292301 B 342012 ...

Reviews: