background image

31

In this fully integrated appliance the controls are located on the
top of the door. When selecting a programme, the door needs
to be open.

1. Check that the baskets have been 

loaded correctly and that the spray 
arms can rotate freely  

2. Turn on the water tap

3. Press the On/Off push button

All the push buttons indicator lights will illuminate.

4. Setting and starting the programme 

Press the push button corresponding to the required 
programme (see "Washing programmes" chart). 
The indicator light corresponding to the programme 
remains illuminated while the other programme indicator 
lights will turn off. 
The start of the washing programme will occur only once 
closed the door, until then it is possible to change the 
programme selection simply pressing the push button of 
another programme.
Close the dishwasher door, the programme will start 
automatically. 

5. Interrupting, changing or cancelling 

a washing programme

Interrupt, change or cancel a washing programme in 
progress ONLY if it’s absolutely necessary

To interrupt a washing programme

Attention! Hot steam may escape when the door is 
opened. There is risk of scalding. Open the door 
carefully.

Open the dishwasher door; the programme will stop. 
Close the door; the programme will start from the 
point in which it was interrupted.

pressing the On/Off (in this case all the indicator 
lights turn off). Press the On/Off push button again; 
the programme will start from the point in which it was 
interrupted.

To change a washing programme

Open the dishwasher door.
Press the push button of the programme you want to 
select for about 6 seconds, the indicator light of the 
running programme starts to flash. 
The indicator light of the running programme turns off 
and at the same time the indicator light of the new 
selected programme will illuminate.
The new programme will start automatically once the 
dishwasher door is closed. 

To cancel a washing programme

Open the dishwasher door. 
Press simultaneously the function push buttons and 3
for about 2 seconds, the indicator light of the running 
programme will start flashing. After about 2 seconds all 
the indicator lights of the programme push buttons will 
illuminate indicating that the running programme has 
been cancelled and that the machine has returned to 
setting mode.
It is now possible to select and start a new washing 
programme.

6. Setting/cancelling the "delay start"

The setting of the delay start occurs after selecting 
the programme.

Setting the "delay start"

Press the "delay start" push button until the indicator light 
corresponding to the chosen hours flashes (3, 6 or 9 
hours).
The countdown will start only once that the door has 
been closed, until that moment it is still possible to 
change the selection made. If the countdown has not yet 
started (closen door) it is also possible to cancel the 
delay selection by simply pressing the "delay start" push 
button until the indicator lights of the hours are no longer 
illuminated. (In this case the selected washing 
programme will start automatically once the door is 
closed).
Close the door, the countdown will start automatically.
The countdown will decrease with step of 3 hours.
The opening of the door will not stop the countdown.
Once the delay start has elapsed the programme will 
start automatically.

Cancelling a "delay start" in progress

To cancel a delay start in progress you must follow the 
same procedure as for cancelling a running programme 
(see "To cancel a washing programme") .
In this case the washing programme must be set again.

7. End of the washing programme

The dishwasher will automatically stop and an 
intermittent audible signal informs you of the end of the 
washing programme.
The indicator light of the programme just ended remains 
illuminated and the end of programme indicator light 
will illuminate.
Hot steam may escape from the appliance when opening 
the door immediately after the end of the programme, 
therefore, open the door carefully.

Switch off the dishwasher by pressing the On/Off push 
button.

Unloading the dishwasher

Hot dishes are sensitive to knocks. The dishes should 
therefore be allowed to cool down before removing from 
the appliance.
Leave the dishes in the dishwasher for approx. 15 
minutes, with the door ajar, after the end of programme 
so that they dry better and will be cooler.
Empty the lower basket first and then the upper one; this 
will avoid water dripping from the upper basket onto the 
dishes in the lower one.

When the washing programme has finished, it is
recommended that the dishwasher is unplugged and the
water tap turned off.

Starting a washing programme

Summary of Contents for ZKS 5640

Page 1: ...Geschirrspüler ZKS 5640 Dishwasher Bedienungsanleitung Seite 2 Instruction book page 19 ...

Page 2: ... Disposal 20 Economical and ecological dishwashing 20 Installation instructions 21 Building in 21 Levelling 21 Fixing to adjacent units 21 Water supply connections 21 Water outlet hose connection 22 Electrical connection 22 Description of the appliance 23 The control panel 23 Prior to using for the first time 24 Setting the water softener 24 Filling with salt 25 Rinse aid 25 In daily use 27 Loadin...

Page 3: ...iced by an authorised service engineer and only genuine spare parts should be used Under no circumstances should you attempt to repair the machine yourself Repairs carried out by inexperienced persons may cause injury or serious malfunctioning Contact your local consumer services department Always insist on genuine spare parts Disposal Dispose of the dishwasher packaging material correctly All pac...

Page 4: ... or to a purpose made quick coupling tap such as the Press block The water pressure must be within the limits given in the Technical specifications Your local Water Authority will advise you on the average mains pressure in your area The water inlet hose must not be kinked crushed or entangled when it is being connected up The dishwasher features fill and drain hoses which can be turned either to ...

Page 5: ... appliances are supplied with a security device to protect against the return of dirty water back into the machine If the spigot of your sink has a no return valve incorporated this can prevent the correct draining of your dishwasher We advise you therefore to remove it Electrical connection Information concerning the electrical connection is given on the rating plate on the edge of the dishwasher...

Page 6: ...imultaneously function push buttons 2 and 3 the indicator lights of the function push buttons 1 2 and 3 start flashing 3 Press the function push button 3 the indicator lights of function push buttons 1 and 2 turn off while the indicator light of the push button 3 goes on flashing at the same time the end of programme indicator light illuminates indicating that the audible signals are active 4 To d...

Page 7: ... new level proceed as follows 1 With the dishwasher switched off press the On Off push button all indicator lights of the programme push buttons will illuminate setting mode 2 Press simultaneously function push buttons 2 and 3 the indicator lights of the function push buttons 1 2 and 3 start flashing 3 Press the function push button 1 the indicator lights of function push buttons 2 and 3 turn off ...

Page 8: ...ve then this can take longer The function of the machine is not affected Do not worry if water over flows from the unit when filling with salt this is quite normal Rinse aid Rinse aid is automatically added during the last rinse ensuring thorough rinsing and spot and streak free drying The dispenser which is positioned inside the door holds about 110 ml of rinse aid which is sufficient for 16 40 d...

Page 9: ... simultaneously function push buttons 2 and 3 the indicator lights of the function push buttons 1 2 and 3 start flashing 3 Press the function push button 2 the indicator lights of function push buttons 1 and 3 turn off while the indicator light of the push button 2 goes on flashing at the same time the end of programme indicator light illuminates indicating that the inflow of rinse is active 4 To ...

Page 10: ...her Before loading the dishes you should Remove large left overs Soften remnants of burnt food in pans When loading the dishes and cutlery please note Dishes and cutlery must not impede the rotation of the spray arms Load hollow items such as cups glasses pans etc with the opening downwards so that water cannot collect in the container or a deep base Dishes and items of cutlery must not lie inside...

Page 11: ...e front positions near the door Before closing the door ensure that the spray arms can rotate freely Adjusting the height of the upper basket If washing very large plates you can load them in the lower basket after moving the upper basket to the higher position To move to the higher position proceed as follows 1 Move the front runner stops A of the upper basket outwards and slide the basket out 2 ...

Page 12: ...es in conjunction with concentrated detergents reduces pollution and is good for your dishes these wash programmes are specially matched to the dirt dissolving properties of the enzymes in the concentrated detergent For this reason 50 C wash programmes in which concentrated detergents are used can achieve the same results that can otherwise only be achieved using 65 C programmes Combi detergents I...

Page 13: ... load breakfast and dinner crockery and cutlery 2 Testing programme for EN 50242 see Hints for Test Centres This programme developed for the use of detergents with enzymes allows you to achieve with reduced consumption of energy the same cleaning results that would otherwise be obtained only with the 65 C programmes and conventional detergents To compensate the lower temperature the duration of th...

Page 14: ...t the running programme has been cancelled and that the machine has returned to setting mode It is now possible to select and start a new washing programme 6 Setting cancelling the delay start The setting of the delay start occurs after selecting the programme Setting the delay start Press the delay start push button until the indicator light corresponding to the chosen hours flashes 3 6 or 9 hour...

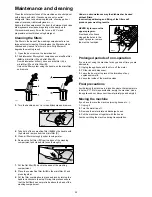
Page 15: ... thoroughly 7 Put the flat filter D back in the base of the washing compartment 8 Place the coarse fine filter A B in the microfilter C and press together 9 Put the filter combination in place and lock by turning the handle clockwise to the stop During this process ensure that the flat filter does not protrude above the base of the washing compartment Under no circumstances may the dishwasher be u...

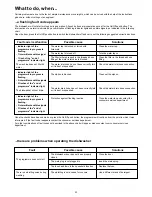
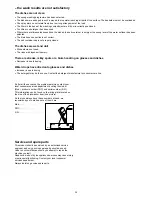
Page 16: ...me in progress is flashing 2 intermittent audible signals 2 flashes of the end of programme indicator light The dishwasher will not drain Indicator light of the programme in progress is flashing 3 intermittent audible signals 3 flashes of the end of programme indicator light Fault code malfunction Possible cause Solutions The water tap is blocked or furred with limescale The water tap is turned of...

Page 17: ...or a bluish coating on glasses and dishes Decrease rinse aid dosing Water drops have dried onto glasses and dishes Increase rinse aid dosing The detergent may be the cause Contact the detergent manufacturer s consumer care line If after all these checks the problem persists contact your local consumer services department quoting the model Mod product number PNC and serial number S N This informati...

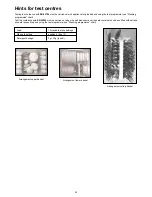
Page 18: ...must be carried out when the salt dispenser and rinse aid container have been filled with salt and rinse aid respectively and using the test programme see Washing programmes chart Hints for test centres Load 12 standard place settings Rinse aid setting position 4 type III Detergent dosage 5g 25g type B Arrangement upper basket Arrangement lower basket Arrangement cutlery basket ...

Page 19: ...GB D 152968 81 0 0 08 03 ...

Reviews: