background image

- 7 -

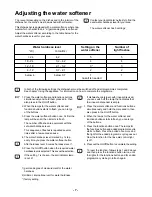
Water hardness level            

°d 

1)

mmol/l 

2)

Setting on the

water softener

Number of

light flashes

> 24

4,2

18 - 24

3,2 - 4,2

12 - 18

2,1 - 3,2

4 - 12

0,7 - 2,1

below 4

below 0,7

5

4

3 * 

2

1

5

4

2

1

no salt is needed 

1. Press the water softener and functions buttons 

simultaneously and hold them pressed in, then 
also press in the On/Off button.

2. When the lamps for the water softener and 

functions buttons starts to flash, you can let go 
of the buttons.

3. Press the water softener button once. At first the

lamp will be solid, then it starts to flash. 

- The number of flashes are equivalent with the 

set water hardness level. 

- This sequence of flashes is repeated several 

times after a few seconds pause. 

4. The water hardness level is raised by 1 step 

every time you press the water softener button. 

After hardness level 5 comes hardness level 1.

5. Press the On/Off button when the required water

hardness level is selected. This saves the selection.

If the setting 1 is chosen, the salt indicator lamp 
is not lit. 

1) german degree of measurement for the water 

hardness    

2) millimol, internationel unit for water hardness 

*) factory setting

If dishwasher detergent with rinse aid is used, 
you can switch off the lamp that indicates that 
the rinse aid dispenser is empty. 

1. Press the water softener and functions buttons 

simultaneously and hold them pressed in, then 
also press in the On/Off button.

2. When the lamps for the water softener and 

functions buttons starts to flash, you can let go 
of the buttons.

3. Press the functions button once. The lamps for 

the functions button and ended programme cycle
starts to flash. Press the button once more and 
the light for the ended programme cycle goes out.
Now the function for the rinse aid control light 
is off. 

4. Press out the On/Off button to complete the setting.

To reset the function, follow steps 1 and 2 above
and then press the functions button twice, until 
the lights for the functions button and for ended 
programme cycle begin to flash again.

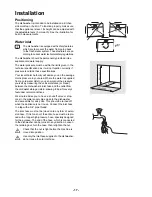
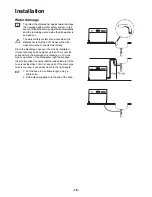
Adjusting the water softener

To prevent limescaling on the dishes and to the interior of the
dishwasher, the dishes must be washed with soft water. 

This dishwasher is equipped with a water softener, where tap-
water which is harder than 4 °d (german degree) is softened.

Adjust the water softener according to the table below for the
water hardness level for your area. 

Contact your local Water Authority to find the
exact water hardness level for your area. 

The water softener has 5 settings:

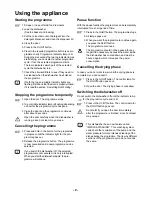
In both of the following settings the dishwasher must be switched off and all programmes completed. 
See chapter ”Using the appliance” for information on how to complete the programme.

Summary of Contents for DCE5655

Page 1: ...822 61 10 23 ...

Page 2: ...the drying phase Switching the dishwasher off Loading and unloading 10 Maintenance and cleaning 11 Something Not Working 12 Service 13 Service and Spare Parts Customer Care Department Information for test centres 13 Guarantee Conditions 14 For the Installer Technical Specifications 15 Unpacking 16 Damages Use Identification of materials Installation 17 Positioning Water inlet Water drainage Power ...

Page 3: ... let children play with the controls or other parts of it Remember that the plastic bags included in the packaging can be fatal playthings for small children Keep all detergents in safe place out of children s reach Prevent children from sitting swinging or standing on the open door During Use This dishwasher is designed solely for washing house hold utensils suitable for machine washing Using it ...

Page 4: ...Description of the appliance 4 4 5 ...

Page 5: ...ou can set the dosage between 1 6 the appli ance is factory set to 1 Begin at the lowest dosage setting and increase if necessary by turning the setting arrow with e g the handle of a spoon The indicator light on the control panel is lit when the dispenser requires refilling 1 Open the lid to the dispenser by pressing the lid catch towards the compartment and lift the lid 2 Fill up with rinse aid ...

Page 6: ...s not started you can change the set time with the delay start button Cancelling the delayed start If the programme has not started the delayed start can be cancelled Press the delay start button repeat edly until none of the lamps next to the hours are lit The required programme starts immediately Water softener and functions button In addition to selecting a programme you can press these two but...

Page 7: ...id dispenser is empty 1 Press the water softener and functions buttons simultaneously and hold them pressed in then also press in the On Off button 2 When the lamps for the water softener and functions buttons starts to flash you can let go of the buttons 3 Press the functions button once The lamps for the functions button and ended programme cycle starts to flash Press the button once more and th...

Page 8: ... dishes Energy 0 80 kWh 0 63 kWh 0 40 kWh 0 35 kWh Water 7 litres 1 15 kWh Drying time 54 minutes 13 minutes 9 litres 7 litres 6 litres 6 litres ENERGY SAVE 55 C 3 QUICK 50 C GLASS 40 C Consumption figures 2 1 Different parts of the wash programme may not sound the same because the wash action is more intensive at some stages 2 Consumption figures have been calculated for nominal conditions The fi...

Page 9: ...mme is now cancelled and a new programme can be selected If you switch the dishwasher off the selected programme is not cancelled it is only interrupted When you start the dishwasher again the pro gramme will continue Pause function With the pause function the programme can be temporarily interrupted for a short period of time 1 Press in the On Off button The programme stops 2 All lamps goes out 3...

Page 10: ...may fade and lose their lustre The same applies to cutlery with wooden or plastic handles Make sure you always buy articles that are dishwasher proof Silver and aluminum items tend to discolour when washed Food remnants from egg and mustard often causes discolourations and stains on silver Make sure to rinse off and remove food remnants on silver if it is not washed immediately after it has been u...

Page 11: ...y use washing up liquid to remove stubborn marks rinse with a damp cloth and rub up with a soft duster Never use abrasive cleaners which could damage the surface ie scouring pads or solvents acetone trichlori ethylene etc If the dishwasher is not going to be used for some time take the following precautions 1 Unplug the dishwasher and turn off the water supply 2 Fill up the rinse aid container 3 M...

Page 12: ...me with too low temperature Is the rinse aid dispenser empty Is the salt container empty or is the water softener not correctly adjusted Is the rinse aid dispenser adjusted to too low dosage Are the dishes rattling against each other Is the spray arm knocking against the dishes Whistling sound when washing This is not a fault try another brand of detergent Is the rinse aid dispenser empty Have the...

Page 13: ...rantee documentation is required for in guarantee service calls Customer Care Department For general enquiries concerning your Zanussi Electrolux appliance or for further information on Zanussi Electrolux products please contact our Customer Care Department by letter or telephone at the address below or visit our website at www zanussi co uk Customer Care Department Zanussi Electrolux 55 77 High S...

Page 14: ...lastic Costs incurred for calls to put right an appliance which is improperly installed or calls to appliances outside the United Kingdom Appliances found to be in use within a commercial environment plus those which are the subject to rental agreements Products of Zanussi Electrolux manufacture which are not marketed by Zanussi Electrolux European Guarantee If you should move to another country w...

Page 15: ...e EN 50242 Dimensions Height 447 mm Width 546 mm Depth to the edge of the door 480 mm Depth to the middel of the door 507 mm Weight Net 22 kg Water pressures Minimum 80 kPa 0 8 bar Maximum 1000 kPa 10 bar Water temperature Maximum 25 C Electrical data Power supply 230 V 50 Hz Fuse 13 A Heating element 1000 W Power rating 1080 W This appliance complies with the following E E C directives 73 23 EEC ...

Page 16: ...invalidate the guarantee Identification of materials All materials used in packaging this appliance are environmentally friendly The various plastics used are identified and can be recycled PE stands for polyethylene which is used for the bag around the appliance and the bag in which these instructions were supplied PS stands for polystyrene moulded which is used for the sections of packaging need...

Page 17: ...ere the water is supplied from a cold water cistern you can work out the pressure yourself by measuring the vertical distance or Head between the dishwasher s inlet hose and the outlet from the cold water storage cistern allowing 86 psi for every 2 feet under normal conditions We would advise you to have a shut off valve or stop cock in the water supply pipe close to the dishwasher and accessible ...

Page 18: ...st be connected electrically Place the discharge hose over the sink as illustrated It must not at any point be higher up than 75 cm over the surface which the dishwasher is standing on If it runs higher operation of the dishwasher might be impaired It is also important to ensure that the inside diameter of the hose is not less than 13 mm at any point If the discharge hose is too long it can easily...

Page 19: ...disposed of to prevent the hazard of shocks in case it should be plugged into a 13 amp socket in another part of your home Important The wires in the mains lead are coloured in accordance with the following code Green and Yellow Earth Blue Neutral Brown Live If you fit your own plug the colours of the wires in the mains lead of your appliance may not correspond with the markings identifying the te...

Page 20: ... Electrolux plc 2003 ...

Reviews: