background image

15

Condensation and Steam

When food is heated, it produces steam in the same way
as a boiling kettle does. When steam comes in contact
of the oven door glass, it will condense and produce water
droplets.
To reduce condensation, ensure the oven is well heated
before placing food in the oven cavity. A short oven pre-
heating (about 10 minutes) will then be necessary before
any cooking.
To prevent discolouration, regularly wipe away
condensation and also soilage from surfaces.

Cookware

• Use any oven proof cookware which will withstand

temperatures of 250°C.

• Baking trays, oven dishes, etc. should not be placed

directly against the grid covering the fan at the back

 Hints and Tips

Always cook with the oven door closed.

Stand clear when opening the drop down oven
door. Do not allow it to fall open - support the
door using the door handle, until it is fully
open.

The oven is supplied with an exclusive system which
produces a natural circulation of air and the constant
recycling of steam. This system makes it possible
to cook in a steamy environment and keep the
dishes soft inside and crusty outside. Moreover,
the cooking time and energy consumption are
reduced to a minimum. During cooking steam may
be produced which can be released when opening
the oven door. This is absolutely normal.

However, always stand back from the oven
when opening the oven door during cooking or
at the end of it to allow any build up of steam
or heat to release.

The heating elements do not work when the
oven door is not completely closed.

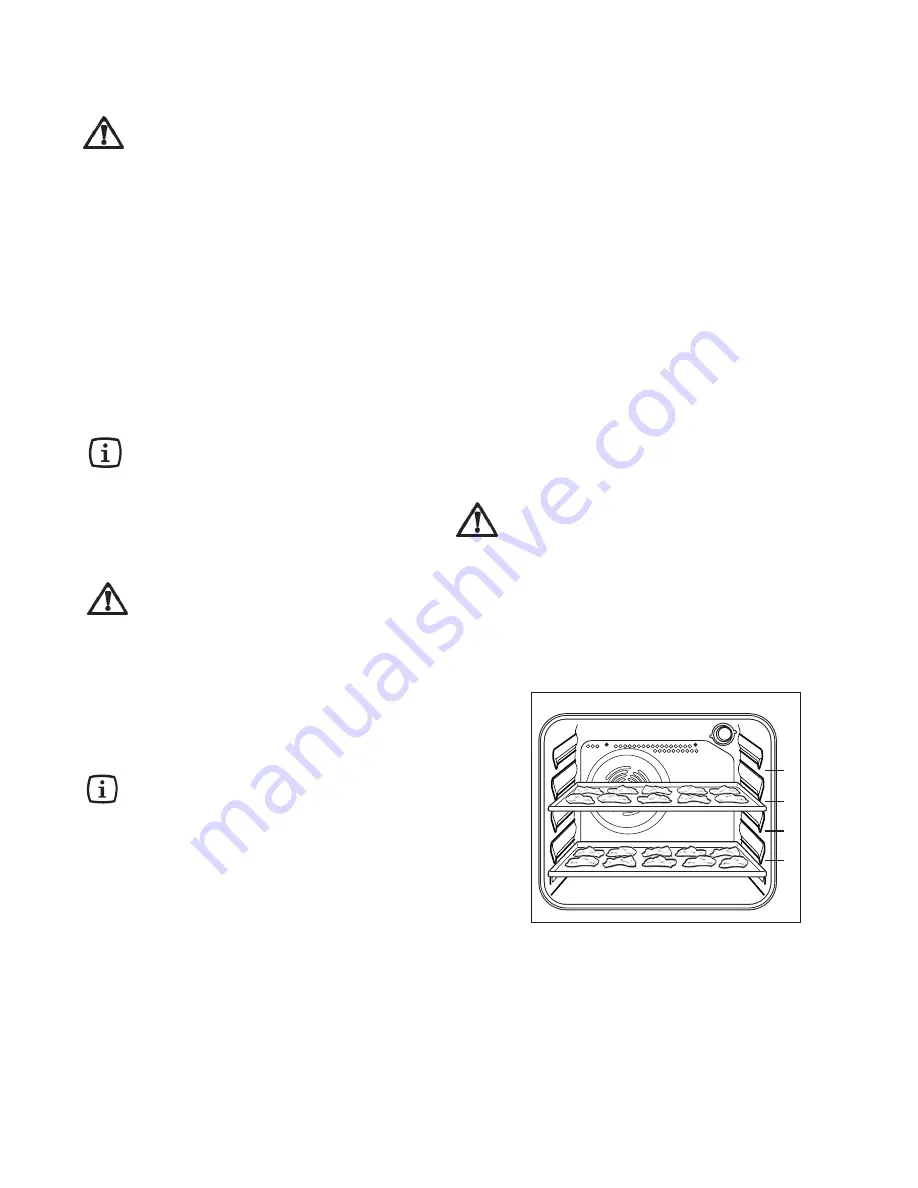
The oven has four shelf levels, and is supplied with
two shelves.
The shelf positions are counted from the bottom
of the oven as shown in the diagram.
It is important that these shelves are correctly
positioned as shown in the diagram.

Warning!

 - Do not place objects on the bottom

of the oven and do not cover it with aluminium
foil while cooking, as you can damage the
enamelled surfaces and the food you are
cooking. Always place pans, heat-resisting
pans and aluminium foils on the oven shelves.

Warning!

 - Be careful when you insert and

extract the grid and the dripping pan from the
oven in order not to damage the enamelled
surfaces of the oven cavity.

Using the Oven

Storage Drawer

The storage drawer is located underneath the oven cavity.

During cooking the storage drawer may become
hot if the oven is on high for a long period of time,
therefore flammable materials such as oven gloves,
tea towels, plastic aprons etc. should not be
stored in the drawer.

Oven accessories such as baking sheets, will also
become hot, therefore care should be taken when
removing these items from the drawer whilst the
oven is in use or still hot.

of the oven, or placed on the oven base.

• Do not use baking trays larger than 30 cm x 35 cm

(12 in x 14 in) as they will restrict the circulation of
heat and may affect performance.

The effects of dishes
on cooking results

Dishes and tins vary in their thickness, conductivity,
colour, etc. which affects the way they transmit heat to
the food inside them.

A

Aluminium, earthenware, oven glassware and bright
shiny utensils reduce cooking and base browning.

B

Enamelled cast iron, anodized aluminium, aluminium
with non-stick interior and coloured exterior and dark,
heavy utensils increase cooking and base browning.

4

3

2

1

Summary of Contents for ZCM 651

Page 1: ...MIXED FUEL COOKERS ZCM 650 ZCM 651 INSTRUCTION BOOKLET Please read this instruction booklet before using the appliance GB...

Page 2: ...2...

Page 3: ...should be improved by opening a window or increasing the extractor speed Do not use this cooker if it is in contact with water Do not operate the cooker with wet hands Ensure the control knobs are in...

Page 4: ...ols 6 Electric Oven 7 Electric Programmer 8 Before the First Use of the Cooker 10 Programming the Oven 11 Safety and Energy saving functions 14 Using the Oven 15 Hints and Tips 15 Using the Convention...

Page 5: ...ti tip shelves Control Panel 1 Back left burner control knob semi rapid 2 Front left burner control knob ultra rapid triple crown 3 Front right burner control knob auxiliary 4 Back right burner contro...

Page 6: ...enerator to be activated automatically If you use a saucepan which is smaller than the recommended size the flame will spread beyond the bottom of the pan causing the handle to overheat As soon as a l...

Page 7: ...temperature control knob allows you to select the time minute minder cooking duration and end of cooking time and temperature Turn it clockwise and hold it in the turned position to increasethetime t...

Page 8: ...the correct time of day is set before using the oven To set the correct time of day 1 Turn the Time Temperature control knob to or to adjust the time in 1 minute degree step 2 After the setting is car...

Page 9: ...perature level indicators As soon as the oven heats up the temperature level indicators light up indicating the degree to which the oven is currently heated When the required temperature is reached an...

Page 10: ...programmer see paragraph How to set the time of day Switch the oven function control knob to conventional cooking and select 250 C with the time temperature control knob Open a window for ventilation...

Page 11: ...ill start the countdown 4 At the end of the timed period an acoustic alarm will be heard To switch off the acoustic alarm press any button To change the minute minder 1 Press button Time to select the...

Page 12: ...and an acoustic alarm will be heard and the relevant indicator will start flashing The display shows 0 00 4 To switch off the acoustic alarm turn the oven function control knob to the OFF position 0 I...

Page 13: ...levant indicators will come on and the display will show the set temperature The oven will switch on and off according to the set programmes and an acoustic alarm will be heard when cooking time is ov...

Page 14: ...display Fig 15 After a few seconds the display will revert to the time of day The oven is now locked Neither oven functions nor temperatures can be selected To unlock the oven 1 Turn the time temperat...

Page 15: ...as four shelf levels and is supplied with two shelves The shelf positions are counted from the bottom of the oven as shown in the diagram It is important that these shelves are correctly positioned as...

Page 16: ...position allows for the best heat distribution To increase base browning simply lower the shelf position To increase top browning raise the shelf position The material and finish of the baking trays a...

Page 17: ...tc z Lower Temperatures Fan oven cooking generally requires lower temperatures than conventional cooking Follow the temperatures recommended in the chart Remember to reduce temperatures by about 20 25...

Page 18: ...d Cannelloni 2 200 2 175 40 55 in mould MEAT 1000 Beef 2 190 2 175 50 70 On grid 1200 Pork 2 180 2 175 100 130 On grid 1000 Veal 2 190 2 175 90 120 On grid 1500 English roast beef 1500 underdone 2 210...

Page 19: ...tomatoes and mushrooms may be placed underneath the grid when grilling meats When toasting bread we suggest that the top runner position is used The food should be turned over during cooking as requir...

Page 20: ...topen Food Defrostingtime Mins Standing time Mins Notes Defrosting The oven fan operates without heat and circulates the air at room temperature inside the oven This increases the speed of defrosting...

Page 21: ...d is used Pan Supports The hob has cast iron pan supports Take care when removing them They are fairly heavy and could damage the hob or your kitchen furniture if you let them fall down Wash the pan s...

Page 22: ...ant to high temperatures During the pyrolytic cleaning process the temperature insidetheovencanreachabout500 Cthusburningfood residuals For your security during the pyrolityc cleaning process theovend...

Page 23: ...been locked At the end of the pyrolitic cleaning process 0 00 will flash in the display Once the oven has cooled down check the temperature level indicators coming off one by one the oven door will un...

Page 24: ...unction 2 Press button Time twice to display the end time of the cleaning cycle After the setting is carried out the Cook Time and End Time indicators will light permanently 3 Turn the time temperatur...

Page 25: ...or completely and locate the two hinges which link the door to the oven 2 unlockandturnthesmallleverslocatedonthetwo hinges 3 handle the door by its left and right hand sides then slowly turn it towar...

Page 26: ...er and a black frame respectively It is important that when refitting the oven door the inner glasses are fixed in the right position To check if this operation has been carried out correctly when ins...

Page 27: ...has not blown Check the burner cap and crown have been replaced correctly e g after cleaning Check the main jet is not blocked and the burner crown is clear of food particles Check the burner cap and...

Page 28: ...el 353 0 1 4090 751 Email service eid electrolux ie In the event of your appliance requiring service or if you wish to purchase spare parts please contact your local Service Force Centre by telephonin...

Page 29: ...ble parts of glass or plastic Costs incurred for calls to put right an appliance which is improperly installed or calls to appliance outside the United Kingdom Appliances found to be in use within a c...

Page 30: ...EREFERENCE 146 Adjust 96 Adjust 70 Adjust NOMINALTHERMAL POWERkW 4 0 1 20 2 0 0 45 1 0 0 33 NOMINALFLOW RATE g h 288 86 144 32 72 24 NOZZLEREFERENCE 98 56 71 32 50 28 NATURAL GAS 20 mbar TYPEOF GAS CH...

Page 31: ...Location of the appliance This appliance must not be installed in a bed sitting room of volume less than 20m or in a bathroom shower room or garage It is essential that the appliance is positioned as...

Page 32: ...en measure height from floor level to engagement edge on back of cooker dimension A of Fig 2 Assemble upper bracket to lower bracket so that underside of bracket is dimension A 3mm 1 8 above floor lev...

Page 33: ...he terminal which is marked with the letter L 4 Connect the black neutral wire to the terminal which is marked with the letter N 5 After fitting a green or yellow green sleeve over the bare copper wir...

Page 34: ...njector Turnontheburnergassupplyandigniteanotherburner supply The pressure reading should be nominally 20mbar and must be between 17 mbar and 25mbar Turn off the burner supplies Conversion from Natura...

Page 35: ...35 ZCM 650 651 0 78 kWh 41 min 56 1130 cm 0 79 kWh 43 min...

Page 36: ...Group The world s No 1 choice The Electrolux Group is the world s largest producer of powered appliances for kitchen cleaning and outdoor use More than 55 million Electrolux Group products such as re...

Reviews: