background image

16

Using the Conventional Oven

When using this setting, heat comes from both the top
and bottom elements. This allows you to cook on a single
level and is particularly suitable for dishes which require
extra base browning such as pizzas, quiches and flans.
Gratins, lasagnes and hotpots which require extra top
browning also cook well in the conventional oven. This
form of cooking gives you the opportunity to cook without
the fan in operation.

How to Use the
Conventional Oven

1. Turn the oven function control knob to the required

cooking function (

).

2. If necessary, turn the Time/Temperature control knob

to 

 or 

 to adjust the temperature.

Top oven element only 

This function is suitable for finishing cooked dishes, e.g.
lasagne, shepherds pie, cauliflower cheese etc.

Hints and Tips

The middle shelf position allows for the best heat
distribution. To increase base browning simply lower the
shelf position. To increase top browning, raise the shelf
position.

The material and  finish of the baking trays and dishes
used will affect base browning. Enamelware, dark, heavy
or non-stick utensils increase base browning, while oven
glassware, shiny aluminium or polished steel trays reflect
the heat away and give less base browning.

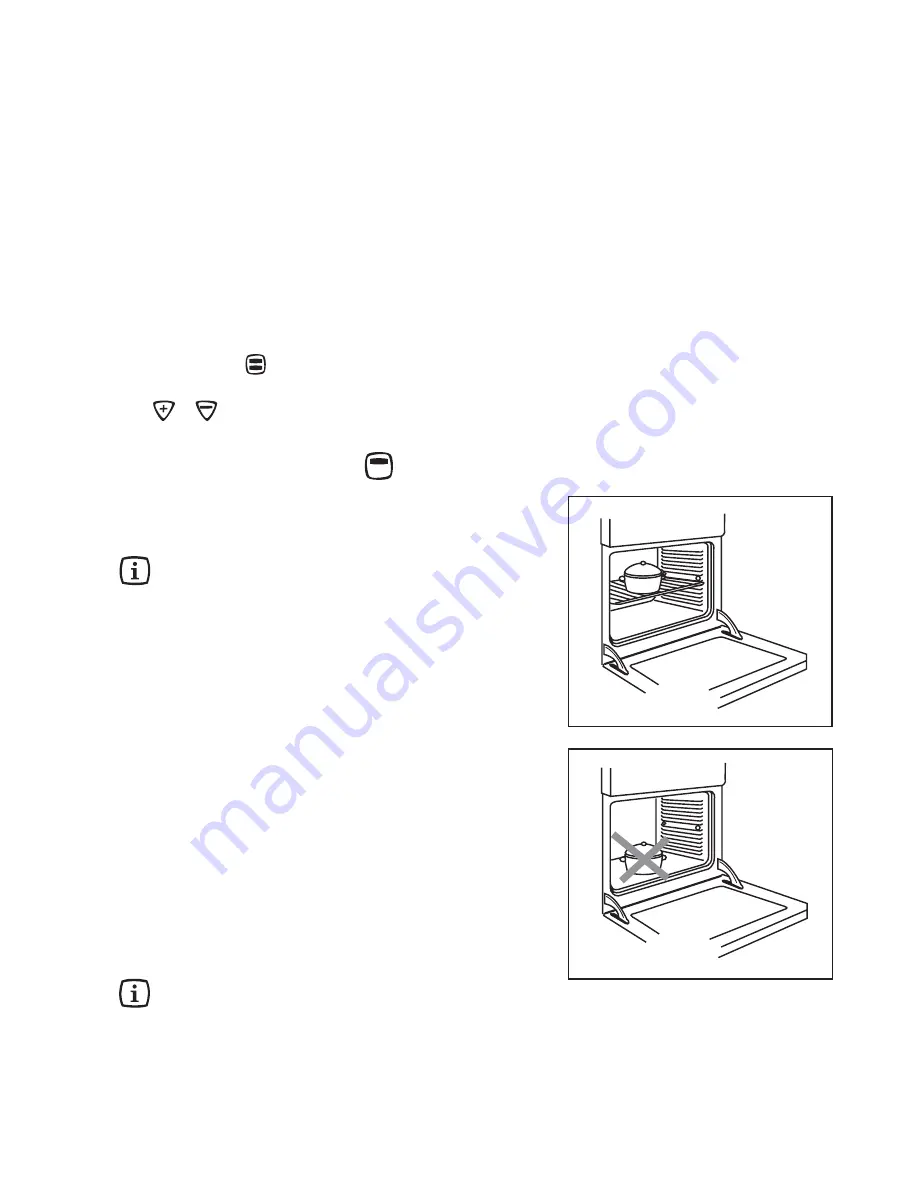
Always place dishes centrally on the shelf to ensure even
browning.

Stand dishes on suitably sized baking trays to prevent
spillage onto the base of the oven and make cleaning
easier.

Do not

 place dishes, tins or baking trays directly on the

oven base as it becomes very hot and damage will occur.

For faster preheating use the fan oven function to preheat
the oven until the oven indicator neon goes out, then
swich the selector to the conventional oven setting.

Single level cooking gives best results. If you
require more than one level cooking use the fan
oven function.

)

Summary of Contents for ZCM 651

Page 1: ...MIXED FUEL COOKERS ZCM 650 ZCM 651 INSTRUCTION BOOKLET Please read this instruction booklet before using the appliance GB...

Page 2: ...2...

Page 3: ...should be improved by opening a window or increasing the extractor speed Do not use this cooker if it is in contact with water Do not operate the cooker with wet hands Ensure the control knobs are in...

Page 4: ...ols 6 Electric Oven 7 Electric Programmer 8 Before the First Use of the Cooker 10 Programming the Oven 11 Safety and Energy saving functions 14 Using the Oven 15 Hints and Tips 15 Using the Convention...

Page 5: ...ti tip shelves Control Panel 1 Back left burner control knob semi rapid 2 Front left burner control knob ultra rapid triple crown 3 Front right burner control knob auxiliary 4 Back right burner contro...

Page 6: ...enerator to be activated automatically If you use a saucepan which is smaller than the recommended size the flame will spread beyond the bottom of the pan causing the handle to overheat As soon as a l...

Page 7: ...temperature control knob allows you to select the time minute minder cooking duration and end of cooking time and temperature Turn it clockwise and hold it in the turned position to increasethetime t...

Page 8: ...the correct time of day is set before using the oven To set the correct time of day 1 Turn the Time Temperature control knob to or to adjust the time in 1 minute degree step 2 After the setting is car...

Page 9: ...perature level indicators As soon as the oven heats up the temperature level indicators light up indicating the degree to which the oven is currently heated When the required temperature is reached an...

Page 10: ...programmer see paragraph How to set the time of day Switch the oven function control knob to conventional cooking and select 250 C with the time temperature control knob Open a window for ventilation...

Page 11: ...ill start the countdown 4 At the end of the timed period an acoustic alarm will be heard To switch off the acoustic alarm press any button To change the minute minder 1 Press button Time to select the...

Page 12: ...and an acoustic alarm will be heard and the relevant indicator will start flashing The display shows 0 00 4 To switch off the acoustic alarm turn the oven function control knob to the OFF position 0 I...

Page 13: ...levant indicators will come on and the display will show the set temperature The oven will switch on and off according to the set programmes and an acoustic alarm will be heard when cooking time is ov...

Page 14: ...display Fig 15 After a few seconds the display will revert to the time of day The oven is now locked Neither oven functions nor temperatures can be selected To unlock the oven 1 Turn the time temperat...

Page 15: ...as four shelf levels and is supplied with two shelves The shelf positions are counted from the bottom of the oven as shown in the diagram It is important that these shelves are correctly positioned as...

Page 16: ...position allows for the best heat distribution To increase base browning simply lower the shelf position To increase top browning raise the shelf position The material and finish of the baking trays a...

Page 17: ...tc z Lower Temperatures Fan oven cooking generally requires lower temperatures than conventional cooking Follow the temperatures recommended in the chart Remember to reduce temperatures by about 20 25...

Page 18: ...d Cannelloni 2 200 2 175 40 55 in mould MEAT 1000 Beef 2 190 2 175 50 70 On grid 1200 Pork 2 180 2 175 100 130 On grid 1000 Veal 2 190 2 175 90 120 On grid 1500 English roast beef 1500 underdone 2 210...

Page 19: ...tomatoes and mushrooms may be placed underneath the grid when grilling meats When toasting bread we suggest that the top runner position is used The food should be turned over during cooking as requir...

Page 20: ...topen Food Defrostingtime Mins Standing time Mins Notes Defrosting The oven fan operates without heat and circulates the air at room temperature inside the oven This increases the speed of defrosting...

Page 21: ...d is used Pan Supports The hob has cast iron pan supports Take care when removing them They are fairly heavy and could damage the hob or your kitchen furniture if you let them fall down Wash the pan s...

Page 22: ...ant to high temperatures During the pyrolytic cleaning process the temperature insidetheovencanreachabout500 Cthusburningfood residuals For your security during the pyrolityc cleaning process theovend...

Page 23: ...been locked At the end of the pyrolitic cleaning process 0 00 will flash in the display Once the oven has cooled down check the temperature level indicators coming off one by one the oven door will un...

Page 24: ...unction 2 Press button Time twice to display the end time of the cleaning cycle After the setting is carried out the Cook Time and End Time indicators will light permanently 3 Turn the time temperatur...

Page 25: ...or completely and locate the two hinges which link the door to the oven 2 unlockandturnthesmallleverslocatedonthetwo hinges 3 handle the door by its left and right hand sides then slowly turn it towar...

Page 26: ...er and a black frame respectively It is important that when refitting the oven door the inner glasses are fixed in the right position To check if this operation has been carried out correctly when ins...

Page 27: ...has not blown Check the burner cap and crown have been replaced correctly e g after cleaning Check the main jet is not blocked and the burner crown is clear of food particles Check the burner cap and...

Page 28: ...el 353 0 1 4090 751 Email service eid electrolux ie In the event of your appliance requiring service or if you wish to purchase spare parts please contact your local Service Force Centre by telephonin...

Page 29: ...ble parts of glass or plastic Costs incurred for calls to put right an appliance which is improperly installed or calls to appliance outside the United Kingdom Appliances found to be in use within a c...

Page 30: ...EREFERENCE 146 Adjust 96 Adjust 70 Adjust NOMINALTHERMAL POWERkW 4 0 1 20 2 0 0 45 1 0 0 33 NOMINALFLOW RATE g h 288 86 144 32 72 24 NOZZLEREFERENCE 98 56 71 32 50 28 NATURAL GAS 20 mbar TYPEOF GAS CH...

Page 31: ...Location of the appliance This appliance must not be installed in a bed sitting room of volume less than 20m or in a bathroom shower room or garage It is essential that the appliance is positioned as...

Page 32: ...en measure height from floor level to engagement edge on back of cooker dimension A of Fig 2 Assemble upper bracket to lower bracket so that underside of bracket is dimension A 3mm 1 8 above floor lev...

Page 33: ...he terminal which is marked with the letter L 4 Connect the black neutral wire to the terminal which is marked with the letter N 5 After fitting a green or yellow green sleeve over the bare copper wir...

Page 34: ...njector Turnontheburnergassupplyandigniteanotherburner supply The pressure reading should be nominally 20mbar and must be between 17 mbar and 25mbar Turn off the burner supplies Conversion from Natura...

Page 35: ...35 ZCM 650 651 0 78 kWh 41 min 56 1130 cm 0 79 kWh 43 min...

Page 36: ...Group The world s No 1 choice The Electrolux Group is the world s largest producer of powered appliances for kitchen cleaning and outdoor use More than 55 million Electrolux Group products such as re...

Reviews: