background image

5

ENGLISH

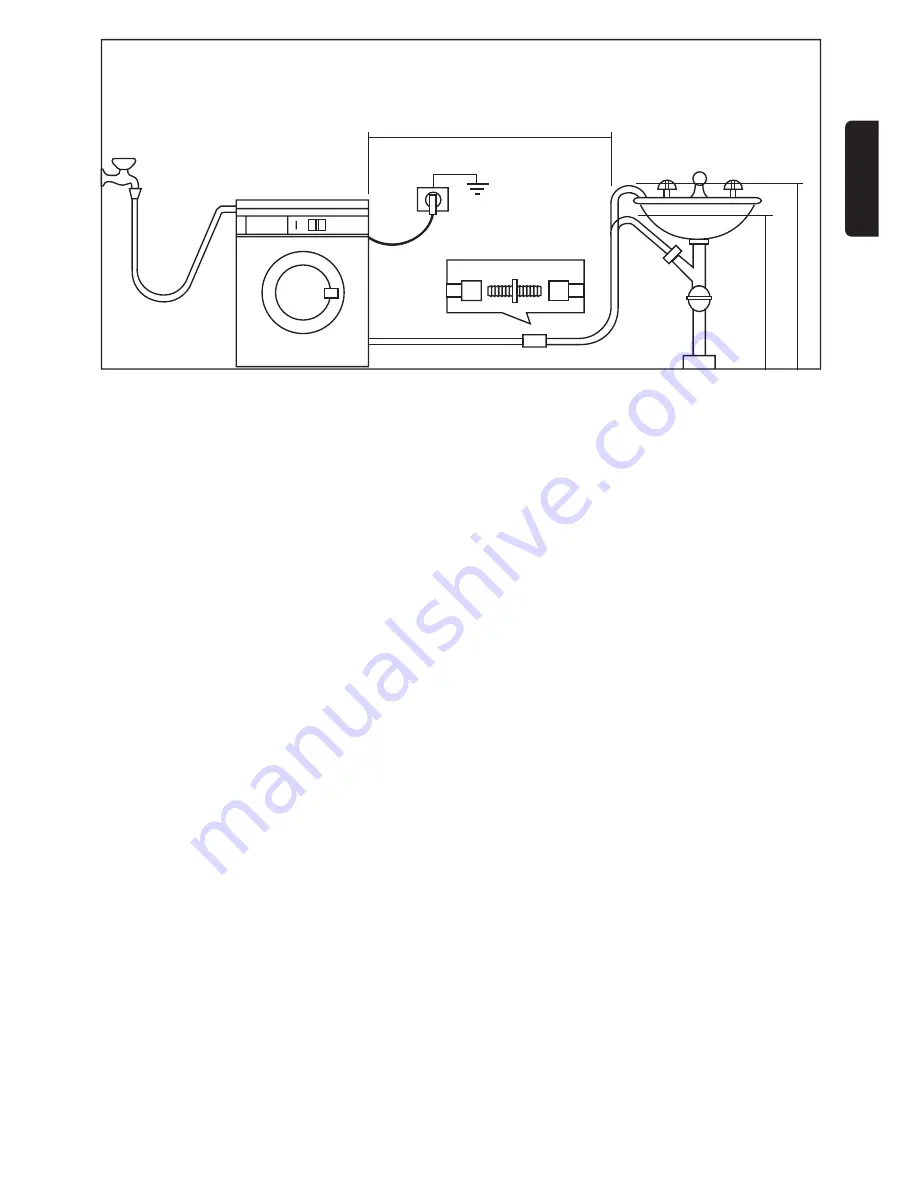
IMPORTANT: The distance from the floor to the highest
part of the hose should be between 60 to 90 cm. (It is
advised to be between 60 and 70 cm). The hose must not
be bent nor twisted to avoid clogging. Should a prolongation
of the discharging hose be unavoidable this must never
surpass 1.5 m and must be of the same diameter as the
original hose.
Make sure the hoses are not too tense.

LEVELLING

Level the appliance by loosening or tightening the feet.
Once in the right position fix the feet by pushing  the nuts
against the base of the case. Accurate levelling will prevent
vibration, noise and displacement of the appliance during
operation.

Some vibration is inevitable, especially if placed on a
wooden floor. Wooden floors are particularly susceptible to
vibrations. For advice, consult a builder. If posible always
place the appliance on a solid floor. 

ELECTRICAL CONNECTIONS

Before plugging the appliance make sure that:

1º the mains of your installation is the same as on the
rating plate of your appliance (the plate is sticked to the
rear of the appliance).

2º The meter, the fuses, the wiring and the socket outlet
can support the max. power absorbed stated on the rating
plate.

3º The socket base and the plug must fit in adequately
without any reducing interposition, multiple outlets or
adapters. If necessary replace the socket outlet by an
adequate one. 

The applicable rules for electrical security require an
adequate earthing. The plug of the appliance is
provided with such a device.

Make sure your socket outlet is provided with an
adequate earthing too.

The manufacturer declines any liability in case of
accidents or incidents should these safety measures
not be observed. 

(Never touch the washing machine or any electric appliance
while standing on a wet floor or being barefoot.)

1,5 m. Maximun

60 cm. Minimun

90 cm. Maximun

1,5 m. Maximum

90 cm. Maximum

60 cm. Minimum

Summary of Contents for ADVANTAGE 400

Page 1: ...WASHING MACHINE AUTOMATA MOSÓGÉP AUTOMATICKÁ PRÁČKA AUTOMATICKÉ PRAČKY INSTRUCTION BOOKLET HASZNÁLATI ÚTMUTATÓ NÁVOD NA OBSLUHU NÁVOD K OBSLUZE 35 292 617 0 ...

Page 2: ...ling Pág 5 Electrical connection Pág 5 Descriptions of the controls Pág 6 Control panel Pág 6 Use of controls Pág 6 Washing powder dispenser Pág 6 On off lamp Pág 6 E button Pág 6 Program selector Pág 6 How to use controls detergent and additives Pág 7 Loading the washing machine Pág 7 Dose de washing powder Pág 7 Dose the additives Pág 7 Select the temperature Pág 7 Select the program Pág 7 Start...

Page 3: ...te fabrics Damage to the fabric can ensure if you over fill Refer to the manufacturer s recommendations of quantities Do not overload the appliance see the relevant WASHING PROGRAM section The glass door becomes very hot during the wash cycle Keep children away from the appliance whilst it is in operation Before opening the door look through the window to check if the water has been drained Should...

Page 4: ...nk a wash basin or a drainage system in the wall Previously check if it is not a hot water tap the running water is clean If not run off a reasonable amount of water to flush out any debris that may have collected in the pipes Have the permanent drainage system in the wall checked by a plumber Place the enclosed rubber joint delivered in a plastic bag together with the appliance A at the very end ...

Page 5: ...ance on a solid floor ELECTRICAL CONNECTIONS Before plugging the appliance make sure that 1º the mains of your installation is the same as on the rating plate of your appliance the plate is sticked to the rear of the appliance 2º The meter the fuses the wiring and the socket outlet can support the max power absorbed stated on the rating plate 3º The socket base and the plug must fit in adequately ...

Page 6: ...appliance is operating 3 E BUTTON Pressing this button the programs stated with 90 C will be realized at 60 C The cycle duration remains the same 4 PROGRAM SELECTOR To select the required program turn the control clockwise until the marker on the top coincides with the number of the required program reference mark on the control panel If at any chance you pass by the required number NEVER TURN THE...

Page 7: ...into compartment For prewash use compartment 3 DOSE THE ADDITIVES If you wish to use additives enter the softener in the compartment with the symbol 4 SELECT THE TEMPERATURE You can change the temperature of the programs stated with 90 C pressing the E button then the maximum water temperature will be 60 C 5 SELECT THE PROGRAM Turn the dial clockwise until the marker reaches the desired program 6 ...

Page 8: ... Prewash at 30 C Wash at 60 C 3 rinses Stop with water in the drum NON FAST COLOURS normal soil 60 K Wash at 60 C 3 rinses Stop with water in the drum SYNTHETICS DELICATES normal soil 40 L Wash at 40 C 3 rinses Stop with water in the drum WOOL SILK normal soil 40 M Wash at 40 C 3 rinses Stop with water in the drum RINSES DELICATES N 3 rinses Stop with water in the drum ADDITIVES SOFTENER P Load ad...

Page 9: ...E Check the quantity you are going to wash for each cycle It is rather difficult to weigh all the pieces to be washed We therefore advise you Cotton and linen fill the drum without pressing Synthetic resistant fill two thirds of the drum Delicates and wool fill half the drum TEMPERATURES You are advised to wash whites at a temperature of 60 C If the laundry is not very soiled this will be enough a...

Page 10: ...it under a fast running tap Replace the filter turning now clockwise and tighten it CLEANING THE WATER INLET HOSE FILTER If it takes longer to fill up the washing machine it is time to check the water inlet hose filter it may be clogged Turn off the water tap Unscrew the fixing nut of the inlet hose Remove the filter from the electrovalve and clean it with a hard bristle brush and replace it Screw...

Page 11: ...se is bent or squashed Check if the drain filter is clogged Check if the selected program includes spinning THE MACHINE LEAKS OR OVERFLOWS Too much washing powder Unsuitable washing powder Check the joints for leaks It is rather difficult to see the water running along a hose THE MACHINE VIBRATES OR IS NOISY Check if all transport devices have been removed Check if the appliance touches the walls ...

Reviews: