background image

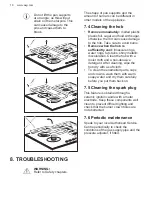
If the pilot lights turn on after

connecting the hob to the

mains, turn on and off the

control knob and wait until

the residual heat indicator

goes out.

3.6 Connection cable

To replace the connection cable use only

the special cable or its equivalent. The

cable type is: H03V2V2-F T90.
Make sure that the cable section is

applicable to the voltage and the working

temperature. The yellow / green earth

wire must be approximately 2 cm longer

than the brown (or black) phase wire.

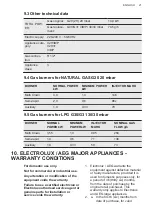
3.7 Assembly

1.

2.

3.

min. 55 mm

min. 650 mm

830   mm

2
0

+

min. 100 mm

30 mm

480   mm

2
0

+

4.

5.

6.

B

A

A) supplied seal

B) supplied brackets

www.aeg.com

10

Summary of Contents for HKB95540NB

Page 1: ...USER MANUAL EN User Manual Hob HKB95540NB ...

Page 2: ...ooter service and repair information www aeg com support Register your product for better service www registeraeg com Buy Accessories Consumables and Original spare parts for your appliance www aeg com shop CUSTOMER CARE AND SERVICE Always use original spare parts When contacting our Authorised Service Centre ensure that you have the following data available Model PNC Serial Number The information...

Page 3: ...Do not let children play with the appliance Keep all packaging away from children and dispose of it appropriately Keep children and pets away from the appliance when it operates or when it cools down Accessible parts are hot If the appliance has a child safety device it should be activated Children shall not carry out cleaning and user maintenance of the appliance without supervision 1 2 General S...

Page 4: ...trical heating element and isolate the appliance from the power supply do not touch the appliance surface do not use the appliance If the supply cord is damaged it must be replaced by the manufacturer an authorized Service or similarly qualified persons in order to avoid a hazard Where the appliance is directly connected to the power supply an all pole isolating switch with a contact gap is requir...

Page 5: ...tion panel under the appliance to prevent access to the bottom 2 2 Electrical Connection WARNING Risk of fire and electric shock All electrical connections should be made by a qualified electrician The appliance must be earthed Before carrying out any operation make sure that the appliance is disconnected from the power supply Make sure that the parameters on the rating plate are compatible with t...

Page 6: ...pplicable before first use Use this appliance in a household environment Do not change the specification of this appliance Make sure that the ventilation openings are not blocked Do not let the appliance stay unattended during operation Set the cooking zone to off after each use Do not put cutlery or saucepan lids on the cooking zones They can become hot Do not operate the appliance with wet hands...

Page 7: ...nce regularly to prevent the deterioration of the surface material Deactivate the appliance and let it cool down before you clean it Disconnect the appliance from the electrical supply before maintenance Do not use water spray and steam to clean the appliance Clean the appliance with a moist soft cloth Only use neutral detergents Do not use any abrasive products abrasive cleaning pads solvents or ...

Page 8: ...han 30 C it is no longer than 1500 mm it shows no throttles it is not subject to traction or torsion it does not get in touch with cutting edges or corners it can be easily examined in order to make sure its condition The control of preservation of the flexible pipe consists in checking that it does not show cracks cuts marks of burnings on the two ends and on its full length the material is not h...

Page 9: ...osition 3 5 Electrical connection Make sure that the rated voltage and type of power on the rating plate agree with the voltage and the power of the local power supply This appliance is supplied with a mains cable and a plug Always use a correctly installed shockproof socket Make sure that there is an access to the mains plug after the installation Do not pull the mains cable to disconnect the app...

Page 10: ... use only the special cable or its equivalent The cable type is H03V2V2 F T90 Make sure that the cable section is applicable to the voltage and the working temperature The yellow green earth wire must be approximately 2 cm longer than the brown or black phase wire 3 7 Assembly 1 2 3 min 55 mm min 650 mm 830 mm 2 0 min 100 mm 30 mm 480 mm 2 0 4 5 6 B A A supplied seal B supplied brackets www aeg co...

Page 11: ...ibilities for insertion The panel installed below the hob must be easy to remove and let an easy access in case a technical assistance intervention is necessary Kitchen unit with door min 6 mm min 30 mm 60 mm min 5 mm max 150 mm A B A Removable panel B Space for connections Kitchen unit with oven The electrical connection of the hob and the oven must be installed separately for safety reasons and ...

Page 12: ...al 4 2 Control panel layout 1 4 2 3 Use the sensor fields to operate the Minute Minder and Hob Hood The displays indicators and sounds tell which functions operate Sen sor field Function Comment 1 Hob Hood To activate and deactivate the manual mode of the function 2 Timer display To show the time in minutes 3 To increase or decrease the time 4 To select the Timer function www aeg com 12 ...

Page 13: ...l heat indicator WARNING There is a risk of burns from residual heat The residual heat indicator lights up when you turn off the burner Knob of the burner Time of cooking min on 5 on 5 Multi Crown off after 25 off after 25 Semi rapid off after 10 off after 20 Auxiliary off after 5 off after 15 5 DAILY USE WARNING Refer to Safety chapters ENGLISH 13 ...

Page 14: ...ING Do not keep the control knob pushed for more than 15 seconds If the burner does not light after 15 seconds release the control knob turn it into off position and try to light the burner again after minimum 1 minute CAUTION In the absence of electricity you can ignite the burner without electrical device in this case approach the burner with a flame turn the control knob counter clockwise to ma...

Page 15: ...e decreases in seconds and the last 10 seconds the timer emits a sound signal 3 Touch or To stop the sound 4 To stop the timer touch longer You can use the Minute Minder at any time also if the appliance is off The function has no effect on the operation of the burners 5 5 Hob Hood It is a manual function which connects the hob to a special hood Both the hob and the hood have an infrared signal co...

Page 16: ...CAUTION Liquids spilt during cooking can cause the glass to break 6 2 Energy saving If it is possible always put the lids on the cookware When the liquid starts to boil turn down the flame to barely simmer the liquid 6 3 Diameters of cookware Use cookware with diameters applicable to the size of burners Burner Diameter of cookware mm Multi Crown 180 260 Semi rapid 120 240 Auxiliary 80 180 6 4 Hint...

Page 17: ...ss or the rims of the burners and the frame if applicable Wash stainless steel parts with water and then dry them with a soft cloth 7 2 Pan supports The pan supports are not resistant to washing in a dishwasher They must be washed by hand 1 Remove the pan supports to easily clean the hob Be very careful when you replace the pan supports to prevent the hob top from damage 2 The enamel coating occas...

Page 18: ...loration Clean the hob with a moist cloth and a non abrasive detergent After cleaning wipe the hob dry with a soft cloth To clean the enamelled parts caps and crowns wash them with warm soapy water and dry them carefully before you put them back on 7 5 Cleaning the spark plug This feature is obtained through a ceramic ignition candle with a metal electrode Keep these components well clean to preve...

Page 19: ...itches off The temperature of the plate is high To ensure long life time of the display the bright ness is reduced depending on the temperature of the hob Above a certain tem perature the control panel switches off Let the hob cool down The control knob pilot lights turn on after connecting the hob to the mains or after a power outage Pilot light test Refer to Installation Hob Hood function does n...

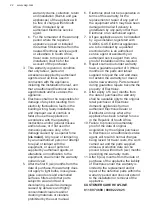
Page 20: ... IT MADE IN ITALY TYPE IP20 0049 A B C A Stick it on Guarantee Card and send this part if applicable B Stick it on Guarantee Card and keep this part if applicable C Stick it on instruction booklet 9 TECHNICAL DATA 9 1 Hob dimensions Width 880 mm Depth 510 mm 9 2 Bypass diameters BURNER Ø BYPASS 1 100 mm Multi Crown 57 Semi rapid 35 Auxiliary 28 www aeg com 20 ...

Page 21: ... 258 Semi rapid 1 9 0 6 71 138 Auxiliary 1 0 0 33 50 73 10 ELECTROLUX AEG MAJOR APPLIANCES WARRANTY CONDITIONS For domestic use only Not for commercial or industrial use Any alteration or modification of the equipment voids the warranty Failure to use a certified electrician or Electrolux authorised service agent or genuine parts for installation or service voids the warranty 1 Electrolux AEG warr...

Page 22: ... cleaners and or cleaning materials or cleaners prohibited by the user manual 6 Electrolux shall not be responsible in terms of this warranty for the replacement or repair of any part of the equipment which may have been damaged in transit if delivery is undertaken by any party other than Electrolux or an authorised agent 7 All gas appliances are to be installed by a gas installer registered with ...

Page 23: ...ault Customer Care For general enquiries or information regarding Electrolux AEG appliances contact Customer Care Department Electrolux South Africa Pty Ltd 3 Aberdeen Road Industrial Sites Benoni Johannesburg South Africa 1501 Electrolux appliances AEG appliances Telephone 00800 222 825 Tollfree in South Africa E mail web link service electrolux co za https www aeg co za support contact us Websit...

Page 24: ...www aeg com shop 867345207 H 172021 ...

Reviews: