background image

13

Something not working

The flow of gas seems abnormal

Gas smell in the room

The oven doesn't heat

Cooking time is too long

The cooker produces smoke

The oven lamp doesn't work

If the appliance doesn't work properly check the following points before asking for service:

Make sure that:

— the flame speader holes are not obstructed;

— the pressure regulator is working;

— the bottle valve is completely open.

Make sure that:

— the gas valve is not open;

— the gas supply tube is well positioned and in good

condition; remember to replace it at least once a

year.

Never look for an escape of gas with a match;

use instead soapy water.

— Make sure that the oven knobs are in the correct

worrking positions.

— Check that the temperature is correct for the type

of food to be cooked.

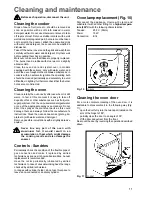
— We advise you to clean the oven after use.

Splashes of fat can occur during the cooking of

meat and, if the oven isn't cleaned properly, these

produce smoke and bad smell. (see paragraph

concerning cleaning).

— The lamp has burnt out. To replace it follow the

instructions given in the relative paragraph.

If, after following all the above checks the appliance still doesn't work, call your nearest Service Centre givin them all

the necessary information, such as model and serial number of the appliance.

Maintenance - Technical assistance

Original spare parts

This machine, before leaving the factory, has been

tested and studied by many experts and specialists, in

order to give you the best results.

Any repair work which needs to be carried out should

be done with the utmost care and attention.

For this reason we reccomend that for any problem you

contact the dealer who sold it to you, or our nearest

authorized Service Centre, specifying the nature of the

problem and the particular model which you own.

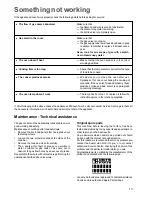
Original spare parts, certified by the manufacturer of the

product  and marked with the following sign,

can only be found at our approved Technical Assistance

Centres and in authorised Spare Parts Shops.

The gas cocks must be periodically lubricated to ensure

good working and safety.

Maintenance should be performed as follows:

•

Remove the knob and panel after having taken out

fastening screws.

•

Loosen the two screws located at the sides of the

cock bar.

•

Remove the cone and clean it carefully.

•

Then, apply a thin layer of grease non soluble in

water, suitable for gas cocks. Take care not to

obstruct the gas flow holes by an excess of grease.

Reassemble the whole with utmost care performing the

operations described above inversely.

Summary of Contents for Mixed Fuel Cookers

Page 1: ...MIXED FUEL COOKERS 60 CM INSTRUCTION BOOKLET IL ...

Page 2: ...sure that the knobs are in the Stop position when the appliance is not in use Always insert the dripping pan when using the grill or when cooking meat on the grid Pour a little water into the dripping pan to avoid grease burning and creating unpleasant smells It is very important that this instruction book should be kept safely for future consultation If the appliance should be sold or given to an...

Page 3: ...ons Important safety information 3 Description of the appliance 4 Using the gas hob 5 Hints and tips 5 Using the electric oven 6 Before the First Use of the Oven 7 Minute minder 7 Suggestions for gas burners 8 Suggestions for using the oven 8 Cooking table 10 Cleaning and maintenance 11 Something not working 13 Technical data 14 Instructions for the installer 14 Gas connection 15 Electrical connec...

Page 4: ...correctly positioned To interrupt the supply of gas turn the knob in a clockwise direction to the position During cooking when using fats or oils take particular care as they can when over heated self ignite Fig 1 FO2063 Fig 2 FO0204 A Burner cap B Burner crown C Ignition candle D Thermocouple Using the gas hob F Hints and tips Pottery Remember that a wide bottomed pan allows a faster cooking than...

Page 5: ...equired temperature While the grill is in function leave the door half open and to put the protective screen to the knob fig 6 a b Cooking with the bottom element Turn the oven control knob to and the thermostat control knob to the required temperature Fan cooking Turn the oven control knob to and the thermostat control knob to the required temperature Defrosting Turn the oven control knob to and ...

Page 6: ...ned until the 60 minute position is reached and then back to the required time Once the pre set time has elapsed a signal will be heard which automatically cuts out The oven however will remain on Minute minder Before the First Use of the Oven Remove all packaging before using the appliance Before first use the oven should be heated without food During this time an unpleasant odour may be emitted ...

Page 7: ...the lower side sufficiently Red meat should be removed from the fridge one hour before cooking otherwise the sudden change of tempera ture could cause it to become tough A roast especially if of red meat must not be salted at the beginning of cooking as salt causes juices and blood to seep out of the òmeat thus preventing the formation of a well browned crust It is advisable to salt the outside of...

Page 8: ...ckness of the meat in order to avoid burning the surface and cooking the inside insufficiently The formation of smoke caused by drops of juice and fat can be avoided by pouring l or 2 glasses of water into the dripping pan The grill can also be used to brown toast bread and grill certain types of fruit such as bananas halved grapefruit slices of pineapple apples etc Fruit should not be placed too ...

Page 9: ...turally raised mixture 1 1 3 1 175 200 50 Little cakes 0 5 1 3 3 160 175 30 Meat Veal 1 2 2 180 200 60 Beef 1 2 2 180 200 70 English roastbeef 1 2 2 220 220 50 Pork 1 2 2 180 200 70 Chicken 1 1 5 2 2 200 200 70 Casseroles Beef casserole 1 1 2 175 200 120 Veal casserole 1 1 2 175 200 110 Fish Filets of cod hake sole 1 1 3 2 180 180 30 Mackeral turbot salmon 1 1 3 2 180 180 45 Oysters 1 3 2 180 180 ...

Page 10: ...propriate spray oven cleaners Do not direct the spray at the mat steel parts as this could damage them and always follow the manufacturer s instructions Clean the oven acces sories grate grid plate etc with warm water and detergent Remove possible incrustations with a slightly abrasive powder Never line any part of the oven with aluminium foil It would result in an accumulation of heat which might...

Page 11: ...to its hinges Balancing the lid The models provided with crystal lids are equipped with specially balanced springs inserted in the hinges at the back of the appliance to allow the lid to be closed smoothly and easily You can use a screwdriver to adjust the closure of the lid The necessary force for opening closing the lid can be increased by turning the adjusting screw 2 or 3 times as shown in Fig...

Page 12: ... your nearest Service Centre givin them all the necessary information such as model and serial number of the appliance Maintenance Technical assistance Original spare parts This machine before leaving the factory has been tested and studied by many experts and specialists in order to give you the best results Any repair work which needs to be carried out should be done with the utmost care and att...

Page 13: ...any damage 3 Adjust the feet height by unscrewing the bottom part of each foot until you obtain the required height height can be adjusted from 850 to 880 mm 4 Insert the feet into the relevant holes indicated in fig 15 5 Lift the cooker in vertical position Replace the crowns the burner caps the hob pan supports and the oven accessories 6 If necessary adjust the cooker horizontal levelling by tur...

Page 14: ...Fig 16 We bring to your attention some of the main existing regulations The flexible tube must not be reach in any point a temperature higher than 90 C it should not be no longer than 1 5m It should not be subjected to any kind of traction or torsion and it should not be allowed to be excessively bent An easy access should be allowed to periodically check its condition Should any leaking occur do ...

Page 15: ...n the unit and the mains complying with the existing regulations The yellow green earth wire must not be interrupted by the switch The brown live wire originating from the clamp of the cooker junction box must always be connected to the phase of the mains supply In any case the supply cord must be positioned in such a way as it doesn t reach in any point a temperature higher than 90 C Replacement ...

Page 16: ...17 Wiring diagramm ...

Reviews: