background image

15

The connection of the cooker to the gas bottle or to the

mains should only be carried out after the unit has been

regulated  for  use  with  the  type  of  gas  which  will  be

supplied. For safe operation, minimum consumption and

longer duration of the unit, make sure that the pressure

of supply is equal to the value indicated in the Technical

Data table.

Rigid connection

For  a  greater  safety,  it  is  advisable  to  make  a  rigid

connection to the gas installation. The coupling to the

unit is of Gc 1/2 type. If the connection pipe is in metal,

an insulated adaptor must be interposed between the

coupling and the tube.

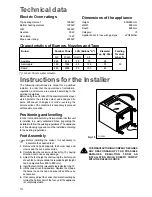
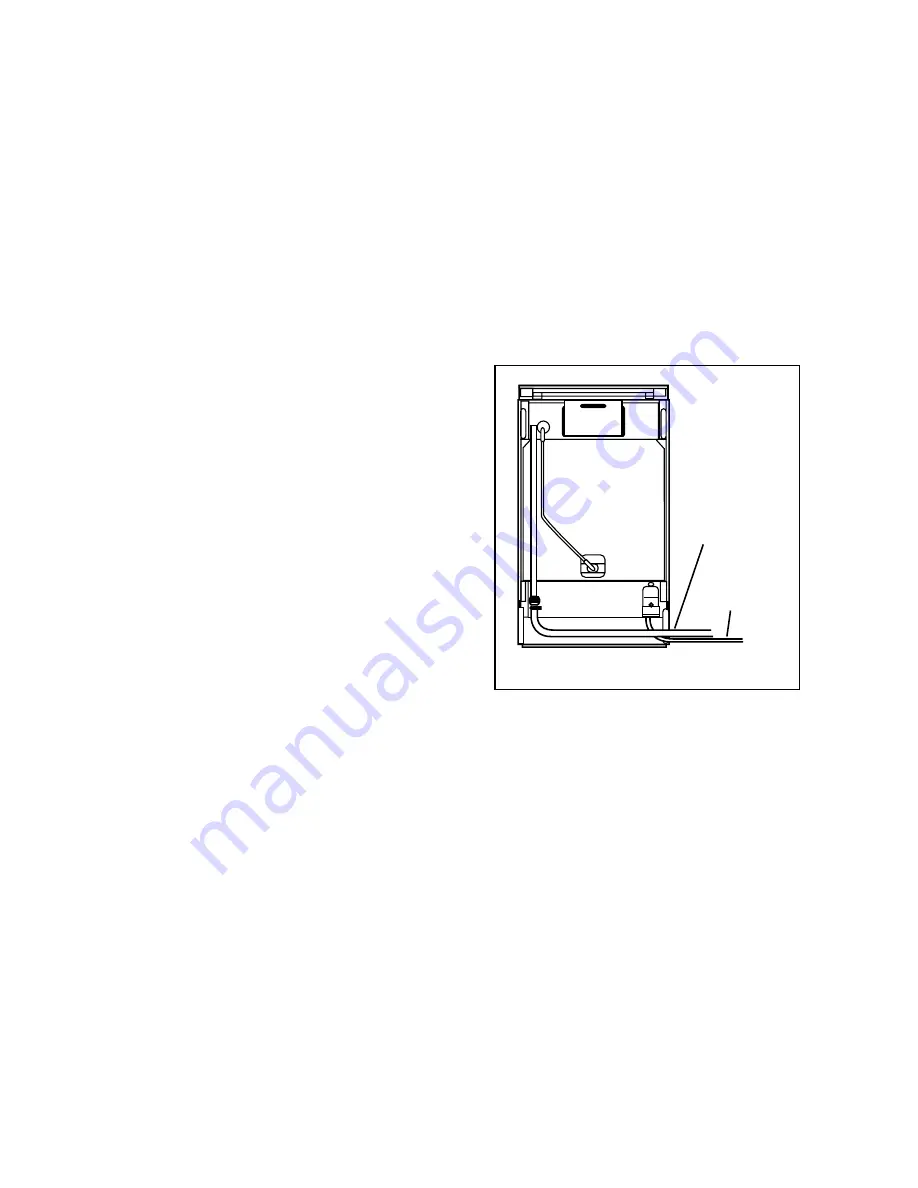
Connection with flexible pipe

Use a flexible gas pipe, according to the characteristics

indicated by the existing regulations. The pipe should be

well fitted and fixed  by means of a clamp. To reach the

supply connection, the pipe should be passed behind

the cooker as shown in Fig. 16. We bring to your attention

some of the main existing regulations. The flexible tube

must not be reach in any point a temperature higher than

90°C, it should not be no longer than 1,5m. It should not

be subjected to any kind of traction or torsion and it should

not be allowed to be excessively bent. An easy access

should be allowed to periodically check its condition.

Should any leaking occur, do not repair il but instead

replace it.

Service

To guarantee good working order and safety, the regulation

taps should be periodically greased. Service can be made

in the following way: Remove the knobs and the control

panel after having removed the fixing screws. Unscrew

the 2 screws placed at the sides of the burner valve shaft.

Unwind the cone and clean it with care; then spread over

the valve a thin layer of grease not soluble by hydrocarbon.

Pay  attention  to  the  fact  that  too  much  grease  can

obstruct the passage of gas. To fit again the burner valve

in the normal position, you should reverse the procedure

outlined above.

Gas connection

Fig. 16

FO 0163

Electric cable

Flexible pipe

Summary of Contents for Mixed Fuel Cookers

Page 1: ...MIXED FUEL COOKERS 60 CM INSTRUCTION BOOKLET IL ...

Page 2: ...sure that the knobs are in the Stop position when the appliance is not in use Always insert the dripping pan when using the grill or when cooking meat on the grid Pour a little water into the dripping pan to avoid grease burning and creating unpleasant smells It is very important that this instruction book should be kept safely for future consultation If the appliance should be sold or given to an...

Page 3: ...ons Important safety information 3 Description of the appliance 4 Using the gas hob 5 Hints and tips 5 Using the electric oven 6 Before the First Use of the Oven 7 Minute minder 7 Suggestions for gas burners 8 Suggestions for using the oven 8 Cooking table 10 Cleaning and maintenance 11 Something not working 13 Technical data 14 Instructions for the installer 14 Gas connection 15 Electrical connec...

Page 4: ...correctly positioned To interrupt the supply of gas turn the knob in a clockwise direction to the position During cooking when using fats or oils take particular care as they can when over heated self ignite Fig 1 FO2063 Fig 2 FO0204 A Burner cap B Burner crown C Ignition candle D Thermocouple Using the gas hob F Hints and tips Pottery Remember that a wide bottomed pan allows a faster cooking than...

Page 5: ...equired temperature While the grill is in function leave the door half open and to put the protective screen to the knob fig 6 a b Cooking with the bottom element Turn the oven control knob to and the thermostat control knob to the required temperature Fan cooking Turn the oven control knob to and the thermostat control knob to the required temperature Defrosting Turn the oven control knob to and ...

Page 6: ...ned until the 60 minute position is reached and then back to the required time Once the pre set time has elapsed a signal will be heard which automatically cuts out The oven however will remain on Minute minder Before the First Use of the Oven Remove all packaging before using the appliance Before first use the oven should be heated without food During this time an unpleasant odour may be emitted ...

Page 7: ...the lower side sufficiently Red meat should be removed from the fridge one hour before cooking otherwise the sudden change of tempera ture could cause it to become tough A roast especially if of red meat must not be salted at the beginning of cooking as salt causes juices and blood to seep out of the òmeat thus preventing the formation of a well browned crust It is advisable to salt the outside of...

Page 8: ...ckness of the meat in order to avoid burning the surface and cooking the inside insufficiently The formation of smoke caused by drops of juice and fat can be avoided by pouring l or 2 glasses of water into the dripping pan The grill can also be used to brown toast bread and grill certain types of fruit such as bananas halved grapefruit slices of pineapple apples etc Fruit should not be placed too ...

Page 9: ...turally raised mixture 1 1 3 1 175 200 50 Little cakes 0 5 1 3 3 160 175 30 Meat Veal 1 2 2 180 200 60 Beef 1 2 2 180 200 70 English roastbeef 1 2 2 220 220 50 Pork 1 2 2 180 200 70 Chicken 1 1 5 2 2 200 200 70 Casseroles Beef casserole 1 1 2 175 200 120 Veal casserole 1 1 2 175 200 110 Fish Filets of cod hake sole 1 1 3 2 180 180 30 Mackeral turbot salmon 1 1 3 2 180 180 45 Oysters 1 3 2 180 180 ...

Page 10: ...propriate spray oven cleaners Do not direct the spray at the mat steel parts as this could damage them and always follow the manufacturer s instructions Clean the oven acces sories grate grid plate etc with warm water and detergent Remove possible incrustations with a slightly abrasive powder Never line any part of the oven with aluminium foil It would result in an accumulation of heat which might...

Page 11: ...to its hinges Balancing the lid The models provided with crystal lids are equipped with specially balanced springs inserted in the hinges at the back of the appliance to allow the lid to be closed smoothly and easily You can use a screwdriver to adjust the closure of the lid The necessary force for opening closing the lid can be increased by turning the adjusting screw 2 or 3 times as shown in Fig...

Page 12: ... your nearest Service Centre givin them all the necessary information such as model and serial number of the appliance Maintenance Technical assistance Original spare parts This machine before leaving the factory has been tested and studied by many experts and specialists in order to give you the best results Any repair work which needs to be carried out should be done with the utmost care and att...

Page 13: ...any damage 3 Adjust the feet height by unscrewing the bottom part of each foot until you obtain the required height height can be adjusted from 850 to 880 mm 4 Insert the feet into the relevant holes indicated in fig 15 5 Lift the cooker in vertical position Replace the crowns the burner caps the hob pan supports and the oven accessories 6 If necessary adjust the cooker horizontal levelling by tur...

Page 14: ...Fig 16 We bring to your attention some of the main existing regulations The flexible tube must not be reach in any point a temperature higher than 90 C it should not be no longer than 1 5m It should not be subjected to any kind of traction or torsion and it should not be allowed to be excessively bent An easy access should be allowed to periodically check its condition Should any leaking occur do ...

Page 15: ...n the unit and the mains complying with the existing regulations The yellow green earth wire must not be interrupted by the switch The brown live wire originating from the clamp of the cooker junction box must always be connected to the phase of the mains supply In any case the supply cord must be positioned in such a way as it doesn t reach in any point a temperature higher than 90 C Replacement ...

Page 16: ...17 Wiring diagramm ...

Reviews: