background image

8

Commissioning

When the hob has been fully installed it will be necessary

to check the minimum flame setting. To do this, follow

the procedure below.

- Turn the gas tap to the MAX position and ignite.

- Set the gas tap to the MIN flame position then turn

the control knob from MIN to MAX several times. If

the flame is unstable or is extinguished follow the

procedure below.

Procedure:

Re-ignite the burner and set to MIN.

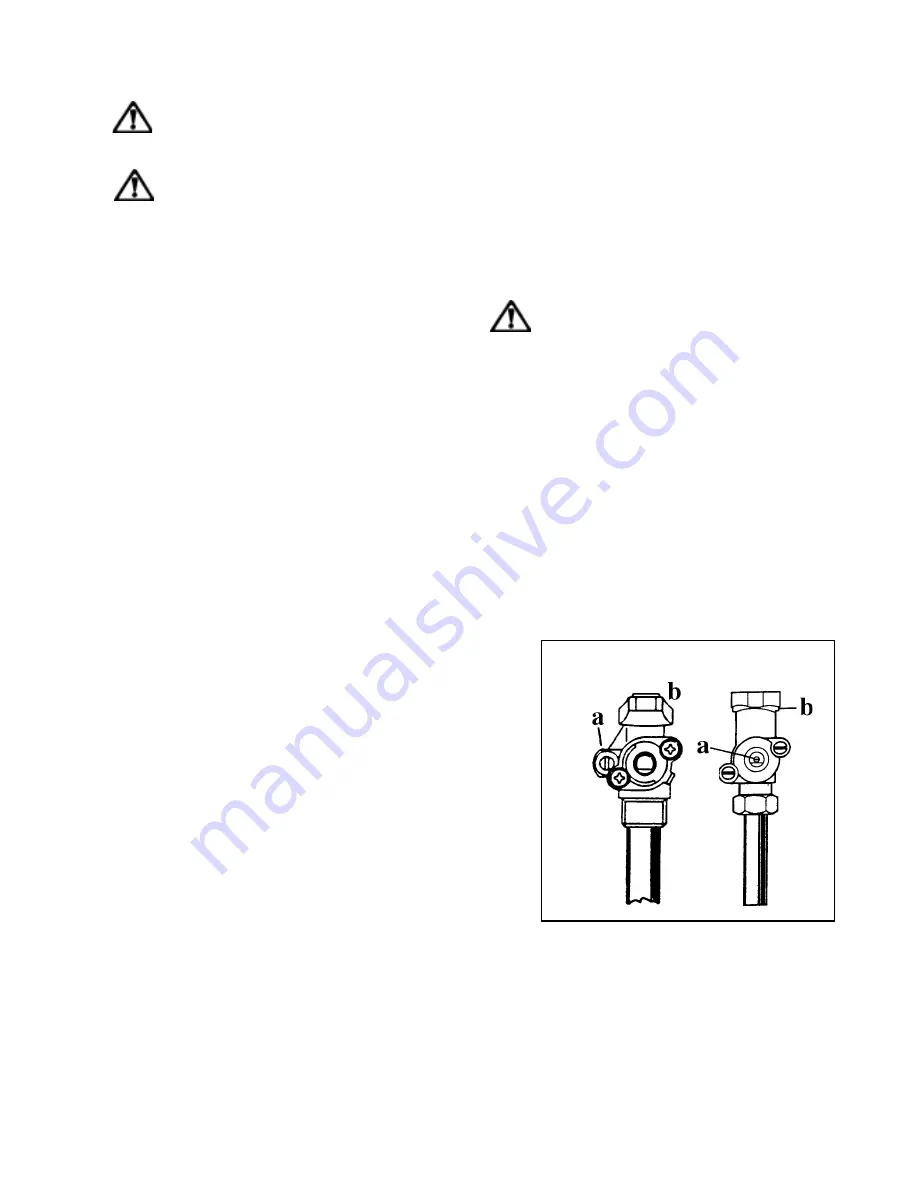
Remove  the  control  knob,  use  a  thin  bladed

screwdriver to turn the adjustment screw. Check

the flame is steady and does not extinguish when

the knob is turned from MIN to MAX. Repeat this

procedure for all burners.

F

Technical Maintenance

Check at regular intervals the condition and serviceability

of the gas connection hose and pressure regulator, if any

is fitted; in case of malfunction, do not repair but replace

the whole faulty part.

To ensure a smooth and safe operation, it is necessary

to periodically grease the gas taps.

a) adjustment screw

b) gas tap

Electrical connections

Any electrical work required to install this appliance

should be carried out by a qualified electrician or

competent person, in accordance with the current

regulations.

THIS APPLIANCE MUST BE EARTHED.

The manufacturer declines any liability should these

safety measures not be observed.

This appliance is designed to be connected to a

230 V 50Hz AC electrical supply.

Before the appliance is connected:

1) check that the main fuse and the domestic installation

can support the load (see the rating label);

2) check that the power supply is properly earthed in

compliance with the current rules;

3) check the socket or the double pole switch used for

the electrical connection can be easily reached with

the  appliance  built  in  the  forniture  unit.  Before

switching on, make sure the electricity supply voltage

is the same as that indicated on the appliance rating

plate. The rating plate is located on the bottom of the

hob. A copy is attached on the back cover of this

book.

The appliance is supplied with a 3 core flexible supply

cord incorporating a plug. Connect the plug to an adequate

socket.

Permanent Connection

In the case of a permanent connection, it is necessary

that  you  install  a  double  pole  switch  between  the

appliance  and  the  electricity  supply  (mains),  with  a

minimum gap of 3 mm. between the switch contacts

and of a type suitable for the required load in compliance

with the current electric regulations.

The switch must not break the yellow and green earth

cable at any point.

Ensure that the hob supply cord does not come

into contact with surfaces with temperatures

higher than 50 deg. C.

Summary of Contents for PNL49

Page 1: ...GAS HOB MODELS PNL 49 PXL 49 PWL 49 INSTRUCTION BOOKLET IL 35665 8405 ...

Page 2: ...ng hose l When using the hob for a long period time the ventilation should be improved by opening a window or increasing the extractor speed l Do not use this appliance if it is in contact with water Do not operate the appliance with wet hands l Ensure the control knobs are in the OFF position when not in use l When using other electrical appliances ensure the cable does not come into contact with...

Page 3: ...ce the appliance is installed it is easily accessible for the engineer in the event of a breakdown WHEN THE HOB IS FIRST INSTALLED Once the hob has been installed it is important to remove any protective materials which were put on in the factory THE HOBLID In order to make the appliance match with the kitchen design a lid can be fitted on the hob The lid available on request is meant to avoid dus...

Page 4: ... pad can be used with caution if the marks are particularly difficult to remove After cleaning be sure to wipe dry with a soft cloth Operation To light a burner press the ignition pushbutton which is marked with a little spark then push down the relevant control knob and turn it anticlockwise to maximum position Upon ignition keep the knob pushed down about 5 seconds then adjust the flame as requi...

Page 5: ...s n The gas ring burns unevenly If after all these checks your appliance still does not operate correctly contact your local Service Centre Overall dimensions Width 580 mm Depth 500 mm Height 84 mm Cut out dimensions Width 550 mm Depth 470 mm Instructions for the Installer Engineer technical data Supply Connections Gas RC 1 2 inch 1 2 inch male Rear right hand corner Electric 230 V 50Hz supply 3 c...

Page 6: ... min FO 2406 Installation Cut Out Size The dimensions of the cut out are given in the diagram IMPORTANT This appliance must be installed by qualified personnel The manufacturer will not accept liability should the above instructions or any of the other safety instructions incorporated in this book be ignored Gas Connection On the end of the shaft A which includes the GJ 1 2 threaded elbow an adjus...

Page 7: ...of the oven from the front part of the kitchen unit 3 FO 0947 FO 0939 FO 0938 470 30 591 380 140 550 min 560 min 120 cm2 180 cm2 4 360 cm2 50 cm2 5 2 FO 0199 a Carry out the building in of the hob as follows put the seals supplied with the hob on the edges of the cut out as shown in the diagram taking care that the seals meet without overlapping place the hob in the cut out taking care that it is ...

Page 8: ...D The manufacturer declines any liability should these safety measures not be observed This appliance is designed to be connected to a 230 V 50Hz AC electrical supply Before the appliance is connected 1 check that the main fuse and the domestic installation can support the load see the rating label 2 check that the power supply is properly earthed in compliance with the current rules 3 check the s...

Reviews: